
Leftover egg whites can be the starting point for a simple breakfast, whether you prefer something savoury or sweet. With a few familiar ingredients, you can turn them into a vegetable-filled omelette, a bowl of apple and cinnamon oatmeal, or small baked egg muffins.
These three egg white recipes for breakfast include measured ingredients, clear cooking steps and practical advice for getting the texture right. Each uses a different method, giving you options for cooking in a frying pan, a saucepan or the oven.
Egg whites need a little attention as they cook. Vegetables can release moisture into an omelette, oatmeal needs stirring as the whites are added, and egg muffins can become rubbery if baked too long. The instructions will explain what to look for at each stage.
Fresh Egg Whites or a Carton?
You can use freshly separated egg whites or plain liquid egg whites from a carton. For the most consistent results, weigh the amount specified in each recipe rather than relying only on the number of eggs.
If choosing a carton, look for plain egg whites rather than a seasoned egg substitute. Follow the product’s cooking, refrigeration and after-opening instructions. Pasteurisation does not mean you can ignore storage guidance or any directions to cook the product.
When separating whole eggs, use clean bowls and utensils. Separate each egg over a small bowl before adding its white to the main bowl; this makes it easier to remove any shell fragments.
A Few Details That Help
Prepare the vegetables first. Cooking mushrooms, spinach and peppers before combining them with egg whites helps control excess moisture.
Keep the heat moderate. High heat can toughen the outside before the centre has cooked. Follow the doneness checks in each recipe rather than relying on appearance alone.
Measure the extras too. Cheese, cooking oil, bread and toppings all contribute to the finished meal. Any nutrition estimate would need to include them, not just the egg whites.
These recipes offer ways to use an ingredient you have or enjoy. They are not intended to suggest that everyone needs to replace whole eggs with egg whites.
1. Spinach and Mushroom Egg White Omelette
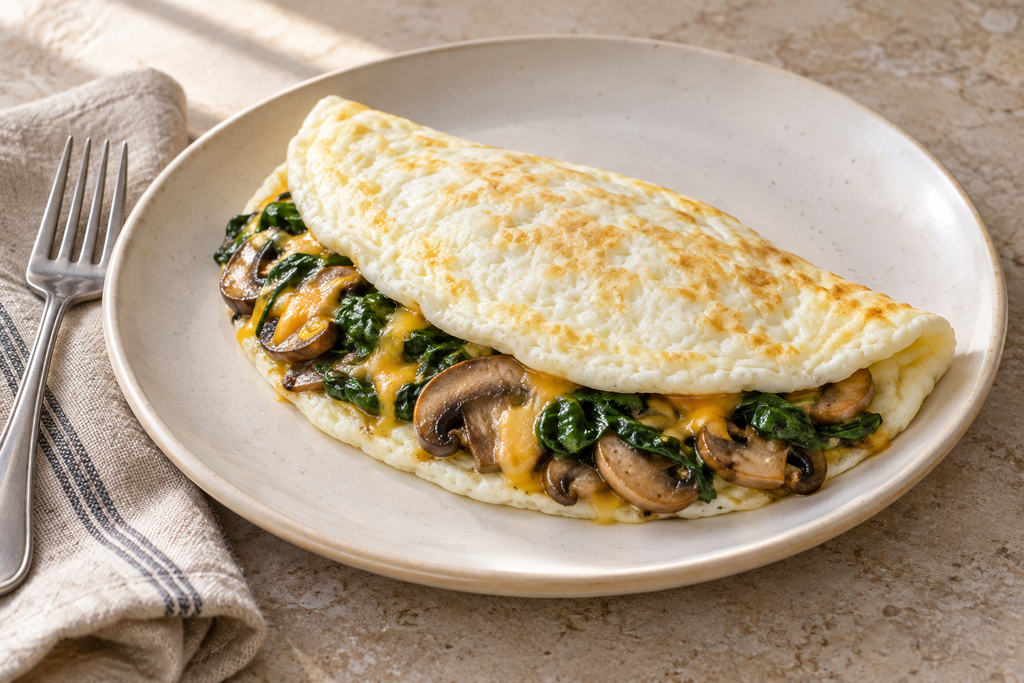
Mushrooms and spinach give this egg white omelette a savoury filling without a long ingredient list. Cooking the vegetables first allows their excess moisture to evaporate, helping the omelette hold together when folded.
A small non-stick frying pan makes the egg layer easier to handle. The finished omelette should be fully set but still tender, rather than deeply browned.
Servings: 1
Preparation time: approximately 10 minutes
Cooking time: approximately 12–15 minutes
Equipment: a non-stick frying pan approximately 20 cm wide, a silicone spatula and a food thermometer
Ingredients
- 150 g egg whites, freshly separated or plain liquid egg whites from a carton
- 100 g mushrooms, cleaned and thinly sliced
- 40 g fresh spinach, washed and thoroughly drained
- 2 teaspoons olive oil, divided
- 15 g grated cheddar, optional
- A small pinch of salt
- Black pepper, to taste
Use the measured weight of egg whites for consistency; the amount obtained from individual eggs varies.
Instructions
1. Cook the mushrooms.
Heat 1 teaspoon olive oil in the frying pan over a medium heat. Add the sliced mushrooms and cook for 5–7 minutes, stirring occasionally.
They should soften, develop a little colour and release their moisture. Continue cooking until there is no visible puddle of liquid in the pan.
2. Wilt the spinach.
Add the drained spinach and stir for 1–2 minutes, until wilted. Season lightly with salt and pepper.
If liquid collects in the pan, cook briefly until it evaporates. Transfer the vegetables to a clean bowl.
3. Prepare the egg whites.
Beat the egg whites gently with a fork until evenly combined. There is no need to whip them into a foam.
Reduce the heat to medium-low. Add the remaining 1 teaspoon olive oil to the pan and swirl to coat the base.
4. Cook the omelette base.
Pour in the egg whites and tilt the pan to distribute them evenly.
Cook gently for approximately 2–3 minutes, until the edges begin to set. Use the spatula to lift a set edge slightly, tilting the pan so any liquid white can flow underneath.
Avoid repeatedly stirring or breaking up the centre.
5. Add the filling and finish cooking.
When the base holds together and the surface is mostly set, spoon the vegetables over one half. Add the optional cheddar over the vegetables.
Cover with a lid and cook over a low heat for approximately 1–2 minutes, checking frequently. The egg whites should be opaque and set, with no visible runny liquid.
Slide the spatula under the unfilled half and gently fold it over the filling. Check that the egg portion reaches 71°C / 160°F, inserting a thin thermometer probe sideways into the folded layer without touching the pan. If needed, cover and continue cooking briefly over a low heat.
6. Serve promptly.
Slide onto a plate and serve warm. Toast or sliced tomatoes can be added alongside if you wish.
If the omelette tears during folding, simply serve it as it is. A neat fold is optional; fully cooked eggs and a filling you enjoy are what matter.
Tips for a Tender Omelette
Dry the spinach well. Water clinging to the leaves can make the filling wetter than expected.
Use a suitably sized pan. A much larger pan produces a thin egg layer that can dry out quickly and tear when folded.
Keep the heat gentle. If the underside browns before the top sets, reduce the heat and use the lid to help the surface cook.
Stop once it is cooked. Leaving the omelette in the hot pan after it reaches the required temperature can make it firmer and more rubbery.
Preparing Ahead and Storing
For the best texture, cook the omelette just before eating. To reduce morning preparation, cook the vegetables the day before, refrigerate promptly in a covered container and reheat thoroughly before adding them to the omelette.
Refrigerate any leftover omelette within 2 hours, or within 1 hour if the surrounding temperature exceeds 32°C / 90°F. Keep at 4°C / 40°F or below and use within 3–4 days.
Reheat until the centre reaches 74°C / 165°F. The egg whites may become firmer after reheating.
For further information, see the safe minimum cooking temperature chart and the USDA’s guidance on leftovers.
Recipe development note: This recipe was developed with AI assistance and has not been independently kitchen-tested for this article. Cooking times and serving size are estimates.
2. Apple and Cinnamon Egg White Oatmeal
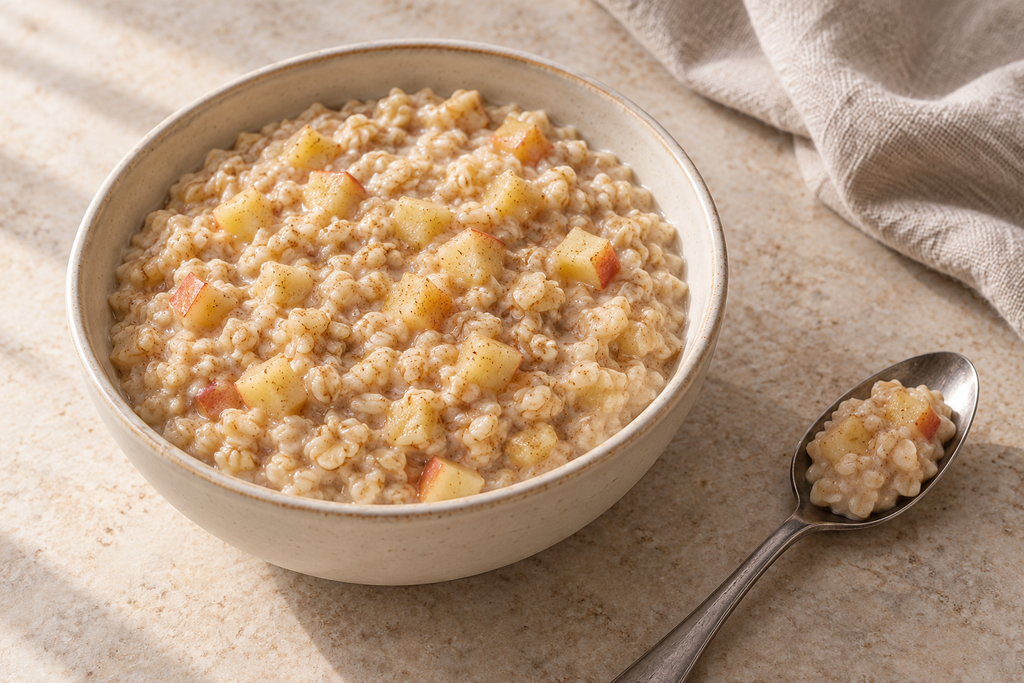
Egg whites can be stirred into oatmeal for a slightly thicker, creamy breakfast. The key is to add them gradually over gentle heat while stirring, then continue cooking until they are fully cooked.
Small apple pieces soften alongside the oats, while cinnamon adds flavour without needing elaborate toppings.
Servings: 1
Preparation time: approximately 5 minutes
Cooking time: approximately 12–15 minutes
Ingredients
- 40 g rolled oats
- 150 ml milk, dairy or an unsweetened plant-based alternative
- 100 ml water, plus a little extra if needed
- 1 small apple, approximately 120 g after coring, finely diced
- 75 g plain egg whites, freshly separated or from a carton
- ¼ teaspoon ground cinnamon
- A small pinch of salt, optional
- 1–2 teaspoons honey or maple syrup, optional
Use ordinary rolled oats rather than steel-cut oats, which require a different cooking time. Peel the apple if you prefer a softer texture.
Instructions
1. Start the oatmeal.
Place the oats, milk, water, diced apple, cinnamon and optional salt in a small saucepan.
Bring to a gentle simmer over a medium-low heat, stirring regularly. Reduce the heat and cook for approximately 7–10 minutes, until the oats soften and the apple is tender enough for your preference.
If the mixture becomes stiff before the apple softens, add a small splash of water.
2. Prepare to add the egg whites.
Beat the egg whites lightly with a fork to loosen them. There is no need to whisk them into a foam.
Turn the heat to low. The oatmeal should be loose enough to stir easily; add another tablespoon or two of water if needed.
3. Stir in the egg whites gradually.
Pour the egg whites into the oatmeal in a thin stream while stirring continuously with a whisk or spoon.
Keep scraping the bottom and sides of the pan. Adding the whites slowly helps distribute them through the oatmeal instead of forming large pieces of cooked egg.
4. Cook thoroughly.
Continue cooking over a low heat for approximately 3–5 minutes, stirring constantly, until the mixture thickens and reaches 71°C / 160°F throughout.
Stir before checking the temperature in several places, keeping the thermometer probe clear of the saucepan. Do not simply add the whites after cooking and rely on residual heat.
5. Adjust and serve.
If the oatmeal is thicker than you like, stir in a small splash of milk or water and heat through.
Taste a cooled spoonful before adding honey or maple syrup. The apple may provide enough sweetness on its own.
Spoon into a bowl and allow to cool to a comfortable eating temperature.
Tips for a Smoother Texture
Dice the apple finely. Pieces approximately 5 mm across soften more quickly and distribute evenly through the oats.
Keep the oatmeal moving. Once the egg whites are added, steady stirring helps prevent them from setting against the hot bottom of the pan.
Avoid a vigorous boil. Gentle heat gives you more control. Small white flecks can still occur and do not mean the recipe has failed; use the temperature check to confirm doneness.
Expect some thickening. Oatmeal continues to thicken as it stands, so serve it slightly looser than your preferred final consistency.
Preparing Ahead and Storing
This oatmeal has its softest texture when freshly made. For easier morning preparation, measure the dry oats and cinnamon into a bowl the night before, keeping the milk and egg whites refrigerated separately.
Refrigerate cooked leftovers in a shallow, covered container within 2 hours, or within 1 hour if the surrounding temperature exceeds 32°C / 90°F. Keep at 4°C / 40°F or below and use within 3–4 days.
Reheat with a little extra milk or water, stirring frequently, until the oatmeal reaches 74°C / 165°F throughout.
For further information, see the safe minimum cooking temperature chart and the USDA’s guidance on leftovers.
Recipe development note: This recipe was developed with AI assistance and has not been independently kitchen-tested for this article. Cooking times and serving size are estimates.
3. Pepper and Cheddar Egg White Muffins
 and the [USDA’s guidance on leftovers](https://www.fsis.usda.gov/food-safety/safe-food-handling-and-preparation/food-safety-basics/leftovers-and-food-safety).
*Recipe development note: This recipe was developed with AI assistance and has not been independently kitchen-tested for this article. Cooking times and yield are estimates.*](https://chefol.com/wp-content/uploads/2025/03/Sult-tojasfeherje-muffin-paprikaval-es-cheddarral-1024x683.png)
These small egg white bakes combine softened red pepper, spring onion and cheddar. They are savoury, crustless egg muffins rather than bread-style muffins, with a pale interior and lightly golden edges.
Cooking the pepper before filling the tin helps remove excess moisture. The cheddar adds flavour, while a moderate oven temperature gives you more control over the texture.
Makes: 6 standard egg white muffins
Servings: 3, allowing 2 muffins per person
Preparation time: approximately 15 minutes
Baking time: approximately 18–23 minutes
Equipment: a standard muffin tin with cavities approximately 100 ml each, a frying pan and a food thermometer
Ingredients
- 300 g egg whites, freshly separated or plain liquid egg whites from a carton
- 1 medium red bell pepper, approximately 150 g after removing the stalk and seeds, finely diced
- 2 spring onions, approximately 30 g, thinly sliced
- 60 g cheddar, grated
- 1 teaspoon olive oil, plus a little extra for greasing
- ⅛ teaspoon ground black pepper
- A small pinch of salt, optional
There is no need to add milk. The vegetables already contribute moisture, and extra liquid can make the muffins harder to remove neatly.
Instructions
1. Heat the oven and prepare the tin.
Preheat the oven to 180°C conventional / 160°C fan / 350°F / Gas 4.
Thoroughly grease six standard muffin cavities, including the sides. Alternatively, use oven-safe silicone liners according to their instructions. Ordinary paper cases may stick to the eggs.
2. Soften the pepper.
Heat the olive oil in a frying pan over a medium-low heat. Add the diced pepper and cook for 5–7 minutes, stirring regularly, until softened.
Add the spring onions and cook for another 1 minute. If liquid remains in the pan, allow it to evaporate before removing from the heat.
Transfer the vegetables to a plate and let them cool slightly while you prepare the egg whites.
3. Combine the filling.
Lightly beat the egg whites with a fork until evenly mixed. Avoid whipping them into a foam.
Stir in the grated cheddar, pepper and optional salt, then add the cooked vegetables. Remember that the cheese already contributes saltiness.
4. Fill the muffin cavities.
Divide the mixture evenly between the prepared cavities, stirring between spoonfuls so the vegetables and cheese do not settle at the bottom of the bowl.
Fill each cavity no more than three-quarters full. If your muffin tin is smaller, use additional greased cavities rather than overfilling.
5. Bake until set.
Bake on the middle shelf for approximately 18–23 minutes. Begin checking towards the earlier end of the range.
The centres should be set, with no visible liquid egg. Check that they reach 71°C / 160°F, inserting a food thermometer into the centre of a muffin without touching the tin. Check more than one, as ovens can heat unevenly.
The tops may remain fairly pale. Do not keep baking solely to make them brown.
6. Rest briefly and remove.
Leave the muffins in the tin for 5 minutes, then loosen the edges with a silicone spatula or another utensil suitable for your tin.
Lift out carefully and serve warm. Some settling as they cool is normal.
Tips for Better Results
Dice the pepper finely. Small pieces distribute evenly and make the muffins easier to portion.
Grease the sides as well as the bases. Egg whites can cling firmly to an inadequately greased tin.
Avoid overbaking. Once the centres reach the required temperature, remove the tin. Prolonged cooking can make the muffins rubbery and cause them to release liquid.
Expect a different texture from whole-egg muffins. These will be paler and a little firmer, with richness coming mainly from the cheddar.
Storing and Reheating
Refrigerate leftovers in a shallow, covered container within 2 hours, or within 1 hour if the surrounding temperature exceeds 32°C / 90°F. Keep at 4°C / 40°F or below and use within 3–4 days.
Reheat only the portion you need. Microwave in short intervals, turning or rearranging the muffins between intervals, until the centres reach 74°C / 165°F. They may become slightly firmer after reheating.
For further information, see the safe minimum cooking temperature chart and the USDA’s guidance on leftovers.
Recipe development note: This recipe was developed with AI assistance and has not been independently kitchen-tested for this article. Cooking times and yield are estimates.
A Simple Breakfast, at Your Own Pace
I’m still building confidence in the kitchen, so I appreciate recipes that explain the small details instead of assuming I already know them. Knowing when to lower the heat or how to check the centre of an egg muffin makes cooking feel more manageable.
That is the idea behind these egg white recipes for breakfast: three approachable ways to use a familiar ingredient, with room for both sweet and savoury preferences. Choose the one that sounds appealing, read through the steps and give yourself time to prepare.
Your omelette may fold unevenly, your oatmeal may need another splash of milk, and your muffins may settle as they cool. Those small differences are part of home cooking. Follow the doneness and storage guidance, and let presentation come second.
I hope you find a breakfast here that you enjoy making—and a little encouragement to keep learning alongside me.
These recipes were developed with AI assistance and have not been independently kitchen-tested. Cooking times and yields are estimates. The images are AI-generated illustrations, not photographs of tested dishes, and your results may look different.