
Some mornings call for a slow breakfast made entirely from scratch. Others require something warm and satisfying that can reach the table without covering the kitchen in flour. These canned biscuit recipes for breakfast were created for those busier mornings—and for relaxed weekends when you would rather spend time around the table than preparing dough.
Refrigerated biscuit dough is one of those convenient ingredients that can become much more than a basket of plain biscuits. It can form the base of a hearty breakfast casserole, hold a savory egg filling, become a miniature breakfast cup, or turn into soft cinnamon rolls with a simple vanilla glaze. Most of the work has already been done, leaving you free to concentrate on the filling, seasoning, and final presentation.
The recipes in this collection are intentionally different from one another. You will find filling options for a family breakfast, smaller portions that can be taken on the go, a meat-free casserole, a freezer-friendly recipe, and one sweet choice for mornings when cinnamon and vanilla sound more appealing than eggs and bacon.
Table of Contents
1. Sausage, Egg and Cheddar Biscuit Casserole
2. Ham and Egg Biscuit Cups
3. Freezer-Friendly Breakfast Biscuit Pockets
4. Bacon Ranch Biscuit Bubble-Up Bake
5. Veggie and Cheddar Biscuit Breakfast Bake
6. Bacon, Egg and Cheese Biscuit Sliders
7. Cinnamon-Sugar Biscuit Rolls With Vanilla Glaze
8. Biscuits and Sausage Gravy Breakfast Bake
What Is Canned Biscuit Dough?
Despite its name, canned biscuit dough is not a tin of baked cookies. It is a refrigerated, ready-to-bake dough commonly sold in pressurized cardboard tubes in American supermarkets. When baked, it produces tender, flaky savory biscuits that are closer to soft bread rolls than to the crisp biscuits familiar to many British readers.
The number and size of the biscuits can differ between brands. Most standard tubes contain approximately 8 biscuits and weigh between 12 and 16 ounces. Before starting a recipe, check both the package weight and the number of portions inside. A tube containing five oversized biscuits will behave differently from one containing eight smaller pieces.
If canned biscuit dough is unavailable where you live, refrigerated savory roll dough may work in some of these recipes. However, the baking time and finished texture can change. Puff pastry and croissant dough are not direct substitutes because they contain different amounts of fat and rise differently in the oven.
Why Canned Biscuits Work So Well for Breakfast
Their greatest advantage is flexibility. A tube of dough can be divided, flattened, layered, filled, or cut into smaller pieces. This makes it possible to create several different breakfast formats from the same basic ingredient.
Canned biscuit dough also pairs naturally with familiar morning flavors:
- Eggs and melted cheese
- Bacon, ham, or breakfast sausage
- Bell peppers, spinach, and onions
- Creamy sausage gravy
- Cinnamon, brown sugar, and vanilla
- Fresh herbs and mild seasonings
Because the dough is already portioned, it can also make serving easier. Biscuit cups and filled pockets are especially useful when everyone eats at a different time or when breakfast needs to travel.
Helpful Tips Before You Begin
Always read the instructions printed on your particular biscuit package. The recipes below provide tested-style temperature and timing guidance, but dough thickness varies between manufacturers. Begin checking for doneness a few minutes before the suggested baking time ends.
Raw biscuit dough should remain refrigerated until you are ready to use it. Warm dough becomes sticky, loses definition, and may be difficult to seal around a filling. Prepare the meat, eggs, vegetables, and cheese first, then open the tube just before assembling the recipe.
Cook bacon and breakfast sausage before adding them to biscuit dough. Drain excess fat so the bottom of the biscuits does not become greasy. When making filled pockets, allow hot ingredients to cool slightly before enclosing them in the dough. Steam from a very hot filling can make the interior wet and interfere with sealing.
Vegetables containing a lot of moisture should also be cooked briefly before use. Sautéing mushrooms, spinach, peppers, and onions removes excess water while concentrating their flavor.
Preventing Undercooked Biscuit Dough
Breakfast casseroles require a little extra attention because liquid eggs can slow down the baking of the dough. Cutting each biscuit into smaller, similarly sized pieces helps everything cook evenly. Avoid packing the baking dish too tightly, and do not pour an excessive amount of egg mixture over the dough.
The top may become golden before the center has finished cooking. If that happens, loosely cover the dish with aluminum foil and continue baking. Allow casseroles to rest for approximately 5–10 minutes before cutting them. This gives the egg mixture time to settle and makes the portions easier to serve.
For filled biscuits, press the edges together firmly and place the sealed side underneath. Do not overfill them, even when an extra spoonful of egg and cheese looks tempting. An overfilled pocket is more likely to open and leak as it bakes.
Make-Ahead Breakfasts That Still Taste Fresh
Several of these canned biscuit recipes for breakfast can be prepared ahead, but the best method depends on the filling. Fully baked pockets, biscuit cups, and breakfast sliders refrigerate and freeze more reliably than unbaked dough sitting in a wet egg mixture.
Let cooked food cool before covering it, then refrigerate it in an airtight container. Reheat individual portions in the oven, air fryer, or microwave until hot throughout. The microwave is quickest, while an oven or air fryer restores more of the biscuit’s original texture.
For a busy weekday, I particularly like the filled pockets because they can be reheated one at a time. For a weekend table, a bubbling casserole feels more generous and invites everyone to help themselves. That contrast is what makes this collection useful: the same convenient dough can solve several completely different breakfast situations.
Whether you are feeding a family, planning a casual brunch, or stocking the freezer for the week ahead, these eight canned biscuit recipes for breakfast provide a practical place to begin.
1. Sausage, Egg and Cheddar Biscuit Casserole
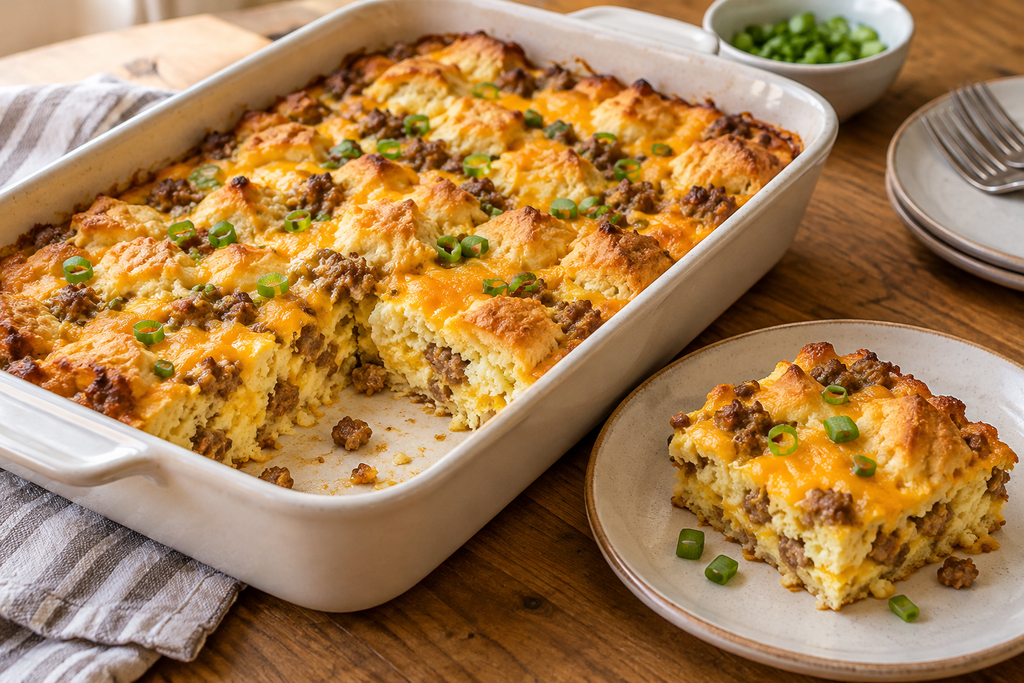
This sausage, egg and cheddar biscuit casserole is the recipe I would choose when several people are gathering around the breakfast table. Pieces of refrigerated biscuit dough bake beneath a seasoned egg mixture with savory sausage and melted cheddar, creating a filling dish that can be served directly from the baking dish.
The key is to cook and drain the sausage thoroughly before assembling the casserole. Cutting the biscuit dough into small pieces also helps it bake evenly instead of leaving a soft, doughy center.
Prep Time: 15 minutes
Cook Time: 35–40 minutes
Resting Time: 10 minutes
Total Time: Approximately 1 hour
Servings: 6
Course: Breakfast, Brunch
Method: Baking
Ingredients
- 1 can (16 ounces/454 g) refrigerated biscuit dough, approximately 8 biscuits
- 12 ounces (340 g) breakfast sausage
- 6 large eggs
- ¾ cup (180 ml) whole milk
- 1½ cups (170 g) shredded sharp cheddar cheese, divided
- 2 green onions, thinly sliced
- ½ teaspoon garlic powder
- ½ teaspoon onion powder
- ¼ teaspoon smoked paprika
- ¼ teaspoon salt, or according to taste
- ¼ teaspoon freshly ground black pepper
- Butter or nonstick cooking spray for the baking dish
Instructions
- Preheat the oven to 375°F (190°C). Lightly grease a 9 × 13-inch (23 × 33 cm) baking dish.
- Place a large skillet over medium heat. Add the breakfast sausage and cook for 6–8 minutes, breaking it into small crumbles as it browns. Continue cooking until no pink remains.
- Transfer the cooked sausage to a plate lined with paper towels. Allow the excess fat to drain while you prepare the remaining ingredients.
- Open the biscuit package and separate the dough. Cut each biscuit into four similarly sized pieces.
- Arrange the biscuit pieces evenly across the bottom of the prepared baking dish. Leave a little room between them so the dough has space to expand.
- Scatter the cooked sausage over the biscuit pieces. Add approximately 1 cup of the shredded cheddar and most of the sliced green onions, reserving some onions for serving.
- In a large mixing bowl, whisk together the eggs, milk, garlic powder, onion powder, smoked paprika, salt, and black pepper until evenly combined.
- Slowly pour the egg mixture across the casserole. Try to distribute it evenly without completely submerging every biscuit piece.
- Sprinkle the remaining ½ cup of cheddar over the top.
- Bake uncovered for 30 minutes. Check the center, then continue baking for another 5–10 minutes, or until the eggs are set and the exposed biscuit pieces are golden brown. A knife inserted near the middle should not come out coated in raw egg.
- If the top becomes too dark before the center has set, cover the baking dish loosely with aluminum foil for the remainder of the baking time.
- Remove the casserole from the oven and leave it to rest for 10 minutes. Finish with the reserved green onions, then cut it into six portions.
Practical Tips
Use regular refrigerated biscuits rather than extra-large biscuits whenever possible. Smaller pieces distribute more evenly through the casserole and are less likely to remain undercooked.
Sharp cheddar gives the dish a noticeable cheese flavor without requiring an excessive amount. Monterey Jack or a mixture of cheddar and mozzarella can also be used.
Taste the cooked sausage before adding the full amount of salt. Some breakfast sausage and cheese varieties are already highly seasoned.
Avoid pouring extra milk into the egg mixture. Too much liquid increases the cooking time and can prevent the biscuit dough at the bottom from browning properly.
Make-Ahead Option
For the best texture, cook the sausage and shred the cheese the evening before, but wait until the morning to combine them with the biscuit dough and eggs. Leaving raw biscuit pieces submerged in the egg mixture overnight can make the base heavy and overly soft.
The fully baked casserole can be refrigerated in an airtight container for up to three days. Reheat individual portions in a 350°F (175°C) oven for approximately 10 minutes or use the microwave for a quicker breakfast.
Easy Variations
For a mildly spicy version, add diced jalapeño or use pepper Jack in place of some of the cheddar. To include vegetables, sauté diced bell pepper or mushrooms with the sausage. Cook away their excess moisture before adding them to the casserole.
You can also replace the pork sausage with turkey or chicken breakfast sausage. Whichever type you choose, make sure it is fully cooked before assembling the dish.
2. Ham and Egg Biscuit Cups

These ham and egg biscuit cups turn a tube of refrigerated dough into neatly portioned breakfasts that are easy to serve and reheat. Each biscuit forms a soft, golden shell around a filling of egg, diced ham, cheddar, and bell pepper.
They are particularly useful for a casual brunch because guests can take an individual cup without cutting into a larger casserole. I also like them for busy weekdays: two cups make a satisfying breakfast, while one works well alongside fruit or yogurt.
The eggs are lightly scrambled before the cups go into the oven. This prevents the biscuit edges from becoming too dark while waiting for a whole raw egg to cook in the center.
Prep Time: 20 minutes
Cook Time: 15–18 minutes
Total Time: Approximately 38 minutes
Yield: 8 biscuit cups
Serving Size: 1–2 cups
Course: Breakfast, Brunch
Method: Baking
Ingredients
- 1 can (approximately 16 ounces/454 g) refrigerated biscuit dough containing 8 biscuits
- 6 large eggs
- 1 tablespoon milk
- 1 teaspoon butter or olive oil
- ¾ cup (110 g) finely diced cooked ham
- ⅓ cup (50 g) finely diced red bell pepper
- ¾ cup (85 g) shredded cheddar cheese, divided
- 2 tablespoons thinly sliced green onions
- ¼ teaspoon garlic powder
- ⅛ teaspoon salt, or according to taste
- ¼ teaspoon freshly ground black pepper
- Butter or nonstick cooking spray for the muffin pan
Instructions
- Preheat the oven to 375°F (190°C). Grease eight wells of a standard 12-cup muffin pan.
- Heat the butter or olive oil in a nonstick skillet over medium heat. Add the diced bell pepper and cook for approximately 2 minutes, just until it begins to soften.
- In a mixing bowl, whisk together the eggs, milk, garlic powder, salt, and black pepper.
- Pour the egg mixture into the skillet. Cook over medium-low heat, stirring gently, until the eggs form soft curds but remain slightly underdone. This should take approximately 2–3 minutes.
- Remove the pan from the heat. Fold in the diced ham, softened pepper, half of the cheddar, and the sliced green onions. Allow the filling to cool for a few minutes.
- Separate the refrigerated biscuits. Flatten each piece of dough into a circle approximately 4 inches (10 cm) wide. Use your fingers or a lightly floured rolling pin.
- Press one flattened biscuit into each prepared muffin cup. Bring the dough gently up the sides without stretching it so thin that it tears.
- Divide the egg and ham mixture evenly between the eight biscuit cups. Do not pack or overfill them.
- Sprinkle the remaining cheddar over the tops.
- Bake for 15–18 minutes, or until the exposed biscuit edges are golden and the egg filling is fully set.
- Leave the cups in the pan for 5 minutes. Run a thin silicone spatula or butter knife around each edge, then carefully lift them out.
- Serve warm, finished with additional green onions or a little black pepper if desired.
Practical Tips
Use finely diced ingredients so every biscuit cup receives a balanced amount of ham, egg, vegetables, and cheese. Large pieces can make the cups difficult to fill and may tear the dough.
The egg mixture should remain slightly soft when it leaves the skillet. It will finish cooking in the oven. Fully scrambling the eggs beforehand may produce a dry filling after baking.
Avoid flattening the biscuit dough too aggressively. It should be wide enough to line the muffin cup but thick enough to retain its soft, layered texture.
Check the cups after 14–15 minutes. Dark-colored muffin pans can brown the dough more quickly than pale metal or silicone pans.
Ingredient Variations
Cooked bacon or crumbled breakfast sausage can replace the ham. For a meat-free version, use sautéed mushrooms, spinach, or finely chopped broccoli.
Cheddar provides a familiar breakfast flavor, but Swiss cheese pairs especially well with ham. Monterey Jack creates a milder filling, while pepper Jack adds gentle heat.
You can replace the red bell pepper with diced green pepper or leave it out altogether. Whatever vegetables you choose, cook away excess moisture before mixing them with the eggs.
Storage and Reheating
Allow leftover biscuit cups to cool before transferring them to an airtight container. Refrigerate them for up to three days.
Reheat them in a 350°F (175°C) oven for approximately 8–10 minutes. An air fryer at a moderate temperature can restore the crisp biscuit edges in less time. The microwave also works, although it produces a softer exterior.
For longer storage, freeze the cooled cups in a single layer before placing them in a freezer-safe container. Thaw them overnight in the refrigerator and reheat until hot throughout.
3. Freezer-Friendly Breakfast Biscuit Pockets
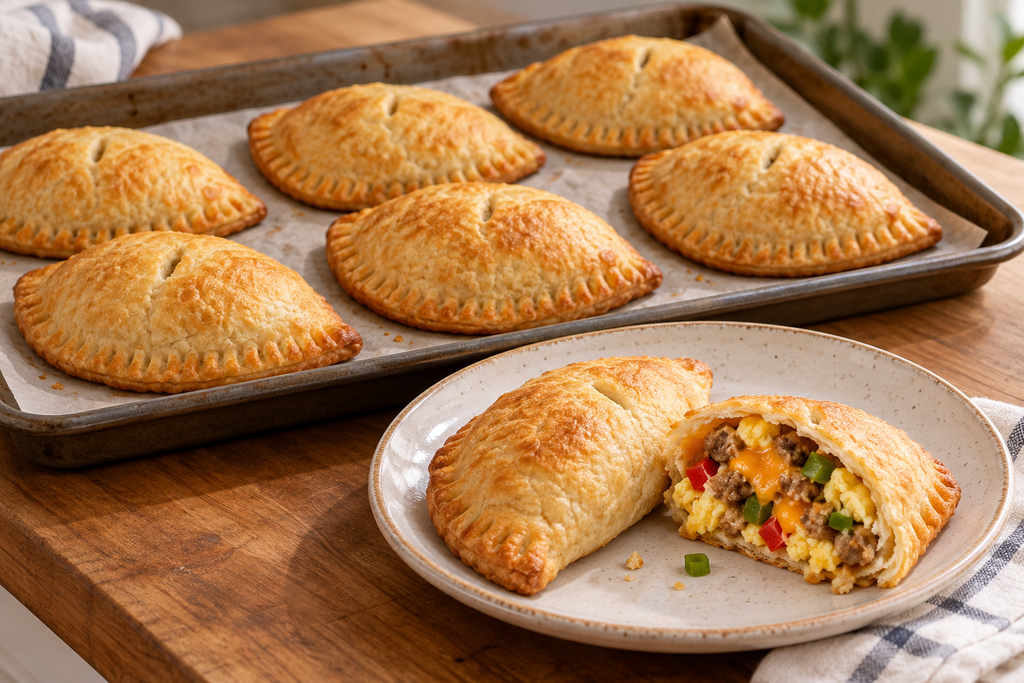
These freezer-friendly breakfast biscuit pockets wrap soft scrambled eggs, cheddar, bell pepper, and breakfast sausage inside golden biscuit dough. They are designed for mornings when sitting down to a freshly cooked breakfast is not realistic, but you still want something warm and filling.
The individual pockets can be baked in one batch and reheated as needed. Letting the filling cool before enclosing it is important: a hot or overly wet filling can soften the dough and make the seams difficult to seal.
Prep Time: 25 minutes
Cook Time: 16–20 minutes
Cooling Time: 10 minutes
Total Time: Approximately 55 minutes
Yield: 8 breakfast pockets
Serving Size: 1–2 pockets
Course: Breakfast
Method: Baking
Ingredients
- 1 can (approximately 16 ounces/454 g) refrigerated biscuit dough containing 8 biscuits
- 6 ounces (170 g) breakfast sausage
- 4 large eggs
- 1 tablespoon milk
- ⅓ cup (50 g) finely diced red or green bell pepper
- ¾ cup (85 g) shredded cheddar cheese
- 2 tablespoons thinly sliced green onions
- ¼ teaspoon garlic powder
- ¼ teaspoon freshly ground black pepper
- Salt to taste
- 1 teaspoon butter or olive oil, if needed
- 1 tablespoon melted butter for brushing, optional
Instructions
- Preheat the oven to 375°F (190°C). Line a large baking sheet with parchment paper.
- Place a nonstick skillet over medium heat. Add the breakfast sausage and cook for 5–7 minutes, breaking it into fine crumbles. Continue cooking until it is completely browned.
- Add the diced bell pepper and cook with the sausage for another 2 minutes, or until it begins to soften.
- Transfer the sausage and pepper mixture to a plate lined with paper towels. Drain the excess fat and leave the mixture to cool.
- Whisk the eggs with the milk, garlic powder, black pepper, and a small amount of salt.
- If the skillet is dry, add the butter or olive oil. Pour in the eggs and cook over medium-low heat, stirring gently. Remove them from the heat while they are still slightly soft. Avoid browning or overcooking the eggs.
- Transfer the eggs to a bowl and allow them to cool for approximately 10 minutes. Fold in the sausage mixture, cheddar, and green onions.
- Separate the refrigerated biscuits. Flatten each biscuit into a circle measuring approximately 5 inches (13 cm) across. Keep the center slightly thicker than the edges to reduce the chance of tearing.
- Place approximately 3 tablespoons of filling on one half of each dough circle. Leave a clean border around the edge.
- Fold the uncovered side over the filling to form a semicircular pocket. Press the edges together with your fingers, then crimp them with the tines of a fork.
- Transfer the sealed pockets to the prepared baking sheet, leaving space between them. Cut one very small steam vent in the top of each pocket.
- Brush the tops lightly with melted butter if desired.
- Bake for 16–20 minutes, or until the pockets are puffed and evenly golden brown.
- Allow them to rest on the baking sheet for 5 minutes before serving. The filling will be extremely hot immediately after baking.
How to Keep the Pockets Closed
Do not overfill the dough. Although a larger amount may fit initially, the filling expands and releases steam as it heats.
Keep the border free from cheese, grease, and egg. A clean edge forms a much stronger seal. If the dough has become sticky, chill the shaped pockets for 10 minutes before baking.
Pressing the seam first with your fingers and then with a fork provides extra protection against leaks. The small vent on top allows steam to escape without forcing the folded edge apart.
Useful Variations
Replace the sausage with cooked bacon, finely diced ham, or turkey breakfast sausage. For a meat-free version, use sautéed mushrooms and spinach, making sure to cook away as much moisture as possible.
Cheddar can be exchanged for Monterey Jack, pepper Jack, or a low-moisture mozzarella. Avoid adding large quantities of soft or very oily cheese because it may escape through the seams.
A thin layer of cream cheese can make the pockets richer, but use no more than one teaspoon per pocket.
Freezing Instructions
Let the baked pockets cool completely. Arrange them in a single layer on a tray and freeze for 1–2 hours. Once firm, transfer them to a freezer-safe container or bag, separating the layers with baking paper.
Freeze for up to two months for the best texture.
Thaw a pocket overnight in the refrigerator and reheat it in a 350°F (175°C) oven for approximately 10–12 minutes. To reheat directly from frozen, loosely wrap it in foil and bake at the same temperature for 20–25 minutes, removing the foil near the end.
A microwave is faster, but it softens the biscuit exterior. For a better balance of speed and texture, microwave the pocket briefly to warm the center and then finish it for a few minutes in an air fryer or oven.
4. Bacon Ranch Biscuit Bubble-Up Bake

This bacon ranch biscuit bubble-up bake gets its playful name from the pieces of refrigerated biscuit dough that rise through the egg mixture as the casserole cooks. The exposed sections become golden and crisp, while the pieces underneath remain tender and absorb the flavors of smoky bacon, cheddar, and ranch-seasoned eggs.
It is a rich, comforting breakfast intended for sharing, so I like serving it with fresh fruit or a lightly dressed green salad. The casserole is especially convenient for a relaxed weekend brunch because most of the preparation can be completed while the oven heats.
Prep Time: 20 minutes
Cook Time: 35–40 minutes
Resting Time: 10 minutes
Total Time: Approximately 1 hour 10 minutes
Servings: 6–8
Course: Breakfast, Brunch
Method: Baking
Ingredients
- 1 can (16 ounces/454 g) refrigerated biscuit dough, approximately 8 biscuits
- 8 slices bacon
- 7 large eggs
- ¾ cup (180 ml) whole milk
- 1½ cups (170 g) shredded sharp cheddar cheese, divided
- 2 tablespoons finely sliced green onions
- 1½ teaspoons dried parsley
- ¾ teaspoon garlic powder
- ½ teaspoon onion powder
- ½ teaspoon dried dill
- ¼ teaspoon freshly ground black pepper
- ⅛ teaspoon salt, or according to taste
- Butter or nonstick cooking spray for the baking dish
Instructions
- Preheat the oven to 375°F (190°C). Grease a 9 × 13-inch (23 × 33 cm) baking dish.
- Place the bacon in a large skillet and cook it over medium heat until crisp. Transfer it to a plate lined with paper towels and allow the excess fat to drain.
- Once the bacon is cool enough to handle, crumble it into small pieces. Reserve approximately 2 tablespoons for sprinkling over the finished casserole.
- Separate the refrigerated biscuits and cut each one into six similarly sized pieces. Smaller pieces cook more reliably in the egg mixture than biscuit quarters.
- Distribute the biscuit pieces across the prepared baking dish. They do not need to form a perfectly even layer, but avoid piling several pieces directly on top of one another.
- Sprinkle the majority of the crumbled bacon, 1 cup of cheddar, and half of the green onions between and over the pieces of biscuit dough.
- In a large bowl, whisk together the eggs, milk, parsley, garlic powder, onion powder, dill, black pepper, and salt.
- Pour the seasoned egg mixture slowly and evenly into the baking dish. Gently move a few of the biscuit pieces with a spoon so the liquid can flow between them, but do not completely submerge all the dough.
- Sprinkle the remaining ½ cup of cheddar over the top.
- Bake uncovered for 30 minutes. Check the center, then continue baking for another 5–10 minutes, until the eggs are set and the raised biscuit pieces are golden brown.
- If the biscuit tops brown before the center is cooked, loosely cover the dish with aluminum foil and finish baking.
- Remove the casserole from the oven and let it rest for 10 minutes. Top it with the reserved bacon and remaining green onions before serving.
Homemade Ranch-Style Seasoning
The parsley, garlic, onion, and dill create a mild ranch-inspired flavor without requiring a packaged seasoning mix. This allows better control over the salt level, which is useful because both bacon and cheddar already contain a significant amount of salt.
If you prefer to use a commercial dry ranch seasoning, replace the parsley, garlic powder, onion powder, dill, and added salt with approximately 1 tablespoon of seasoning mix. Taste and seasoning strength vary by brand, so avoid adding additional salt until the casserole is served.
How to Prevent a Doughy Center
Cut the biscuit dough into six pieces rather than halves or quarters. The smaller pieces leave more room for hot air to circulate and cook more evenly.
Use a large baking dish rather than a deep, narrow casserole. Spreading the ingredients across a wider surface prevents an overly thick layer of dough and eggs.
Do not increase the quantity of milk. Additional liquid may seem as though it would make the eggs softer, but it also extends the cooking time and can leave the biscuits underneath damp.
After approximately 35 minutes, test a section near the center. The egg should be set, and a visible biscuit piece should separate into a fluffy crumb rather than stretch like raw dough.
Useful Variations
For a milder casserole, replace half of the sharp cheddar with Monterey Jack. Pepper Jack can be used when you want a little heat.
Finely diced jalapeño, briefly sautéed bell pepper, or a small handful of cooked spinach may also be added. Cook vegetables before assembly and remove as much moisture as possible.
Turkey bacon can replace traditional bacon, although it may not provide the same crisp texture. Cook it fully before adding it to the casserole.
Storage and Reheating
Store cooled leftovers in an airtight container in the refrigerator for up to three days. Reheat individual portions in a 350°F (175°C) oven for 10–12 minutes or microwave them until hot throughout.
The casserole can be frozen after baking, although the biscuit texture will become slightly softer. Freeze individual portions rather than the whole baking dish so they thaw and reheat more evenly
5. Veggie and Cheddar Biscuit Breakfast Bake

This veggie and cheddar biscuit breakfast bake offers a colorful, meat-free alternative to the richer sausage and bacon casseroles in the collection. Refrigerated biscuit pieces are combined with sautéed peppers, mushrooms, spinach, seasoned eggs, and melted cheddar to create a substantial breakfast without meat.
Cooking the vegetables before assembling the casserole is essential. Mushrooms and spinach release a surprising amount of moisture, which could otherwise leave the biscuit dough wet and prevent the eggs from setting evenly.
Prep Time: 25 minutes
Cook Time: 35–40 minutes
Resting Time: 10 minutes
Total Time: Approximately 1 hour 15 minutes
Servings: 6
Course: Breakfast, Brunch
Diet: Vegetarian
Method: Baking
Ingredients
- 1 can (16 ounces/454 g) refrigerated biscuit dough, approximately 8 biscuits
- 1 tablespoon olive oil
- 5 ounces (140 g) mushrooms, sliced and then roughly chopped
- ½ medium red bell pepper, finely diced
- ½ small yellow onion, finely diced
- 2 packed cups (60 g) fresh baby spinach, roughly chopped
- 6 large eggs
- ¾ cup (180 ml) whole milk
- 1½ cups (170 g) shredded sharp cheddar cheese, divided
- ½ teaspoon garlic powder
- ½ teaspoon dried oregano
- ¼ teaspoon smoked paprika
- ¼ teaspoon freshly ground black pepper
- ¼ teaspoon salt, or according to taste
- 2 tablespoons sliced green onions or chopped parsley
- Butter or nonstick cooking spray for the baking dish
Instructions
- Preheat the oven to 375°F (190°C). Lightly grease a 9 × 13-inch (23 × 33 cm) baking dish.
- Heat the olive oil in a large skillet over medium-high heat. Add the chopped mushrooms and cook for 4–5 minutes, stirring occasionally, until their released moisture has evaporated and the edges begin to brown.
- Add the diced bell pepper and onion. Continue cooking for approximately 4 minutes, or until the onion becomes translucent and the pepper begins to soften.
- Add the chopped spinach and cook for another 1–2 minutes, just until wilted. Remove the skillet from the heat and allow the vegetables to cool slightly.
- Separate the refrigerated biscuits and cut each one into six similarly sized pieces.
- Arrange the biscuit pieces in the prepared baking dish, leaving small gaps between them.
- Distribute the cooked vegetable mixture evenly over and between the biscuit pieces. Sprinkle 1 cup of the shredded cheddar over the vegetables.
- In a large bowl, whisk together the eggs, milk, garlic powder, oregano, smoked paprika, black pepper, and salt.
- Pour the egg mixture slowly and evenly into the baking dish. Do not press the biscuits down or completely cover every piece with liquid.
- Sprinkle the remaining ½ cup of cheddar over the top.
- Bake uncovered for 30 minutes. Check the center, then continue baking for another 5–10 minutes, until the eggs are set and the visible biscuit pieces are golden brown.
- If the surface is browning too quickly, cover the dish loosely with aluminum foil during the final portion of the baking time.
- Remove the breakfast bake from the oven and let it rest for 10 minutes before cutting. Finish with green onions or parsley and serve warm.
Why the Vegetables Are Cooked First
Raw mushrooms, spinach, onions, and peppers contain considerable moisture. If they are placed directly into the casserole, that liquid is released during baking and collects around the biscuit pieces.
Sautéing the vegetables concentrates their flavor and gives the casserole a more reliable texture. Continue cooking the mushrooms until the skillet looks nearly dry before adding the remaining vegetables.
Allowing the mixture to cool briefly also protects the refrigerated dough. Very hot vegetables can soften its fat before the casserole reaches the oven, reducing the biscuit’s rise.
Additional Vegetable Options
This recipe is flexible, but the total quantity of cooked vegetables should remain reasonably close to the amount listed.
Suitable additions include:
- Finely chopped broccoli that has been lightly steamed
- Diced zucchini cooked until its moisture evaporates
- Roasted asparagus cut into small pieces
- Drained roasted red peppers
- Chopped kale with the tough stems removed
Avoid watery raw tomatoes unless they have been seeded, cooked, and drained. Frozen spinach may be used, but it must be thawed and squeezed thoroughly before measuring.
Cheese Variations
Sharp cheddar contributes enough flavor to stand up to the vegetables. Monterey Jack gives the casserole a softer, milder character, while pepper Jack introduces a little heat.
Crumbled feta can also be used, but replace only part of the cheddar so the top still melts properly. A small amount of grated Parmesan is a good finishing addition but may make extra salt unnecessary.
Preparing Ahead
The vegetables can be sautéed up to two days in advance and stored in the refrigerator. Shred the cheese and prepare the seasonings ahead as well, then assemble the casserole shortly before baking.
I would not refrigerate the fully assembled, unbaked casserole overnight. Extended contact with the egg mixture can make the biscuit pieces dense and soggy.
Storage and Reheating
Refrigerate cooled leftovers in an airtight container for up to three days. Reheat individual portions in a 350°F (175°C) oven for approximately 10 minutes or microwave them until hot throughout.
The baked casserole can also be frozen in individual portions. Thaw them overnight in the refrigerator before reheating for the most even result.
6. Bacon, Egg and Cheese Biscuit Sliders

These bacon, egg and cheese biscuit sliders turn freshly baked biscuits into small, satisfying breakfast sandwiches. Each one is filled with a tender square of baked egg, crisp bacon, and melted cheddar, then brushed with a little seasoned butter before returning briefly to the oven.
Unlike the casseroles in this collection, the biscuits are baked separately before being assembled. This preserves their flaky texture and makes the sliders easy to portion for brunch, a family breakfast, or a relaxed gathering.
Prep Time: 20 minutes
Cook Time: 25 minutes
Total Time: Approximately 45 minutes
Yield: 8 sliders
Serving Size: 1–2 sliders
Course: Breakfast, Brunch
Method: Baking and Assembly
Ingredients
For the sliders
- 1 can (approximately 16 ounces/454 g) refrigerated biscuit dough containing 8 biscuits
- 8 large eggs
- 2 tablespoons milk
- ¼ teaspoon salt
- ¼ teaspoon freshly ground black pepper
- 8 slices bacon
- 8 small slices cheddar cheese or 1 cup (115 g) shredded cheddar
- Butter or nonstick cooking spray for the egg pan
For the seasoned butter
- 1½ tablespoons butter, melted
- ¼ teaspoon garlic powder
- ¼ teaspoon dried parsley
- ⅛ teaspoon smoked paprika
Instructions
- Preheat the oven according to the directions on the biscuit package, usually 350–375°F (175–190°C). Line a baking sheet with parchment paper.
- Arrange the refrigerated biscuits on the prepared baking sheet, leaving space between them. Bake according to the package instructions until risen and golden brown, generally 13–17 minutes.
- Remove the biscuits from the oven and allow them to cool for approximately 5 minutes. Leave the oven switched on and set it to 350°F (175°C) if necessary.
- While the biscuits bake, cook the bacon in a large skillet over medium heat until crisp. Transfer it to a plate lined with paper towels. Once cool, break each slice into two or three pieces that will fit inside the sliders.
- Reduce the oven temperature to 350°F (175°C) if it was set higher. Lightly grease an 8-inch (20 cm) square baking pan.
- Whisk the eggs with the milk, salt, and black pepper. Pour the mixture into the prepared pan.
- Bake the eggs for approximately 12–15 minutes, or until just set in the center. Avoid overbaking, as the eggs will return to the oven after the sliders are assembled.
- Allow the baked eggs to cool for a few minutes, then cut them into eight similarly sized squares.
- Carefully split each baked biscuit horizontally using a serrated knife.
- Place one square of baked egg on the bottom half of every biscuit. Add bacon and a small slice of cheddar or an even portion of shredded cheese.
- Replace the biscuit tops and arrange the sliders in a lightly greased baking dish or on the parchment-lined baking sheet.
- Mix the melted butter with the garlic powder, parsley, and smoked paprika. Brush a light layer over the biscuit tops.
- Return the assembled sliders to the oven for 5–7 minutes, or until the cheese melts and the sandwiches are hot throughout.
- Serve immediately while the biscuits are warm and the cheese remains melted.
Why Bake the Eggs in a Pan?
Preparing one thin layer of egg is easier than frying eight separate portions. It also creates evenly shaped pieces that remain inside the sliders instead of falling out with the first bite.
Use an 8-inch square pan rather than a large sheet pan. If the egg layer is too thin, it can become dry before the center finishes setting.
Remove the eggs as soon as the center is firm. They receive additional heat when the assembled sandwiches return to the oven.
Building Better Sliders
Allow the biscuits to cool briefly before cutting. Very hot biscuits are delicate and more likely to crumble under the knife.
A serrated knife works better than pressing down with a smooth blade. Saw gently through the biscuit so its flaky layers remain intact.
Keep the fillings modest. These are small breakfast sandwiches, and piling on too much egg or bacon makes them difficult to eat. If the biscuits are especially small, trim the egg squares accordingly.
Easy Variations
Replace the bacon with cooked breakfast sausage patties or thin slices of ham. Pepper Jack can substitute for cheddar when you want a spicier sandwich.
For a meat-free version, leave out the bacon and add a thin layer of sautéed spinach or roasted red pepper. Make sure vegetables are well drained before assembly.
A small amount of hot sauce, mustard, or maple syrup can be served alongside the sliders. Adding sauces at the table keeps the biscuits from becoming soggy during baking.
Preparing Ahead
The bacon and baked egg layer can be prepared one day in advance and refrigerated separately. Bake the biscuits and assemble the sliders shortly before serving for the best texture.
Fully assembled leftovers can be refrigerated in an airtight container for up to two days. Wrap them loosely in foil and reheat in a 350°F (175°C) oven for approximately 10 minutes.
The microwave is faster but makes the biscuit softer. If using it, heat the slider in short intervals to avoid turning the egg rubbery.
7. Cinnamon-Sugar Biscuit Rolls With Vanilla Glaze
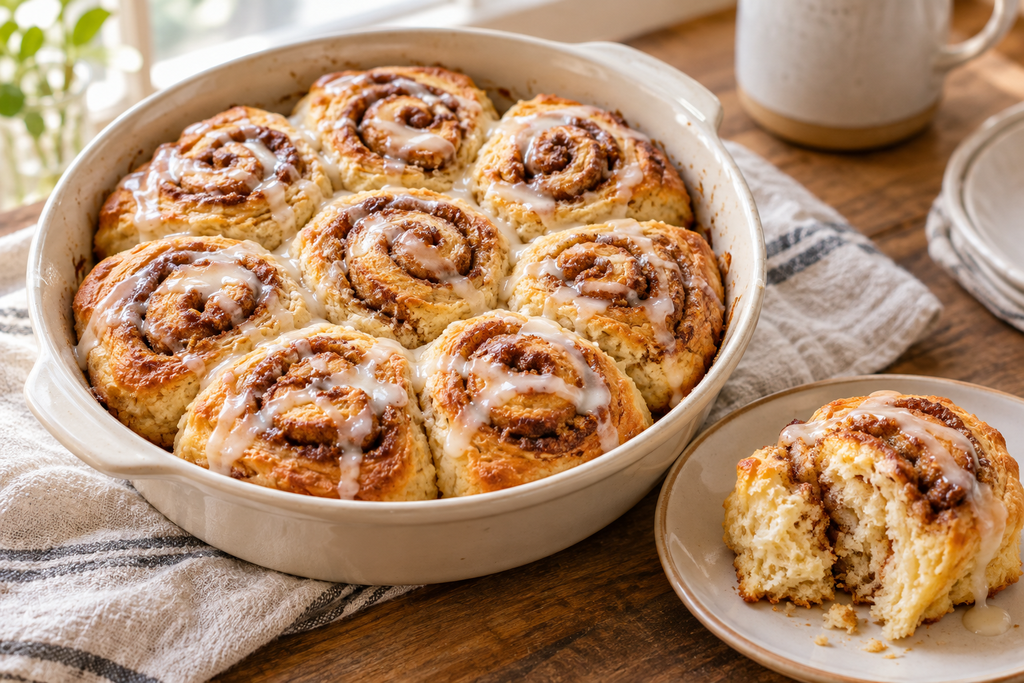
These cinnamon-sugar biscuit rolls are the sweet option in the collection. Refrigerated biscuit dough replaces traditional yeast dough, so there is no kneading, rising, or lengthy preparation. The finished rolls are tender and buttery, with ribbons of cinnamon sugar and a simple vanilla glaze.
They will not have exactly the same soft, stretchy texture as classic yeast-raised cinnamon rolls. Instead, their crumb is closer to a flaky American biscuit. They are best served slightly warm, while the centers remain tender and the glaze is still soft.
Prep Time: 20 minutes
Cook Time: 18–22 minutes
Cooling Time: 10 minutes
Total Time: Approximately 50 minutes
Yield: 8 cinnamon biscuit rolls
Course: Breakfast, Brunch
Method: Baking
Ingredients
For the rolls
- 1 can (approximately 16 ounces/454 g) refrigerated biscuit dough containing 8 biscuits
- 3 tablespoons unsalted butter, softened
- ⅓ cup (65 g) packed light brown sugar
- 1½ teaspoons ground cinnamon
- 1 small pinch of salt
- 2 tablespoons finely chopped pecans, optional
- Butter or nonstick cooking spray for the baking dish
For the vanilla glaze
- ¾ cup (90 g) powdered sugar
- 1½–2 tablespoons milk
- ½ teaspoon vanilla extract
- 1 small pinch of salt
Instructions
- Preheat the oven to 350°F (175°C). Lightly grease an 8-inch (20 cm) round or square baking dish.
- In a small bowl, combine the brown sugar, cinnamon, and a small pinch of salt. Stir in the chopped pecans if using.
- Separate the refrigerated biscuits and arrange them on a lightly floured work surface so their edges overlap slightly.
- Press the biscuits together with your fingers, then gently roll them into one rectangle measuring approximately 10 × 12 inches (25 × 30 cm). Pinch any visible gaps closed.
- Spread the softened butter evenly over the dough, leaving a narrow border along one of the longer edges.
- Sprinkle the cinnamon-sugar mixture across the buttered surface. Press it down lightly so it adheres to the dough.
- Starting from the opposite long edge, roll the dough into a firm log. Work slowly and keep the roll relatively tight without squeezing out the filling.
- Pinch the unbuttered edge against the log to seal it. Place the seam underneath.
- Using a sharp knife or unflavored dental floss, cut the log into eight similarly sized rolls.
- Arrange the rolls cut-side up in the prepared baking dish. Leave a little space between them so they can expand.
- Bake for 18–22 minutes, or until the rolls are puffed and golden. Check the center rolls carefully because they generally take the longest to cook.
- Remove the dish from the oven and allow the rolls to cool for approximately 10 minutes.
- To make the glaze, whisk together the powdered sugar, 1½ tablespoons of milk, vanilla extract, and salt. Add the remaining milk a few drops at a time until the glaze is thick but pourable.
- Drizzle the vanilla glaze over the warm rolls and serve.
Forming the Dough Rectangle
Refrigerated biscuit dough is usually divided into individual rounds, so the pieces must be joined before filling. Overlap their edges slightly and press firmly before using the rolling pin.
If a seam opens while rolling, pinch it closed rather than continuing to flatten the entire rectangle. Excessive rolling can compress the biscuit layers and produce dense rolls.
Keep the dough cold. If it becomes sticky or very soft, transfer the flattened rectangle to a sheet of parchment paper and refrigerate it for approximately 10 minutes before adding the filling.
How to Tell When the Rolls Are Done
The exposed edges should be golden, and the center rolls should no longer look wet or stretchy when gently separated. If the tops brown too quickly, loosely cover the baking dish with aluminum foil.
Do not rely only on the color of the outer rolls. The rolls in the middle receive less direct heat and may require several additional minutes.
Allowing them to rest before glazing gives the biscuit centers time to finish setting. It also prevents the glaze from disappearing completely into the hot dough.
Flavor Variations
Add finely grated orange zest to the cinnamon filling for a brighter flavor. A pinch of cardamom also works well with the brown sugar and vanilla.
Chopped pecans or walnuts introduce a little crunch, but keep the pieces small so the dough remains easy to roll and slice.
For a maple glaze, replace part of the milk with pure maple syrup. Begin with a small quantity and adjust gradually because syrup thins the glaze quickly.
Storage and Reheating
These biscuit rolls have the best texture on the day they are baked. Store leftovers in an airtight container at room temperature for one day or refrigerate them for up to three days.
Reheat an individual roll briefly in the microwave or place several rolls in a 300°F (150°C) oven for approximately 8 minutes. Avoid overheating, which can dry out the biscuit crumb and cause the glaze to melt away.
8. Biscuits and Sausage Gravy Breakfast Bake
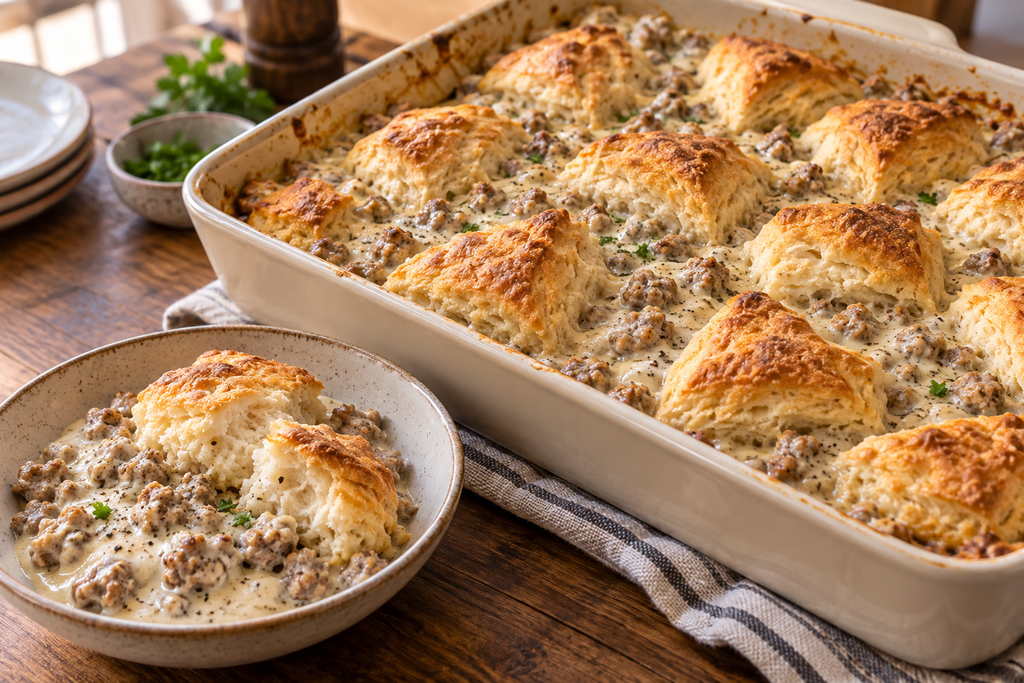
This biscuits and sausage gravy breakfast bake finishes the collection with a comforting Southern-inspired dish. Creamy peppered sausage gravy is covered with pieces of refrigerated biscuit dough and baked until the gravy bubbles around the edges and the biscuit topping becomes golden.
Unlike the egg-based casseroles, this recipe relies on a properly prepared gravy for its structure. The gravy should be slightly thinner than you would normally serve over baked biscuits because it continues to thicken in the oven.
Prep Time: 20 minutes
Cook Time: 25–30 minutes
Resting Time: 10 minutes
Total Time: Approximately 1 hour
Servings: 6
Course: Breakfast, Brunch
Method: Stovetop and Baking
Ingredients
- 1 can (16 ounces/454 g) refrigerated biscuit dough, approximately 8 biscuits
- 1 pound (454 g) breakfast sausage
- 3 tablespoons all-purpose flour
- 2¾ cups (660 ml) whole milk, preferably at room temperature
- ½ teaspoon garlic powder
- ½ teaspoon onion powder
- ¾ teaspoon freshly ground black pepper, plus more for serving
- ¼ teaspoon dried sage, optional
- Salt to taste
- 1 tablespoon melted butter, optional
- 1 tablespoon chopped parsley for serving, optional
- Butter or nonstick cooking spray for the baking dish
Instructions
- Preheat the oven to 375°F (190°C). Lightly grease a 9 × 13-inch (23 × 33 cm) baking dish.
- Place a large skillet over medium heat. Add the breakfast sausage and cook for 7–9 minutes, breaking it into small crumbles as it browns.
- Continue cooking until no pink remains. Do not drain the sausage unless the skillet contains more than approximately 3 tablespoons of rendered fat. A moderate amount of fat is needed to form the gravy.
- Sprinkle the flour evenly over the cooked sausage. Stir continuously for 1–2 minutes so the flour absorbs the fat and loses its raw taste.
- Add the milk gradually, approximately ½ cup at a time, stirring or whisking after each addition. Scrape the bottom of the skillet to incorporate any browned pieces.
- Stir in the garlic powder, onion powder, black pepper, and sage, if using.
- Bring the mixture to a gentle simmer and cook for approximately 4–6 minutes, stirring frequently. Remove it from the heat when the gravy has thickened enough to coat the back of a spoon but still pours easily.
- Taste the gravy before adding salt. Breakfast sausage can already be highly seasoned, so only a small amount may be required.
- Pour the sausage gravy into the prepared baking dish and spread it evenly.
- Separate the refrigerated biscuits and cut each one into four pieces. Arrange the pieces over the gravy with a little space between them. Do not press them down or completely cover the surface.
- Brush the exposed biscuit pieces lightly with melted butter if desired.
- Bake uncovered for 20 minutes. Check the biscuits, then continue baking for another 5–10 minutes, until the tops are golden and the dough in the center is cooked through.
- If the biscuits brown before their centers are ready, cover the dish loosely with aluminum foil and continue baking.
- Remove the breakfast bake from the oven and let it rest for 10 minutes. The gravy will thicken further as it cools.
- Finish with chopped parsley and additional black pepper if desired. Spoon the gravy and biscuits into shallow bowls or onto plates and serve warm.
Getting the Gravy Consistency Right
The gravy should look slightly looser in the skillet than you want it to be when served. Flour continues to absorb liquid during baking and again while the casserole rests.
If the gravy becomes very thick before it reaches the baking dish, stir in additional milk a few tablespoons at a time. If it still looks watery after simmering, continue cooking it briefly rather than adding extra flour directly.
Adding flour to hot finished gravy can create stubborn lumps. It is better to let the original flour cook long enough to thicken the milk.
Preventing Raw Biscuit Centers
Cut each biscuit into quarters and leave small spaces between the pieces. Crowding whole biscuits across the surface can trap steam and leave the sides or bottoms undercooked.
Use a relatively wide baking dish so the layer of gravy is not excessively deep. The biscuit pieces should sit mostly above the surface rather than sinking completely into it.
Check a center piece before removing the dish from the oven. Its interior should look fluffy and bread-like, with no shiny or stretchy raw dough.
Useful Variations
For a spicier gravy, use hot breakfast sausage or add a pinch of crushed red pepper. A little smoked paprika provides warmth without making the dish noticeably hot.
Turkey or chicken breakfast sausage can replace pork sausage, but these leaner options may not release enough fat to form the roux. If the skillet looks dry after cooking, add 1–2 tablespoons of butter before stirring in the flour.
For an herb-forward version, add a small amount of dried thyme along with the sage. Avoid using too many herbs, which can overpower the simple sausage-and-pepper character of the gravy.
Preparing Ahead
The sausage gravy can be prepared up to two days ahead and refrigerated in an airtight container. It will become much thicker when chilled.
Before assembling the bake, warm the gravy gently and stir in enough milk to restore a loose, pourable consistency. Add the raw biscuit pieces only immediately before baking.
Do not refrigerate the fully assembled dish overnight. The unbaked biscuit dough can absorb moisture from the gravy and become heavy.
Storage and Reheating
Store cooled leftovers in an airtight container in the refrigerator for up to three days. The biscuits will soften as they sit in the gravy, but the flavor remains good.
Reheat individual portions in a 350°F (175°C) oven until hot throughout. If the gravy has become very thick, add a small splash of milk around the biscuit pieces before reheating.
A Note About the Images
The food images in this article were created with the assistance of artificial intelligence under our editorial direction. Each image was developed specifically for its accompanying recipe, using the listed ingredients, preparation method, cooking technique, texture, and expected finished appearance as visual references.
Although the images are not photographs of the exact dishes prepared in a physical kitchen, care was taken to present realistic and technically plausible results. We reviewed the compositions to avoid misleading ingredients, impossible textures, and decorative elements that do not belong to the recipes.
Natural variations should still be expected when cooking at home. The appearance of your dish may differ depending on the brand and size of the refrigerated biscuits, the baking dish, oven performance, ingredient substitutions, and individual preparation. The images are intended to provide helpful visual guidance and inspiration rather than guarantee an identical result. All AI-assisted images were created specifically for Chef Olu and were not copied from third-party recipe websites.