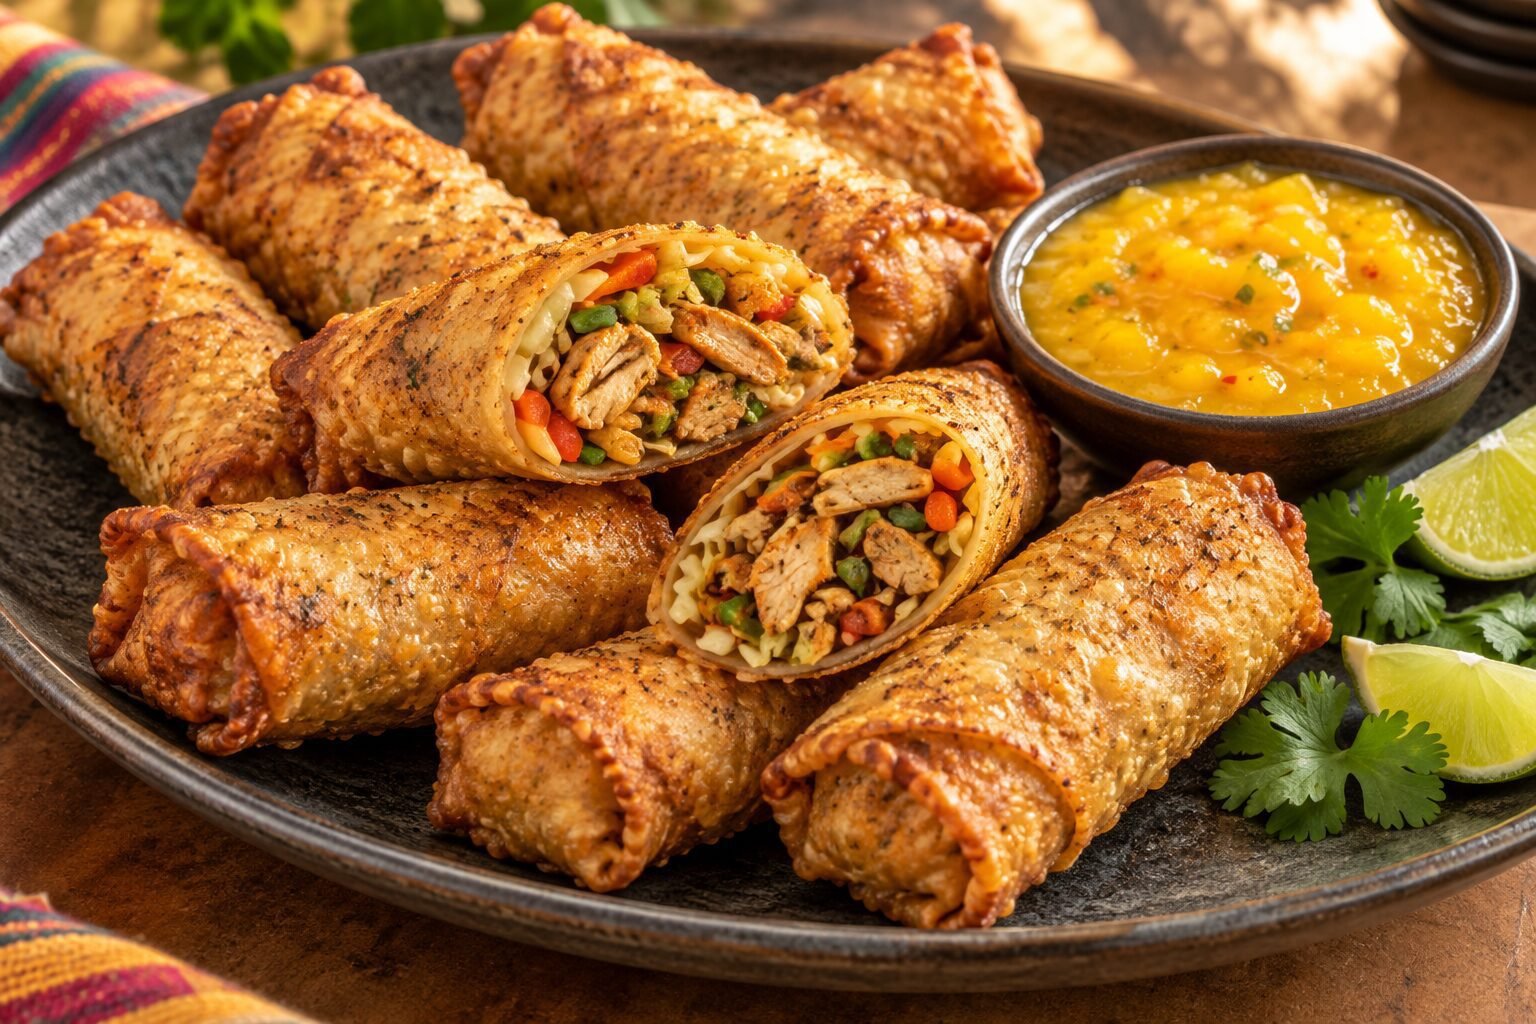
There is something naturally inviting about a platter of homemade rolls placed in the center of the table. Some are delicate and filled with cool vegetables and herbs, while others arrive hot from the oven or fryer with a crisp, golden shell. Everyone can choose a favorite, try a different dipping sauce, and reach for another without turning the meal into a formal occasion.
This collection of Spring Roll and Egg Roll Recipes includes six genuinely different ideas rather than several versions of almost the same filling. You will find fresh Vietnamese-inspired shrimp rolls, crisp vegetable spring rolls, creamy crab egg rolls, Filipino-style Lumpia Shanghai, jerk chicken egg rolls, and a sweet apple pie version for dessert.
They can be served as appetizers, party snacks, light lunches, or part of a larger shared meal. Several can also be assembled in advance or frozen before cooking, making them more practical than their carefully rolled appearance might suggest.
Spring Rolls, Egg Rolls, and Rice Paper Rolls
The names are sometimes used interchangeably, but the wrappers and cooking methods can be quite different.
Fresh Vietnamese-style rolls are usually made with dry rice paper sheets. The wrappers become flexible after brief contact with water and are then filled without being cooked again. Because rice paper softens quickly, it should be moistened rather than left soaking in a bowl. A wrapper that still feels slightly firm when removed from the water will continue to soften on the work surface.
Thin frozen spring roll pastry is generally made with wheat flour and becomes light, crisp, and flaky when fried. It can also be baked or cooked in an air fryer, although the surface should be brushed or sprayed with oil to encourage even browning.
American-style egg roll wrappers are thicker and often contain egg. They produce a bubbled, substantial crust that works particularly well with hearty fillings such as chicken, crab, cabbage, or cream cheese.
Lumpia wrappers are especially thin and crisp. They are traditionally used for Filipino rolls and are ideal for making the narrow, compact shape associated with Lumpia Shanghai.
Using the wrapper specified in each recipe gives the most reliable result. Substituting rice paper for an egg roll wrapper, for example, can change the texture, sealing method, and cooking time considerably.
The Secret to a Filling That Stays Inside
Most problems begin when the filling contains too much moisture. Watery vegetables, warm meat, and excessive sauce can soften the wrapper before the roll reaches the pan.
Cooked fillings should be allowed to cool completely before wrapping. Cabbage, mushrooms, and other moisture-rich vegetables should be cooked until much of their released liquid has evaporated. Fresh ingredients for rice paper rolls should be patted dry after washing.
It is also important not to overfill the wrappers. A generous-looking mound may feel appealing, but it makes the roll harder to close and places pressure on the seam during cooking. A smaller, tightly shaped portion usually produces a neater roll with a more even ratio of filling to wrapper.
Keep unused wrappers covered while working. A barely damp towel helps prevent rice paper from drying out, while a clean, slightly damp towel can protect wheat wrappers from becoming brittle. The towel should not be wet enough to make the wrappers sticky.
How to Roll Them Neatly
Place the filling toward the lower third of the wrapper rather than directly in the center. Fold the lower edge over the filling and pull it back gently to form a compact cylinder. Fold the two sides inward, then continue rolling away from you.
Fresh rice paper will usually seal to itself. Wheat-based spring roll wrappers can be closed with a thin paste made from flour and water, while egg roll wrappers may be sealed with water or beaten egg according to the package directions.
The first roll may not look perfect, and it does not need to. After two or three attempts, the amount of filling and pressure required become much easier to judge. Homemade rolls with slightly different shapes often make the final platter feel more welcoming rather than less successful.
Frying, Baking, or Using an Air Fryer
Deep-frying generally creates the most evenly crisp exterior. Use a thermometer and maintain the oil temperature recommended in the individual recipe, usually around 350–365°F or 175–185°C. If the oil is too cool, the wrappers can absorb excessive oil. If it is too hot, the exterior may darken before the filling is heated through.
Add only a few rolls at a time. Overcrowding lowers the oil temperature and can cause the rolls to stick together. Lower them into the oil carefully, with the seam facing downward first.
Baking requires less active cooking. Arrange the rolls on a rack or parchment-lined baking sheet, leave space between them, and coat their surfaces lightly with oil. Turn them during baking for more even color.
An air fryer is particularly useful for reheating cooked rolls and preparing smaller batches. The result may not look exactly like a deep-fried roll, but it can still become pleasantly crisp.
Fresh rice paper rolls are the exception. They are served soft and cool rather than baked or fried.
Dipping Sauces Complete the Experience
A well-chosen dipping sauce brings contrast to the filling. Fresh shrimp rolls are especially good with a creamy peanut sauce or a light lime and fish sauce dip. Vegetable spring rolls pair naturally with sweet chili sauce, while crab and cream cheese benefit from something tangy or gently spicy.
The jerk chicken egg rolls in this collection are served with a fruity mango-pineapple dip that cools the spice without hiding it. Lumpia Shanghai works beautifully with a sweet, sharp dipping sauce, and the apple pie egg rolls need little more than caramel sauce or vanilla ice cream.
Place two or three sauces on the table when serving a mixed platter. Trying the same roll with different dips turns a simple appetizer into a more playful shared experience.
Six Rolls for Six Different Moments
Each of these Spring Roll and Egg Roll Recipes has its own role. The fresh shrimp rolls suit warm afternoons and lighter meals. Crispy vegetable rolls are an approachable option for a mixed gathering. Crab and cream cheese egg rolls feel rich and celebratory, while Lumpia Shanghai is compact, savory, and easy to share.
Jerk chicken egg rolls bring a bold fusion of Caribbean seasoning and crisp egg roll wrappers. Finally, apple pie egg rolls turn the familiar rolled shape into a warm dessert.
Together, the recipes can create an entire tasting table, but they do not need to be prepared at once. Choose one according to the occasion, learn how its particular wrapper behaves, and build confidence from there. The pleasure of homemade rolls comes partly from eating them, but also from the relaxed rhythm of filling, folding, and sharing the finished batch.
1. Fresh Vietnamese Shrimp and Herb Spring Rolls
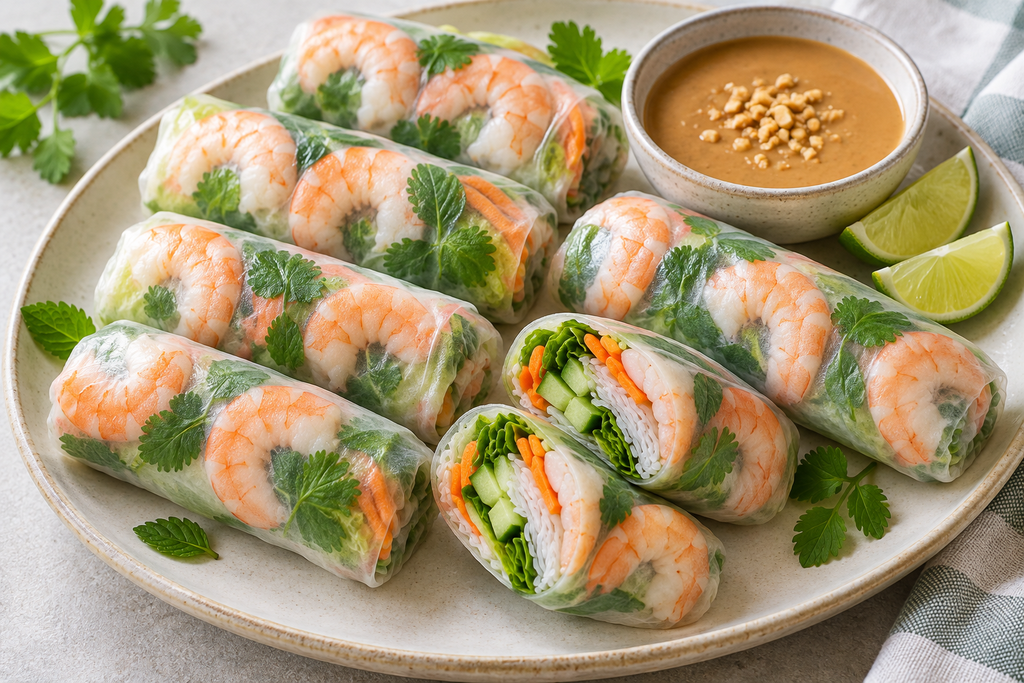
Fresh Vietnamese Shrimp and Herb Spring Rolls are light, colorful, and especially enjoyable when the weather calls for something cool rather than fried. Tender shrimp, rice vermicelli, crisp vegetables, and fragrant herbs are wrapped in soft rice paper and served with a creamy peanut-lime dipping sauce.
These rolls require no cooking after assembly, so the preparation is calm and flexible. Arrange the ingredients in separate bowls, place a shallow dish of water on the table, and allow everyone to roll their own. The first one may be slightly uneven, but the process quickly becomes part of the meal’s appeal.
Servings: 4
Yield: 8 rolls
Preparation time: 30 minutes
Cooking time: 5 minutes
Total time: 35 minutes
Ingredients
For the spring rolls
- 8 medium round rice paper wrappers, approximately 8½ inches or 22 cm wide
- 16 medium shrimp, peeled and deveined
- 2 oz or 60 g thin rice vermicelli noodles
- 8 small butter lettuce or soft green lettuce leaves
- 1 small carrot, cut into thin matchsticks
- ½ English cucumber, cut into thin matchsticks
- 1 cup fresh mint leaves
- ½ cup fresh cilantro leaves
- ½ cup Thai basil leaves or additional mint
- 2 green onions, thinly sliced lengthwise
- 1 lime, cut into wedges for serving
For the peanut-lime dipping sauce
- ¼ cup smooth peanut butter
- 2 tablespoons low-sodium soy sauce
- 1 tablespoon freshly squeezed lime juice
- 1 tablespoon honey or brown sugar
- 1 teaspoon toasted sesame oil
- ½ teaspoon finely grated fresh ginger
- ½ teaspoon sriracha, optional
- 2–4 tablespoons warm water
Instructions
- Bring a small saucepan of water to a gentle boil. Add the shrimp and cook for approximately 2–3 minutes, until they are opaque and completely cooked.
- Transfer the shrimp immediately to a bowl of ice water. Once cool, drain and pat them dry. Slice each shrimp in half lengthwise to create two thinner pieces.
- Prepare the rice vermicelli according to the package directions. Drain it thoroughly, rinse briefly under cool water, and shake away as much moisture as possible. Cut the noodles into shorter lengths with clean kitchen scissors if they are difficult to handle.
- Make the dipping sauce. In a small bowl, whisk together the peanut butter, soy sauce, lime juice, honey, sesame oil, ginger, and optional sriracha.
- Add warm water one tablespoon at a time until the sauce becomes smooth and easily dipable. Taste and adjust the lime juice or sweetness if needed. Set it aside.
- Arrange the shrimp, noodles, lettuce, vegetables, and herbs in separate bowls or small piles within easy reach of the work surface.
- Fill a wide, shallow dish with lukewarm water. Place a clean, slightly damp kitchen towel or smooth cutting board beside it.
- Working with one wrapper at a time, slide the rice paper into the water and rotate it for approximately 5–8 seconds. Remove it while it still feels slightly firm. It will continue to soften as you add the filling.
- Place the wrapper on the prepared work surface. Arrange four shrimp halves in a horizontal row slightly above the center, with their attractive pink side facing downward through the wrapper.
- Place one lettuce leaf below the shrimp. Add a small bundle of vermicelli, carrot, cucumber, mint, cilantro, Thai basil, and green onion. Keep the filling compact and leave approximately 1½ inches of space on both sides.
- Fold the lower edge of the rice paper firmly over the vegetable and noodle filling. Fold the left and right sides inward.
- Continue rolling away from you, keeping the ingredients gently compressed. The row of shrimp should become visible through the final outer layer.
- Place the finished roll seam-side down on a serving plate. Repeat with the remaining wrappers and filling, keeping the completed rolls separated so they do not stick together.
- Serve the Fresh Vietnamese Shrimp and Herb Spring Rolls promptly with the peanut-lime dipping sauce and fresh lime wedges.
How to Handle Rice Paper
Do not wait for the rice paper to become completely soft in the water. An over-soaked wrapper is fragile, sticky, and difficult to move. It should still feel slightly resistant when lifted from the dish.
If the wrapper remains too firm after the ingredients have been arranged, wait several seconds before attempting to roll it. The moisture already on its surface will continue softening it.
Rice paper brands vary in thickness, so the ideal soaking time may differ. Treat the first wrapper as a test and adjust the remaining ones accordingly.
Use lukewarm rather than hot water. Hot water softens rice paper very quickly and makes it easier to oversoak.
Tips for Rolls That Hold Together
Remove as much moisture as possible from the noodles, shrimp, and vegetables. Wet ingredients can make the wrappers slippery and weaken their surface.
Avoid overfilling. A smaller roll that closes securely is more enjoyable to eat than a large one that tears on the plate.
Place the noodles and vegetables on top of the lettuce leaf. The lettuce provides a soft barrier between the firm vegetable edges and the delicate wrapper.
Roll with gentle, consistent pressure. Pulling too firmly can tear the rice paper, while rolling too loosely allows the filling to shift.
Serving Experience
Fresh spring rolls are particularly well suited to a relaxed lunch or shared appetizer. Place the prepared ingredients in the center of the table and let each person assemble a roll. Someone may prefer extra mint, another may leave out the cilantro, and the final shapes will probably all be slightly different.
A mixed platter can be served with more than one sauce. Alongside the peanut dip, try a light mixture of lime juice, fish sauce, water, sugar, garlic, and chili.
The rolls also pair well with a simple cucumber salad or a bowl of lightly seasoned broth. Their cool herbs and crisp vegetables create a refreshing contrast to grilled or spicy dishes.
Storage
These rolls are best eaten shortly after assembly. Refrigeration can cause the rice paper to become firm, while prolonged exposure to air dries it out.
If they must be prepared a few hours ahead, arrange the rolls in a single layer without allowing them to touch. Cover them first with a clean, barely damp towel and then with plastic wrap. Refrigerate until close to serving time.
Store the dipping sauce separately in an airtight container for up to 4 days. Add a small amount of warm water and stir before serving if it thickens in the refrigerator.
2. Crispy Vegetable Spring Rolls
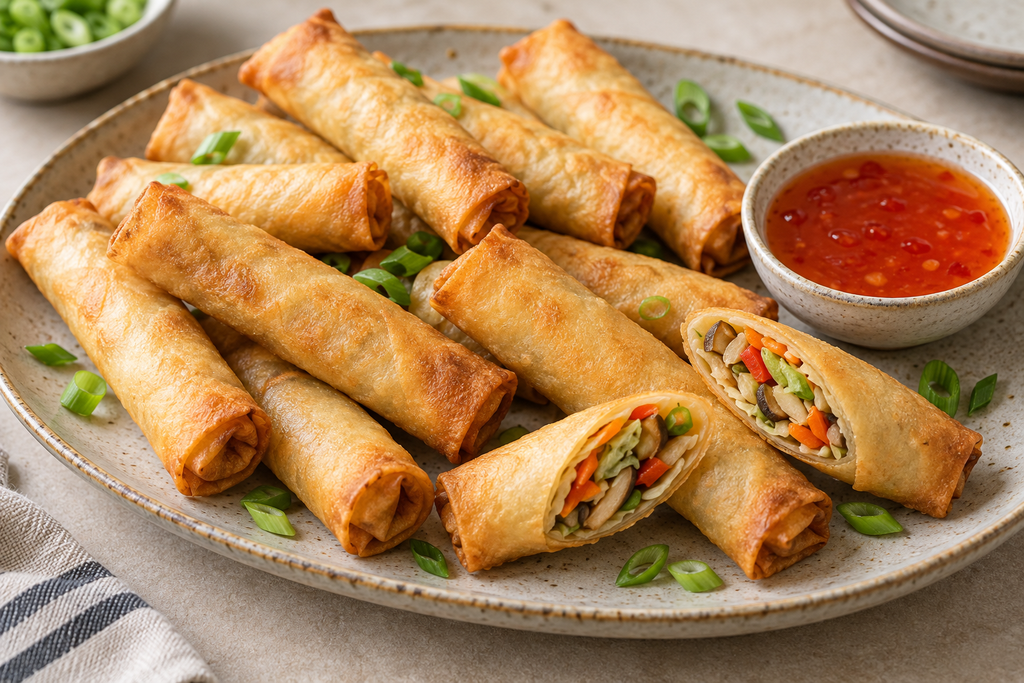
Crispy Vegetable Spring Rolls are filled with tender cabbage, carrots, mushrooms, and green onions wrapped in a thin, delicate pastry. Fried until golden, they develop a light, brittle crunch around a savory vegetable center. A baked option is included for occasions when you prefer to use less oil.
The most important part of this recipe is not the rolling or frying—it is removing excess moisture from the filling. Cooking the vegetables until their released liquid has evaporated and allowing them to cool completely helps the wrappers remain crisp and secure.
Servings: 4–6
Yield: 12 spring rolls
Preparation time: 25 minutes
Cooling time: 20 minutes
Cooking time: 10–20 minutes
Total time: Approximately 1 hour
Ingredients
For the vegetable filling
- 1 tablespoon neutral cooking oil
- 2 teaspoons toasted sesame oil
- 2 cups finely shredded green cabbage
- 1 medium carrot, cut into thin matchsticks or coarsely grated
- 4 oz or 115 g shiitake or cremini mushrooms, finely sliced
- ½ red bell pepper, cut into thin strips
- 3 green onions, thinly sliced
- 2 garlic cloves, finely minced
- 1 teaspoon finely grated fresh ginger
- 1½ tablespoons low-sodium soy sauce
- 1 teaspoon rice vinegar
- ¼ teaspoon ground white or black pepper
- 1 teaspoon cornstarch
- 1 tablespoon cool water
For assembling and frying
- 12 frozen wheat spring roll pastry wrappers, thawed according to the package directions
- 1 tablespoon all-purpose flour
- 2 tablespoons water
- Neutral oil, for frying
For serving
- Sweet chili sauce
- Soy sauce
- Sliced green onions, optional
Instructions
- Heat the neutral oil and sesame oil in a large skillet or wok over medium-high heat.
- Add the cabbage, carrot, mushrooms, and bell pepper. Stir-fry for approximately 4–5 minutes, until the vegetables begin to soften and most of their released moisture has evaporated.
- Add the green onions, garlic, and ginger. Cook for another 30 seconds, stirring continuously.
- Pour in the soy sauce and rice vinegar, then season with pepper. Toss the vegetables until evenly coated.
- In a small cup, mix the cornstarch with 1 tablespoon of cool water. Pour the mixture into the pan and stir for approximately 30 seconds. It will bind the remaining moisture and help the filling hold together.
- Transfer the filling to a wide plate or shallow tray. Spread it into a thin layer and allow it to cool completely. Do not wrap the spring rolls while the filling is warm.
- In a small bowl, stir the flour and 2 tablespoons of water into a smooth paste. This will be used to seal the wrappers.
- Place one spring roll wrapper on a clean work surface with one corner pointing toward you. Keep the remaining wrappers covered with a clean, barely damp towel.
- Place approximately 2 tablespoons of cooled filling across the lower third of the wrapper. Shape it into a compact horizontal line, leaving space on each side.
- Fold the bottom corner over the filling and roll it forward once, pulling back gently to create a firm cylinder.
- Fold the left and right corners inward. Continue rolling toward the top corner, keeping the wrapper snug without pulling hard enough to tear it.
- Brush a small amount of flour paste onto the final corner and finish rolling. Place the spring roll seam-side down on a tray. Repeat with the remaining wrappers.
Deep-Frying Method
- Pour enough neutral oil into a heavy saucepan or deep skillet to reach a depth of approximately 2 inches.
- Heat the oil to 350°F or 175°C. Use a thermometer for the most reliable temperature.
- Carefully lower 3–4 spring rolls into the oil with the seam facing downward. Do not overcrowd the pan.
- Fry for approximately 3–4 minutes, turning occasionally, until evenly golden and crisp.
- Transfer the spring rolls to a wire rack set over a baking sheet. A rack allows excess oil to drain without trapping steam underneath.
- Allow the oil to return to 350°F or 175°C before cooking the next batch.
Oven-Baked Method
- Preheat the oven to 425°F or 220°C. Place a wire rack over a rimmed baking sheet and lightly coat it with oil.
- Arrange the rolls seam-side down with space between them. Brush or spray every surface lightly with neutral oil.
- Bake for 10 minutes, then turn the rolls carefully.
- Continue baking for another 8–12 minutes, until crisp and golden. The baked wrappers may be slightly less blistered than fried ones but should still have a satisfying crunch.
- Let them rest for 3–5 minutes before serving, as the filling will be very hot.
How to Keep Spring Rolls Crisp
A wet or warm filling is the most common cause of soggy wrappers. Spread the cooked vegetables out rather than leaving them in a deep bowl, as a thin layer cools more quickly and allows steam to escape.
Do not add extra sauce to the filling after it has cooled. Serve dipping sauces separately so they do not soften the wrapper.
If the rolls are waiting to be fried, keep them uncovered for only a short time. For a longer wait, loosely cover them with a dry kitchen towel. A wet towel can soften wheat wrappers and make them sticky.
Drain fried rolls on a wire rack rather than piling them on paper towels. Stacking traps steam and softens the crisp surface.
Filling Variations
Finely shredded napa cabbage can replace green cabbage. Bean sprouts may also be added, but they should be thoroughly dried and cooked briefly to release excess moisture.
For additional protein, include crumbled firm tofu. Press the tofu well, break it into small pieces, and brown it before adding the vegetables.
Glass noodles can provide a more substantial filling. Soak them according to the package directions, drain them extremely well, and cut them into short lengths before stirring a small amount into the cooled vegetables.
Serving Experience
Arrange the Crispy Vegetable Spring Rolls on a large platter with small bowls of sweet chili sauce and soy sauce. Serving the sauces separately keeps the rolls crisp and allows everyone to choose between sweet, tangy, and savory flavors.
They make an enjoyable starter for a shared dinner, but they can also become a light meal with a crunchy cucumber salad, steamed rice, or a clear vegetable soup.
The first bite should reveal a crisp outer shell followed by a colorful, savory filling. Let the rolls cool for several minutes before serving—the vegetables retain heat longer than the wrapper suggests.
Make-Ahead, Storage, and Reheating
The uncooked rolls can be assembled several hours ahead. Arrange them in a single layer, cover them carefully, and refrigerate until ready to cook.
They can also be frozen before frying. Place the rolls on a parchment-lined tray without allowing them to touch. Freeze until firm, then transfer them to a freezer-safe container. Cook them directly from frozen, adding a little extra time and checking that the centers are thoroughly hot.
Refrigerate cooked leftovers in an airtight container for up to 3 days. Reheat them in a 375°F or 190°C oven or air fryer until hot and crisp. Microwaving is not recommended because it makes the wrappers soft.
3. Crab and Cream Cheese Egg Rolls
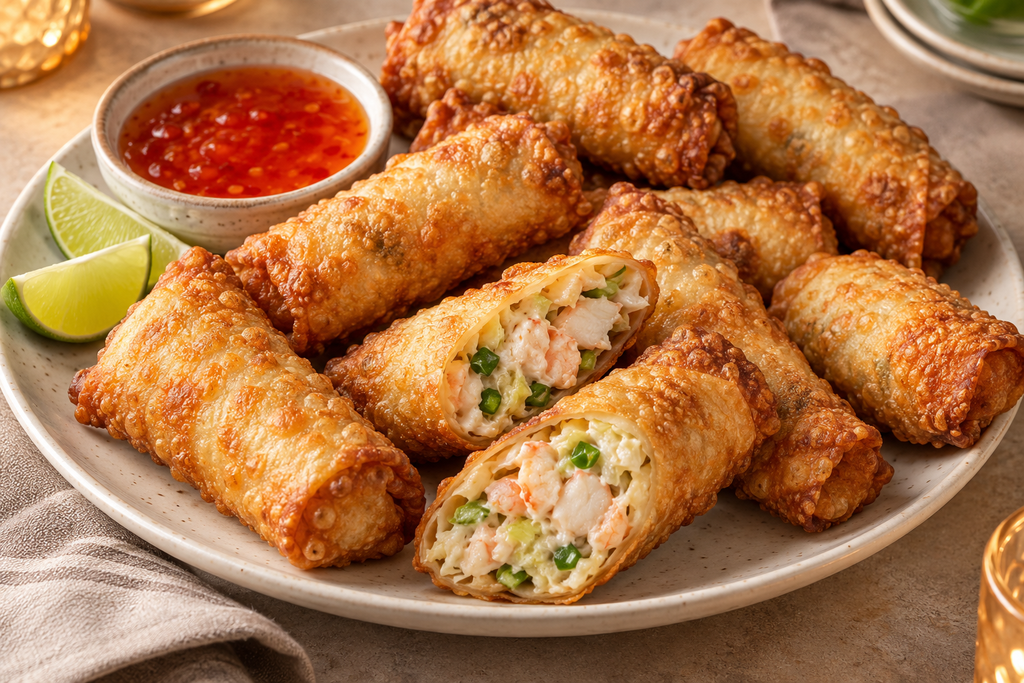
Crab and Cream Cheese Egg Rolls combine a crisp, substantial wrapper with a warm filling of crab, cream cheese, green onions, and gentle seasoning. The flavor is rich without hiding the crab, and a small amount of shredded cabbage gives the center enough structure to prevent it from becoming a pocket of melted cheese.
These egg rolls work particularly well as a party appetizer or a special snack for a shared movie night. They can be deep-fried for the most deeply golden crust or prepared in an air fryer for a lighter but still crisp alternative.
Servings: 6
Yield: 12 egg rolls
Preparation time: 25 minutes
Chilling time: 20 minutes
Cooking time: 10–15 minutes
Total time: Approximately 1 hour
Ingredients
For the filling
- 8 oz or 225 g full-fat cream cheese, softened
- 8 oz or 225 g cooked lump crab meat, thoroughly drained
- 1 cup very finely shredded green cabbage
- 3 green onions, thinly sliced
- 1 garlic clove, finely minced
- 1 teaspoon freshly grated ginger
- 1 teaspoon low-sodium soy sauce
- 1 teaspoon Worcestershire sauce
- ½ teaspoon toasted sesame oil
- ½ teaspoon freshly squeezed lime juice
- ¼ teaspoon garlic powder
- ¼ teaspoon ground white or black pepper
- ⅛ teaspoon cayenne pepper, optional
- ¼ teaspoon fine salt, if needed
For assembling
- 12 square egg roll wrappers
- 1 large egg
- 1 tablespoon water
- Neutral oil, for deep-frying or brushing
For serving
- Sweet chili sauce
- Lime wedges
- Thinly sliced green onions
Instructions
- Inspect the crab meat carefully and remove any pieces of shell or cartilage. Place it in a fine-mesh strainer or on several layers of paper towel and remove as much excess liquid as possible.
- Add the softened cream cheese to a medium bowl. Stir until smooth and easy to combine.
- Add the crab, cabbage, green onions, garlic, ginger, soy sauce, Worcestershire sauce, sesame oil, lime juice, garlic powder, pepper, and optional cayenne.
- Fold the ingredients together gently so that some recognizable pieces of crab remain. Taste a tiny portion only if the crab and all other ingredients are ready to eat, then add salt if necessary. Soy sauce and crab may already provide enough.
- Cover the filling and refrigerate it for approximately 20 minutes. Chilling firms the cream cheese and makes the mixture easier to wrap.
- In a small bowl, whisk the egg with 1 tablespoon of water. This egg wash will seal the wrappers.
- Place one egg roll wrapper on a clean work surface with a corner pointing toward you. Keep the remaining wrappers covered with a clean, barely damp towel.
- Spoon approximately 2 tablespoons of chilled filling across the lower third of the wrapper. Shape it into a short, compact log.
- Fold the bottom corner over the filling and roll it forward once. Fold the left and right corners firmly toward the center.
- Brush the exposed upper edges and final corner lightly with egg wash. Continue rolling until the egg roll is completely sealed.
- Place it seam-side down on a parchment-lined tray. Repeat with the remaining wrappers and filling.
- Keep the assembled rolls refrigerated while the oil or air fryer heats. Cold filling is less likely to become excessively runny before the wrapper turns crisp.
Deep-Frying Method
- Pour neutral oil into a heavy saucepan or deep skillet to a depth of approximately 2 inches.
- Heat the oil to 350°F or 175°C. Use a kitchen thermometer and regulate the heat between batches.
- Carefully add 3–4 egg rolls, placing them seam-side down first. Do not crowd the pan.
- Fry for approximately 3–4 minutes, turning occasionally, until the wrappers are deeply golden and crisp.
- Transfer the cooked egg rolls to a wire rack set over a baking sheet. Allow the oil to return to temperature before adding the next batch.
- Let the egg rolls rest for at least 5 minutes before serving. The cream cheese filling will be extremely hot.
Air-Fryer Method
- Preheat the air fryer to 375°F or 190°C if your model requires preheating.
- Brush or spray the egg rolls lightly but thoroughly with neutral oil.
- Arrange them seam-side down in a single layer without allowing them to touch. Work in batches if necessary.
- Air-fry for 5 minutes, then turn each egg roll carefully.
- Continue cooking for another 4–6 minutes, until the wrapper is crisp and golden. Cooking time may vary by appliance.
- Allow the rolls to rest for 5 minutes before serving.
How to Prevent the Filling From Escaping
Drain the crab thoroughly. Even a small amount of liquid can loosen the cream cheese and create steam inside the wrapper.
Keep the filling chilled. Soft, warm cream cheese begins melting before the wrapper has time to set and may push through weak seams.
Do not overfill the wrappers. Two tablespoons may appear modest, but the filling expands and softens as it heats.
Apply egg wash across the full width of the final corner rather than using only a small spot. Check the sides for openings before frying.
Maintain the oil at approximately 350°F or 175°C. Cooler oil prolongs the cooking time and gives the cheese more opportunity to escape.
Ingredient Options
Cooked fresh or pasteurized refrigerated crab provides the most natural texture. Well-drained canned crab can also be used.
Imitation crab will produce a sweeter and more uniform filling. Chop it finely and reduce the added salt before tasting.
A small amount of finely diced red bell pepper can add color, but avoid juicy vegetables or excessive quantities that could make the filling watery.
For a brighter flavor, add another teaspoon of lime zest rather than additional lime juice. Zest provides citrus aroma without loosening the mixture.
Serving Experience
Serve Crab and Cream Cheese Egg Rolls on a platter with sweet chili sauce, lime wedges, and green onions. The sweet, tangy sauce cuts through the richness of the warm filling.
For a gathering, cut several rolls diagonally so guests can see the crab and creamy center. Leave the rest whole so they stay warm longer.
These rolls work best as one element of a shared appetizer table. Pair them with cucumber salad, fresh shrimp rolls, or lightly dressed greens to balance their richness.
Make-Ahead and Storage
The filling can be prepared one day ahead and kept covered in the refrigerator.
Assembled uncooked egg rolls can be refrigerated for several hours. Arrange them in one layer and cover them so the wrappers do not dry out.
To freeze, place the uncooked rolls on a parchment-lined tray without allowing them to touch. Freeze until firm, then transfer them to a freezer-safe container. Cook from frozen, allowing additional time, and confirm that the centers are thoroughly hot.
Refrigerate cooked leftovers for up to 3 days. Reheat them in a 375°F or 190°C oven or air fryer until hot and crisp. Avoid microwaving if possible, as it softens the wrappers and can cause the cream cheese filling to overheat unevenly.
4. Lumpia Shanghai
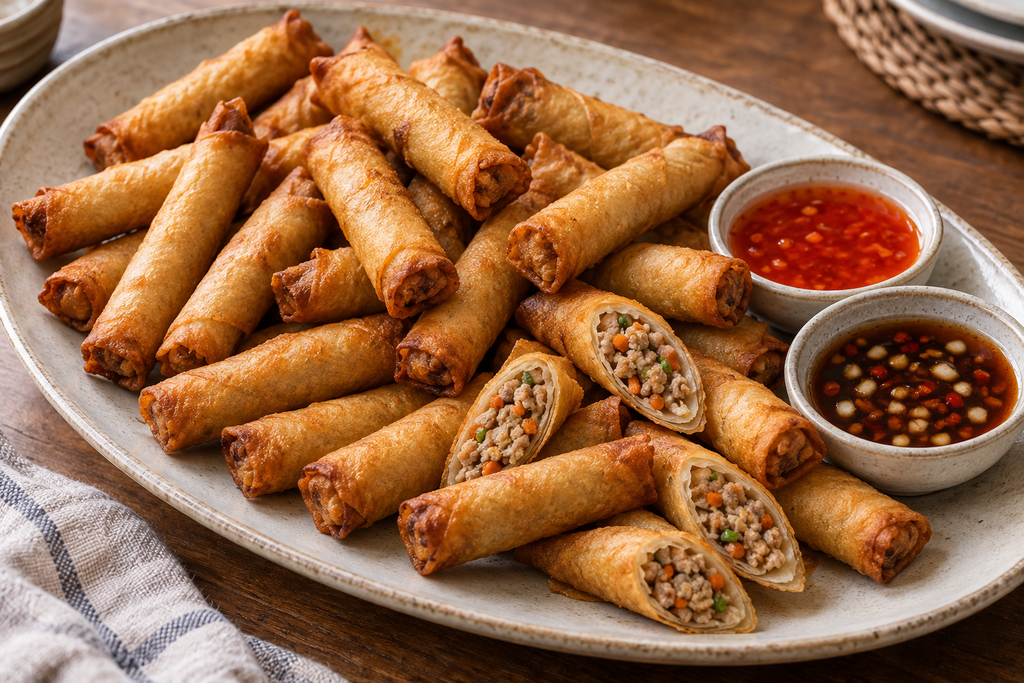
Lumpia Shanghai are slim Filipino-style spring rolls filled with a savory mixture of ground pork, carrots, onion, garlic, and green onions. Their narrow shape and very thin wrappers produce a crisp shell around a juicy, well-seasoned center.
Because the rolls are smaller than typical egg rolls, they are easy to share and disappear quickly from a party platter. They can also be assembled and frozen in advance, making them especially useful when preparing food for a larger gathering.
Servings: 6–8
Yield: Approximately 24 small rolls
Preparation time: 35 minutes
Cooking time: 15 minutes
Total time: 50 minutes
Ingredients
For the pork filling
- 1 lb or 450 g ground pork
- ½ cup finely grated carrot
- ½ cup very finely chopped yellow onion
- 3 green onions, finely sliced
- 3 garlic cloves, finely minced
- 1 large egg
- 1 tablespoon low-sodium soy sauce
- 1 teaspoon fish sauce
- 1 teaspoon toasted sesame oil
- ½ teaspoon fine salt
- ½ teaspoon freshly ground black pepper
- ½ teaspoon sugar
- 1 tablespoon cornstarch
For assembling and frying
- 12 large square lumpia wrappers or very thin spring roll wrappers
- 1 tablespoon all-purpose flour
- 2 tablespoons water
- Neutral oil, for frying
For serving
- Sweet chili sauce
- Banana ketchup, optional
- Spiced vinegar, optional
Instructions
- Place the ground pork in a large mixing bowl.
- Add the grated carrot, onion, green onions, garlic, egg, soy sauce, fish sauce, sesame oil, salt, black pepper, sugar, and cornstarch.
- Mix gently with clean hands or a sturdy spoon until the ingredients are evenly distributed. Avoid aggressively kneading the mixture, which can give the cooked filling a dense texture.
- Cook a teaspoon-sized portion of the filling in a small skillet. Taste the cooked sample and adjust the seasoning in the raw mixture if necessary.
- In a small bowl, stir the flour and water together to form a smooth sealing paste.
- Carefully separate one lumpia wrapper and place it on a clean work surface. Keep the unused wrappers covered with a clean, barely damp towel so they do not dry out.
- Spread approximately 2 tablespoons of pork filling in a thin horizontal line across the lower part of the wrapper. The filling should form a narrow cylinder approximately ½ inch thick.
- Fold the lower edge over the filling and roll it forward tightly. Fold the two sides inward if the wrapper extends well beyond the filling.
- Continue rolling until you reach the upper edge. Brush the edge with flour paste and seal the roll.
- Place the finished lumpia seam-side down on a parchment-lined tray. Repeat with the remaining wrappers and filling.
- Use kitchen scissors or a sharp knife to cut each long roll into two equal pieces. This should produce approximately 24 small Lumpia Shanghai.
- Pour neutral oil into a heavy saucepan or deep skillet to a depth of approximately 2 inches. Heat it to 350°F or 175°C.
- Carefully add a small batch of lumpia to the oil. Do not overcrowd the pan, as the temperature will fall and the wrappers may become oily.
- Fry for approximately 4–5 minutes, turning occasionally, until deeply golden and crisp.
- Check one roll from the first batch. The pork filling must be completely cooked and should reach an internal temperature of 160°F or 71°C.
- Transfer the cooked rolls to a wire rack set over a baking sheet. Allow the oil to return to 350°F or 175°C before frying the next batch.
- Let the Lumpia Shanghai rest for several minutes before serving with sweet chili sauce, banana ketchup, or spiced vinegar.
Why the Rolls Need to Be Narrow
The pork filling goes into the wrapper raw, so its thickness determines whether the center cooks before the exterior becomes too dark.
A narrow line of filling heats quickly and evenly. If the roll is as thick as an egg roll, the wrapper may brown while the pork remains undercooked.
Use approximately the same amount of filling for every wrapper. This helps the entire batch finish at a similar time.
If you are uncertain, cook one test roll before shaping the rest. Cut it open, check the texture, and adjust the thickness or seasoning as needed.
Choosing the Right Wrapper
Traditional lumpia wrappers are extremely thin and produce a delicate, shattering crust. They are often available frozen in Asian grocery stores.
Thin wheat spring roll pastry is the best alternative. Thick American egg roll wrappers can be used, but the final texture and appearance will be substantially different.
Thaw frozen wrappers in their unopened package according to the manufacturer’s directions. Opening them too early exposes the delicate sheets to air and makes them brittle.
Separate them carefully and keep the stack covered throughout assembly.
Keeping the Filling Juicy but Manageable
Finely chop or grate all vegetables. Large pieces can puncture the wrapper and make narrow rolls difficult to shape.
Carrot and onion bring moisture to the pork, while cornstarch lightly binds the juices inside the filling. Do not add wet sauces beyond the stated amount.
Ground pork with a moderate amount of fat produces a more flavorful, tender filling than extremely lean meat. If the mixture seems very soft, refrigerate it for 15–20 minutes before rolling.
Always keep the raw filling chilled when pausing between batches.
Serving Lumpia Shanghai
Lumpia Shanghai are traditionally suited to generous shared tables. Pile them on a wide platter and place two or three dipping sauces nearby so everyone can choose between sweet, spicy, and tangy flavors.
Their small size makes them particularly enjoyable at celebrations. They are easy to pick up, require no knife or fork, and remain crisp for longer when they are not stacked too deeply.
For a complete meal, serve them with steamed rice, cucumber salad, pickled vegetables, or noodle dishes. A bright vinegar-based dipping sauce cuts through the richness of the fried pork filling particularly well.
Freezing and Cooking Ahead
Lumpia Shanghai freeze especially well before frying. Arrange the assembled pieces in a single layer on a parchment-lined tray and freeze until firm.
Transfer the frozen rolls to a freezer-safe container, separating layers with parchment paper. Freeze for up to 3 months.
Do not thaw before frying. Frozen lumpia can be placed carefully into 325°F or 165°C oil and cooked slightly longer at the gentler temperature. Check that the pork filling reaches 160°F or 71°C before serving.
Store cooked leftovers in the refrigerator for up to 3 days. Reheat them in a 375°F or 190°C oven or air fryer until crisp and thoroughly hot. The microwave will warm the filling but soften the wrapper.
5. Jerk Chicken Egg Rolls With Mango-Pineapple Dip
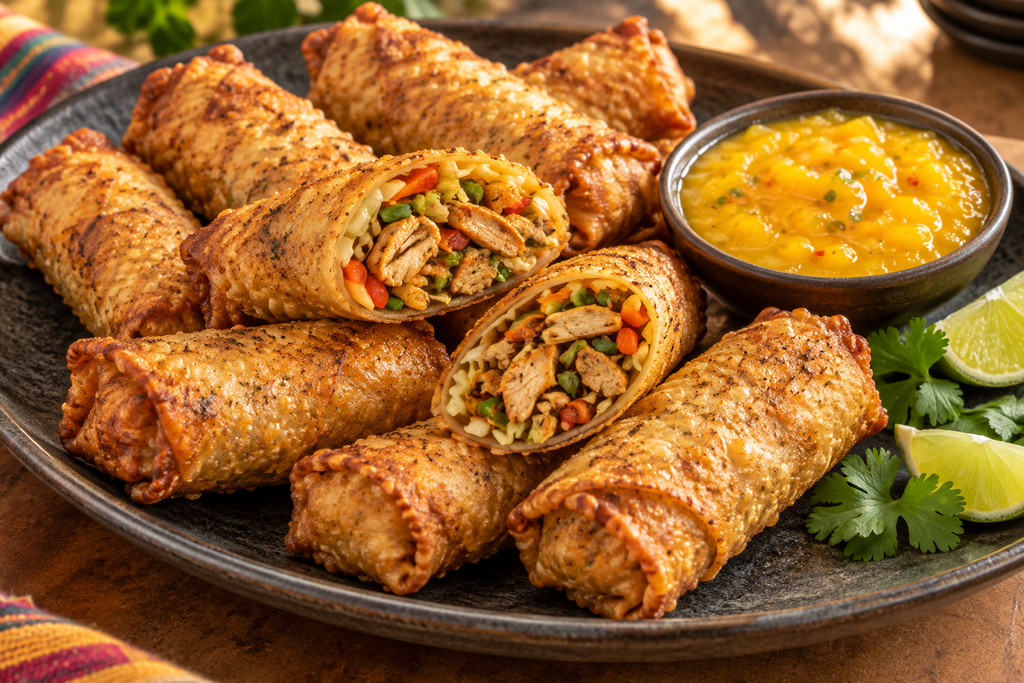
Jerk Chicken Egg Rolls combine warm Caribbean-inspired seasoning with the crisp shell of an egg roll. The filling brings together spiced chicken, cabbage, carrots, peppers, and green onions, while a cool mango-pineapple dip adds a sweet and tangy contrast.
These rolls are bold without being overwhelmingly hot. You can control the heat through the amount of cayenne or fresh chili used in the jerk seasoning, making them suitable for anything from a casual family snack to a lively party platter.
Servings: 6
Yield: 12 egg rolls
Preparation time: 30 minutes
Cooling time: 20 minutes
Cooking time: 20 minutes
Total time: Approximately 1 hour 10 minutes
Ingredients
For the jerk chicken
- 1 lb or 450 g boneless, skinless chicken thighs or chicken breasts
- 1 tablespoon neutral cooking oil
- 1 teaspoon ground allspice
- 1 teaspoon smoked paprika
- ¾ teaspoon dried thyme
- ½ teaspoon garlic powder
- ½ teaspoon onion powder
- ½ teaspoon ground ginger
- ½ teaspoon fine salt
- ¼ teaspoon ground cinnamon
- ¼ teaspoon freshly ground black pepper
- ⅛–¼ teaspoon cayenne pepper
- 1 tablespoon freshly squeezed lime juice
- 1 teaspoon brown sugar
For the vegetable filling
- 1 tablespoon neutral cooking oil
- 1½ cups finely shredded green cabbage
- 1 medium carrot, finely shredded
- ½ red bell pepper, finely sliced
- 3 green onions, thinly sliced
- 1 garlic clove, finely minced
- 1 teaspoon low-sodium soy sauce
- 1 teaspoon freshly squeezed lime juice
For the mango-pineapple dip
- 1 cup diced ripe mango
- ¾ cup pineapple chunks, thoroughly drained
- 2 tablespoons freshly squeezed lime juice
- 1 tablespoon honey
- 1 tablespoon finely chopped red onion
- 1 small piece of fresh chili or a pinch of cayenne, optional
- ¼ teaspoon fine salt
- 1 tablespoon chopped fresh cilantro, optional
For assembling and cooking
- 12 square egg roll wrappers
- 1 large egg
- 1 tablespoon water
- Neutral oil, for frying or brushing
Instructions
- Pat the chicken dry and cut it into small, evenly sized pieces.
- In a medium bowl, combine the allspice, smoked paprika, thyme, garlic powder, onion powder, ginger, salt, cinnamon, black pepper, cayenne, lime juice, brown sugar, and 1 tablespoon of oil.
- Add the chicken and toss until every piece is evenly coated.
- Heat a large skillet over medium-high heat. Add the seasoned chicken in a single layer and cook for approximately 6–8 minutes, turning occasionally.
- Check a larger piece to ensure the chicken reaches an internal temperature of 165°F or 74°C. Transfer the cooked chicken to a cutting board and let it rest for 5 minutes.
- Chop or shred the chicken into small pieces suitable for filling the wrappers.
- Return the skillet to medium-high heat and add 1 tablespoon of oil. Add the cabbage, carrot, and bell pepper.
- Stir-fry the vegetables for approximately 3–4 minutes, until slightly softened but not completely limp.
- Add the green onions and garlic. Cook for another 30 seconds.
- Stir in the soy sauce and lime juice. Continue cooking until no visible liquid remains in the pan.
- Add the chopped chicken and toss until the filling is evenly combined. Transfer it to a wide plate or tray and allow it to cool completely.
Prepare the Mango-Pineapple Dip
- Place the mango, pineapple, lime juice, honey, red onion, optional chili, and salt in a blender or small food processor.
- Blend until mostly smooth. Leave a little texture if preferred.
- Stir in the optional cilantro after blending.
- Taste and adjust with additional lime, honey, or chili. Refrigerate the sauce while assembling the egg rolls.
Assemble the Egg Rolls
- Whisk the egg with 1 tablespoon of water in a small bowl.
- Place one egg roll wrapper on a clean work surface with a corner facing you. Keep the remaining wrappers covered with a barely damp towel.
- Add approximately 3 tablespoons of the cooled filling across the lower third of the wrapper. Shape it into a compact log.
- Fold the lower corner over the filling and roll forward once. Fold the left and right sides toward the center.
- Brush the upper edges and final corner with egg wash. Continue rolling until completely sealed.
- Place the egg roll seam-side down on a parchment-lined tray. Repeat with the remaining filling and wrappers.
Deep-Frying Method
- Pour neutral oil into a heavy saucepan or deep skillet to a depth of approximately 2 inches.
- Heat the oil to 350°F or 175°C.
- Fry 3–4 egg rolls at a time for approximately 3–4 minutes, turning occasionally, until deeply golden and crisp.
- Transfer the egg rolls to a wire rack set over a baking sheet. Allow the oil to return to temperature between batches.
- Rest the rolls for approximately 5 minutes before serving with the chilled mango-pineapple dip.
Air-Fryer Method
- Preheat the air fryer to 375°F or 190°C if required by your model.
- Brush or spray the egg rolls lightly on all sides with neutral oil.
- Arrange them seam-side down in a single layer.
- Air-fry for 5 minutes, turn them over, and continue cooking for another 5–7 minutes until crisp and golden.
- Let the rolls rest briefly before serving.
Balancing the Jerk Seasoning
Allspice and thyme create the foundation of the seasoning, while cinnamon, ginger, garlic, and cayenne bring warmth and complexity. Cayenne controls most of the heat, so begin with the smaller amount if cooking for a mixed group.
Traditional jerk seasoning can be considerably hotter, often using Scotch bonnet peppers. Fresh Scotch bonnet is intensely spicy and should be handled carefully. For this approachable egg roll version, cayenne or a small amount of milder chili gives more predictable control.
The mango-pineapple dip should taste bright rather than syrupy. Add lime juice if the fruit is especially sweet, or a little honey if it is underripe and tart.
Keeping the Egg Rolls Crisp
Allow both the chicken and vegetable mixture to cool completely. Warm filling creates steam inside the wrapper and softens it before cooking.
Do not add the mango-pineapple dip to the filling. It should remain a separate sauce because its moisture would make the wrappers difficult to seal.
Avoid stacking hot egg rolls. Arrange them on a wire rack in a single layer until serving.
If preparing several batches, keep the cooked rolls warm in a 200°F or 95°C oven while the remaining egg rolls cook.
Serving Experience
Jerk Chicken Egg Rolls are made for a lively shared table. Arrange them on a large platter with the mango-pineapple dip in the center and scatter a few green onion slices or cilantro leaves around the edge.
Cut several rolls diagonally so the colorful cabbage, carrot, pepper, and spiced chicken filling can be seen. Leave the others whole so they retain heat and crispness.
The first bite offers a crisp shell and smoky, warmly spiced chicken. Dipping the next bite into the cool fruit sauce changes the flavor entirely, balancing the seasoning with sweetness and acidity.
Make-Ahead and Storage
Prepare the chicken and vegetable filling up to one day in advance. Refrigerate it in an airtight container and assemble the egg rolls shortly before cooking.
Uncooked assembled rolls can be frozen in a single layer until firm, then transferred to a freezer-safe container. Cook directly from frozen, adding several minutes and ensuring the centers are thoroughly heated.
Refrigerate cooked leftovers for up to 3 days. Reheat them in a 375°F or 190°C oven or air fryer. Store the mango-pineapple dip separately and serve it cold or at room temperature.
6. Apple Pie Egg Rolls
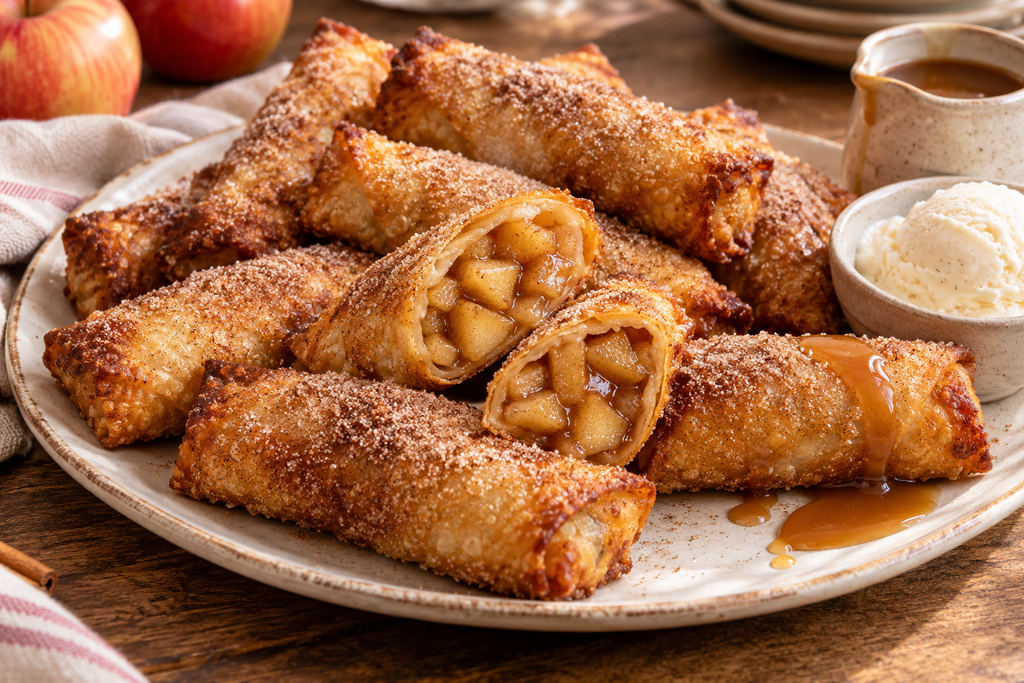
Apple Pie Egg Rolls wrap the familiar flavors of warm apples, cinnamon, brown sugar, and butter in a crisp handheld shell. They are easier to portion than a full pie and bring a playful dessert finish to a platter of savory spring rolls and egg rolls.
The apple filling is cooked and cooled before assembly, allowing it to thicken and helping the wrappers stay secure. The finished rolls can be baked or prepared in an air fryer, then brushed with butter and coated lightly in cinnamon sugar.
Servings: 6
Yield: 12 egg rolls
Preparation time: 25 minutes
Cooling time: 25 minutes
Cooking time: 10–20 minutes
Total time: Approximately 1 hour 10 minutes
Ingredients
For the apple filling
- 4 medium apples, approximately 1½ lb or 680 g before peeling
- 2 tablespoons unsalted butter
- ⅓ cup packed light brown sugar
- 1 teaspoon ground cinnamon
- ⅛ teaspoon ground nutmeg
- ⅛ teaspoon fine salt
- 1 tablespoon freshly squeezed lemon juice
- 1 teaspoon vanilla extract
- 2 teaspoons cornstarch
- 1 tablespoon cool water
For assembling
- 12 square egg roll wrappers
- 1 large egg
- 1 tablespoon water
- Neutral cooking spray or melted butter, for coating
For the cinnamon-sugar finish
- ¼ cup granulated sugar
- 1 teaspoon ground cinnamon
- 2 tablespoons melted unsalted butter
For serving
- Caramel sauce, optional
- Vanilla ice cream, optional
- Powdered sugar, optional
Instructions
- Peel and core the apples. Cut them into small cubes approximately ¼ inch in size. Uniform pieces cook more evenly and are easier to contain inside the wrappers.
- Melt 2 tablespoons of butter in a large skillet over medium heat.
- Add the diced apples, brown sugar, cinnamon, nutmeg, salt, and lemon juice.
- Cook for approximately 6–8 minutes, stirring frequently, until the apples become tender but still retain their shape.
- In a small cup, stir the cornstarch and cool water together until smooth.
- Pour the cornstarch mixture into the apples while stirring. Cook for another 1–2 minutes, until the liquid becomes thick and glossy.
- Remove the skillet from the heat and stir in the vanilla extract.
- Transfer the apple filling to a wide plate or shallow tray. Spread it out and allow it to cool completely. The filling should be thick, not watery, before it touches the wrappers.
- In a small bowl, whisk the egg with 1 tablespoon of water to make an egg wash.
- Place one egg roll wrapper on a clean work surface with a corner pointing toward you. Keep the remaining wrappers covered with a barely damp towel.
- Spoon approximately 2½ tablespoons of cooled apple filling across the lower third of the wrapper. Avoid including excess syrup.
- Fold the bottom corner firmly over the apples and roll forward once.
- Fold the left and right corners toward the center. Brush the upper edges and final corner lightly with egg wash.
- Continue rolling until the Apple Pie Egg Roll is completely sealed. Place it seam-side down on a parchment-lined tray.
- Repeat with the remaining wrappers and apple filling.
Oven-Baked Method
- Preheat the oven to 425°F or 220°C. Place a wire rack over a rimmed baking sheet and lightly coat it with cooking spray.
- Arrange the egg rolls seam-side down with space between them.
- Brush or spray every surface lightly with oil or melted butter.
- Bake for 10 minutes, then turn each roll carefully.
- Continue baking for another 8–10 minutes, until crisp and golden.
- Remove the rolls from the oven and brush them lightly with melted butter while still hot.
Air-Fryer Method
- Preheat the air fryer to 375°F or 190°C if your appliance requires it.
- Brush or spray the assembled rolls lightly with oil on all sides.
- Arrange them seam-side down in a single layer without allowing them to touch.
- Air-fry for 5 minutes, then turn the rolls.
- Continue cooking for another 4–6 minutes, until crisp and evenly golden.
- Brush the hot rolls with melted butter.
Add the Cinnamon-Sugar Coating
- Combine the granulated sugar and cinnamon in a shallow dish.
- Roll the warm, buttered egg rolls gently in the cinnamon sugar or sprinkle it over all sides.
- Allow the rolls to rest for approximately 5 minutes before serving. The filling will be significantly hotter than the wrapper.
- Serve warm with optional caramel sauce, vanilla ice cream, or a light dusting of powdered sugar.
Choosing the Apples
A combination of sweet and tart apples creates a more balanced filling. Granny Smith provides acidity and retains its shape well, while varieties such as Honeycrisp, Pink Lady, or Braeburn add sweetness and aroma.
Avoid apples that soften into sauce very quickly unless you intentionally want a smoother filling. The small pieces should become tender but remain recognizable after cooking.
Taste the filling before adding the cornstarch. If the apples are especially sweet, add a little more lemon juice. If they are very tart, another tablespoon of brown sugar may be appropriate.
Preventing Leaks
Cool the filling completely. Warm apple mixture produces steam, softens the wrappers, and makes the egg wash less effective.
The cornstarch should thicken the released apple juices until very little free liquid remains in the skillet.
Do not overfill the rolls. Extra apples place pressure on the seams as they heat and expand.
Seal the side folds as well as the final corner. If apple syrup touches an edge before sealing, wipe it away gently and apply fresh egg wash.
Position the rolls seam-side down during the first part of cooking so the wrapper sets in place.
A Dessert Worth Sharing
Apple Pie Egg Rolls are especially enjoyable when served on a large board with a small pitcher of warm caramel sauce. Guests can pick up a roll, dip one end, and decide whether to add ice cream.
The contrast makes the dessert memorable: a crisp cinnamon-sugar shell gives way to soft, warmly spiced apples. The format feels playful and casual even though the flavors are familiar.
These rolls are best served warm rather than piping hot. Waiting several minutes protects everyone from the very hot fruit filling and allows the thickened juices to settle.
Make-Ahead, Storage, and Reheating
The apple filling can be prepared up to 2 days ahead and stored in an airtight container in the refrigerator.
Assemble the rolls several hours before cooking and refrigerate them in a single layer. Keep them covered so the wrappers do not dry out.
Cooked Apple Pie Egg Rolls can be refrigerated for up to 3 days. Reheat them in a 350°F or 175°C oven or air fryer until warm and crisp.
The microwave is not recommended because it softens the wrappers and can create extremely hot areas within the filling.
For the best texture, apply a fresh, light coating of cinnamon sugar after reheating.
A Note About Our AI-Assisted Images
The food images in this article were created with the assistance of artificial intelligence. They are not photographs of one particular batch of the recipes, and we believe it is important to be transparent about that.
However, these images were not produced as generic or random illustrations. Each one was carefully developed around the corresponding recipe’s actual ingredients, wrapper type, cooking method, proportions, textures, and realistically expected finished appearance. Particular attention was given to meaningful culinary differences, including translucent rice paper, thin spring roll pastry, thicker egg roll wrappers, the narrow shape of Lumpia Shanghai, and the appearance of each individual filling.
Our aim was to create the most lifelike, useful, and recipe-specific visual representation available—not to promise that every homemade roll will look identical. Differences in ingredients, wrapper brands, equipment, cooking temperatures, and individual rolling technique will naturally affect the final appearance.
These images should therefore be viewed as carefully researched visual guidance and serving inspiration. Your own results may vary in shape, color, and presentation, while still being completely successful and delicious.