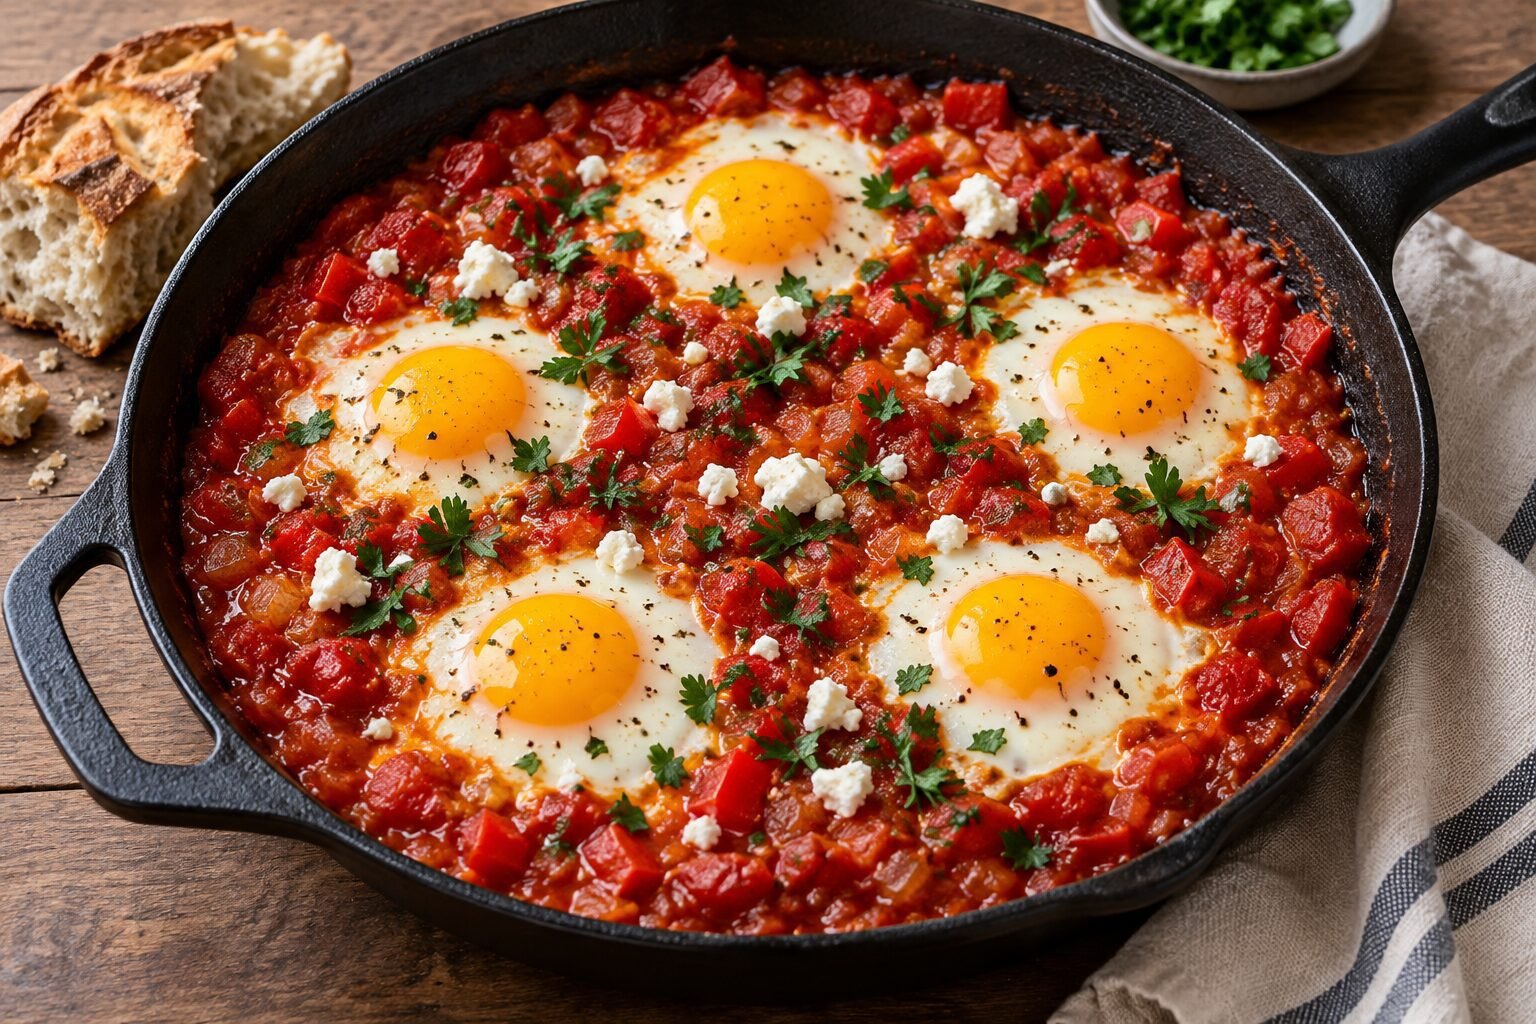
Opening the refrigerator and discovering that you have far more eggs than your usual breakfast can handle is not necessarily a problem. In fact, it can be the beginning of several comforting meals, make-ahead breakfasts, shareable brunch dishes, and homemade desserts. Eggs are remarkably versatile: they can hold a casserole together, give a cake its tender structure, turn cream into a silky custard, or become the centerpiece of a colorful skillet meal.
This collection of recipes that use a lot of eggs is designed for those moments when you want to use more than one or two eggs at a time. Most of the savory dishes call for at least six whole eggs, while several larger casseroles use ten or even twelve. The desserts offer another useful possibility, especially when you have spare yolks waiting in the refrigerator.
The goal is not simply to use the eggs before they are forgotten. Each recipe should give you a meal that feels worth making in its own right.
What Counts as a Recipe That Uses a Lot of Eggs?
There is no official number, but for this collection, a dish generally qualifies if it uses at least five or six whole eggs. Recipes that use several egg yolks also belong here because separating eggs can quickly leave you with ingredients that need a purpose.
The number should always be considered alongside the serving size. A breakfast sandwich topped with one fried egg may be delicious, but making four sandwiches does not necessarily help when you are trying to use a large supply efficiently. A vegetable frittata made with eight eggs or an overnight strata made with twelve is far more useful—and usually feeds several people at once.
That is why this selection focuses on substantial dishes rather than adding an egg to an otherwise unrelated meal.
From Quiet Breakfasts to Busy Family Tables
Some of these recipes are ideal for an unhurried weekend breakfast. A skillet of shakshuka, with eggs gently cooked in a seasoned tomato and pepper sauce, invites everyone to gather around the table and tear pieces from a loaf of crusty bread. It is colorful, warming, and satisfying without feeling overly heavy.
A loaded vegetable frittata or spinach and feta crustless quiche is better suited to meal preparation. Both can be sliced into portions, stored, and enjoyed later. They are also forgiving recipes: vegetables, herbs, and small pieces of cheese left in the refrigerator can often find a useful place in the filling.
When more people need to be fed, casseroles become especially practical. Sausage and apple breakfast casserole brings together savory, sweet, and gently spiced flavors, while chicken chiles rellenos strata offers a heartier combination of bread, chicken, green chiles, eggs, and melted cheese. Much of the preparation can be completed the evening before, making these dishes particularly helpful for holidays, overnight guests, or relaxed Sunday brunches.
Eggs Are Not Only for Breakfast
One of the best things about these recipes that use a lot of eggs is that they are not limited to the morning. A savory bread pudding can become an easy lunch or casual dinner when served with a crisp salad. Hash brown quiche cups work as portable snacks, lunch-box additions, or small bites for a brunch table.
The spiral vegetable omelet roll creates something a little more memorable. Instead of cooking individual omelets one by one, a large egg layer is baked, covered with a colorful filling, and carefully rolled. When sliced, the spiral becomes visible, giving the dish an impressive appearance without requiring complicated decoration.
A frittata is equally comfortable at breakfast, lunch, or dinner. Serve it warm with roasted potatoes, or let it cool slightly and pair it with salad and bread. These adaptable dishes are useful when you want to cook once and create more than one meal.
Save Room for Something Sweet
Extra eggs also provide a good reason to bake. Lemon pound cake uses several whole eggs to create a rich yet tender crumb, while fresh lemon zest keeps the flavor bright. It is the kind of cake that feels appropriate beside afternoon coffee but can also be dressed up with berries for dessert.
Pumpkin crème brûlée is especially useful when you have egg yolks to use. The yolks give the custard its smooth texture, while pumpkin and warm spices make it feel cozy and seasonal. Baked vanilla custard offers a simpler alternative and uses familiar ingredients to produce a softly set dessert that can be prepared in individual ramekins or one larger baking dish.
Choosing the Right Recipe
Before deciding what to make, count the eggs available and consider how soon you want to serve the food. Shakshuka is best brought directly from the stove to the table. Frittatas, quiches, and casseroles are more accommodating when food needs to be prepared ahead. Cakes and custards require cooling time, but they can often be made a day before they are needed.
You should also check whether a recipe uses whole eggs or only yolks. When a dessert leaves you with unused whites, save them for another suitable recipe rather than allowing the original problem to repeat itself.
These 11 recipes that use a lot of eggs offer more than a way to clear space in the refrigerator. They turn a simple, familiar ingredient into colorful breakfasts, practical family meals, generous brunch dishes, and desserts worth anticipating. Whether you have six eggs or a nearly full carton waiting to be used, there is an inviting place to begin.
1. Classic Shakshuka – 6 Eggs
1. Classic Shakshuka – 6 Eggs
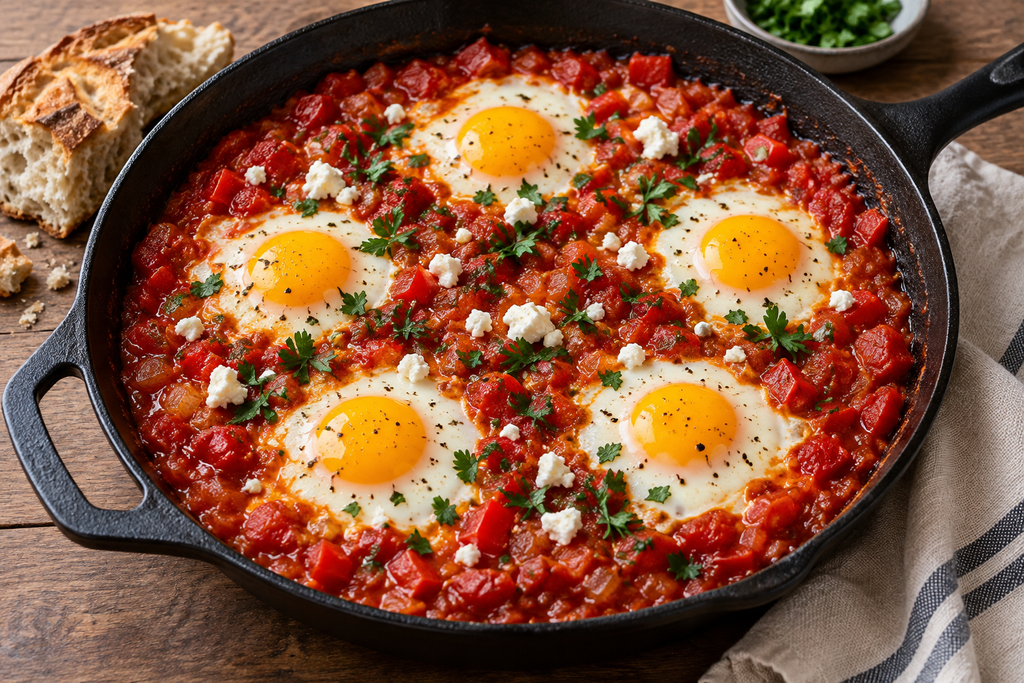
Classic Shakshuka is the kind of meal that turns a handful of familiar ingredients into something warm, colorful, and wonderfully communal. Six eggs are gently cooked in a thick tomato and bell pepper sauce, allowing the whites to set while the yolks remain soft enough for dipping. Place the skillet in the middle of the table with some crusty bread, and breakfast immediately feels like an occasion.
Although shakshuka is often served in the morning, it also makes an easy lunch or relaxed weeknight dinner. The sauce can be prepared ahead, and the eggs only need to be added shortly before serving.
Servings: 3–4
Preparation time: 15 minutes
Cooking time: 30 minutes
Total time: 45 minutes
Ingredients
- 2 tablespoons olive oil
- 1 medium yellow onion, finely chopped
- 1 large red bell pepper, deseeded and diced
- 3 garlic cloves, minced
- 1 teaspoon ground cumin
- 1 teaspoon sweet paprika
- 1/4 teaspoon smoked paprika
- 1/4 teaspoon red pepper flakes, or to taste
- 1 can (28 ounces/800 g) crushed or diced tomatoes
- 1 tablespoon tomato paste
- 1/2 teaspoon fine salt, plus more if needed
- 1/4 teaspoon freshly ground black pepper
- 6 large eggs
- 1/3 cup (50 g) crumbled feta, optional
- 2 tablespoons chopped fresh parsley or cilantro
- Crusty bread or warm flatbread, for serving
Instructions
- Heat the olive oil in a large, deep skillet over medium heat. A 10- to 12-inch skillet provides enough room for all six eggs without crowding them.
- Add the chopped onion and bell pepper. Cook for 7–8 minutes, stirring occasionally, until the onion becomes translucent and the pepper begins to soften.
- Add the garlic, cumin, sweet paprika, smoked paprika, and red pepper flakes. Cook for approximately 30 seconds, stirring continuously. The spices should become fragrant, but the garlic should not brown.
- Pour in the tomatoes and stir in the tomato paste, salt, and black pepper. Bring the mixture to a gentle simmer.
- Reduce the heat to medium-low and cook the sauce uncovered for 12–15 minutes. Stir occasionally, particularly around the bottom and edges of the skillet. The finished sauce should be thick enough to hold shallow indentations rather than immediately flowing back into them.
- Taste the sauce and adjust the salt, pepper, or red pepper flakes if necessary. Remember that feta will add extra saltiness if you plan to use it.
- Use the back of a spoon to create six separate wells in the tomato mixture. Crack each egg into a small bowl before sliding it into one of the wells. This makes it easier to keep the yolks intact and prevents shell fragments from falling into the sauce.
- Cover the skillet and cook over low heat for 5–8 minutes. Begin checking the eggs after 5 minutes. The whites should be opaque and set, while the yolks can remain soft. Cook for another minute or two if you prefer firmer yolks.
- Remove the skillet from the heat. Sprinkle the Classic Shakshuka with crumbled feta and chopped parsley or cilantro.
- Serve immediately with crusty bread or warm flatbread for scooping up the eggs and tomato sauce.
How to Get the Texture Right
The sauce is the foundation of a successful shakshuka. If it is too watery before the eggs are added, liquid may collect around the whites and prevent them from setting evenly. Give the tomatoes enough time to reduce until the sauce looks rich and spoonable.
After adding the eggs, keep the heat low. Aggressive bubbling can cause the sauce to spit and may cook the underside of the eggs long before the tops are ready. Covering the skillet traps gentle heat and helps the whites set from above.
Egg size and starting temperature can affect cooking time. Cold eggs taken directly from the refrigerator may need slightly longer than eggs that have rested at room temperature for a few minutes. Watch their appearance rather than relying only on the clock.
Practical Variations
Classic Shakshuka is easy to adapt without losing its character. Add a finely chopped jalapeño with the bell pepper for more heat, or stir a handful of baby spinach into the reduced sauce before adding the eggs. Chickpeas can make the meal more substantial, while a small amount of feta adds creamy, salty contrast.
Avoid adding too many vegetables with a high water content unless they are cooked separately first. Mushrooms, zucchini, and fresh tomatoes can release enough moisture to thin the sauce.
Preparing and Storing the Sauce
The tomato and pepper base can be prepared up to 2 days ahead and refrigerated in a covered container. Reheat it gently in the skillet until it begins to simmer, then create the wells and add the eggs.
Shakshuka is at its best immediately after the eggs are cooked. Leftovers can be refrigerated, but reheating will usually firm the yolks. If you expect to save part of the meal, prepare the full quantity of sauce and cook only as many eggs as you plan to serve. The remaining sauce can then be reheated with freshly cracked eggs the following day.
There is a small pleasure in breaking the first golden yolk and watching it mingle with the warmly spiced tomato sauce. That simple, shareable moment is what makes Classic Shakshuka feel more memorable than an ordinary plate of eggs.
2. Loaded Vegetable Frittata – 8 Eggs
2. Loaded Vegetable Frittata – 8 Eggs
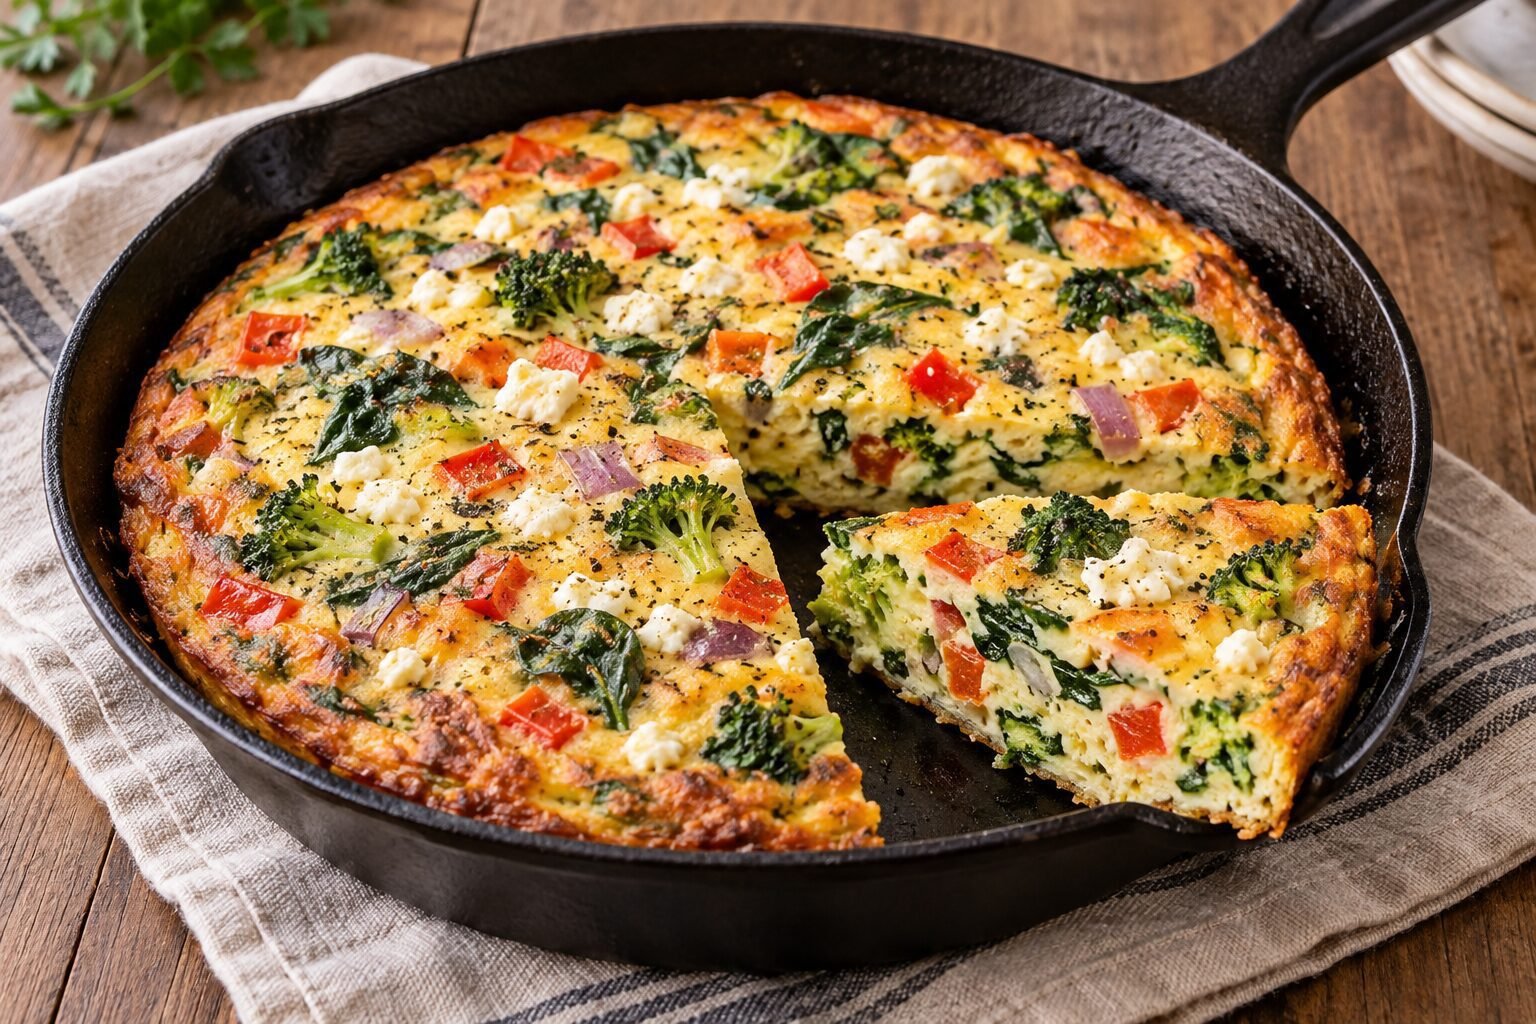
A Loaded Vegetable Frittata is one of the most practical ways to turn eight eggs and a collection of colorful vegetables into a complete meal. It is substantial enough for dinner, attractive enough for a weekend brunch, and easy to divide into portions for the days ahead. The combination of broccoli, spinach, red pepper, red onion, and feta creates plenty of flavor without hiding the soft, gently seasoned egg base.
Unlike a quiche, this frittata does not need a pastry crust. It begins on the stovetop and finishes in the oven, all in the same skillet. That means less preparation, fewer dishes, and a beautifully golden result that can be cut into clean wedges.
Servings: 6
Preparation time: 15 minutes
Cooking time: 30 minutes
Total time: 45 minutes
Ingredients
- 8 large eggs
- 1/3 cup (80 ml) milk
- 1/2 teaspoon fine salt
- 1/4 teaspoon freshly ground black pepper
- 1/2 teaspoon dried oregano
- 2 tablespoons olive oil
- 1 small red onion, diced
- 1 red bell pepper, deseeded and diced
- 1 1/2 cups (140 g) small broccoli florets
- 2 packed cups (60 g) baby spinach
- 2 garlic cloves, minced
- 1/2 cup (75 g) crumbled feta, divided
- 1 tablespoon chopped fresh parsley, optional
Instructions
- Preheat the oven to 375°F (190°C). Position a rack in the center of the oven.
- Crack the eggs into a large bowl. Add the milk, salt, black pepper, and oregano. Whisk until the yolks and whites are completely combined, but avoid beating in too much air. Set the mixture aside.
- Heat the olive oil in a 10-inch oven-safe skillet over medium heat. Add the red onion, bell pepper, and broccoli.
- Cook the vegetables for 6–8 minutes, stirring occasionally. The onion should soften, the pepper should lose its raw crunch, and the broccoli should become bright green and just tender. If the broccoli begins to brown before it softens, add one tablespoon of water and cover the skillet for approximately 1 minute.
- Add the baby spinach and garlic. Cook for another 1–2 minutes, stirring until the spinach has wilted and any liquid it releases has evaporated.
- Spread the vegetables evenly across the skillet. Reduce the heat to medium-low.
- Pour the egg mixture over the vegetables. Gently move a few vegetables with a spatula so the eggs can flow between them, but do not continue stirring as if making scrambled eggs.
- Sprinkle approximately two-thirds of the feta over the surface. Cook undisturbed on the stovetop for 3–4 minutes, or until the edges begin to set while the center remains liquid.
- Transfer the skillet to the preheated oven. Bake for 12–16 minutes, until the center is just set and no longer looks wet. The frittata should be lightly puffed, but it does not need to become deeply browned.
- Sprinkle the remaining feta over the top during the final 3 minutes of baking.
- Carefully remove the skillet from the oven. Remember that the handle will be extremely hot. Let the Loaded Vegetable Frittata rest for 5–10 minutes before slicing.
- Garnish with chopped parsley, if desired, then cut into six wedges and serve warm or at room temperature.
How to Keep a Frittata Tender
The difference between a tender frittata and a rubbery one usually comes down to cooking time. Remove the skillet from the oven as soon as the center has set. The retained heat from the pan will continue cooking the eggs while the frittata rests.
The small amount of milk softens the egg mixture without making it watery. Adding substantially more liquid may prevent the center from setting properly, especially when the recipe already contains several vegetables.
Cooking the vegetables before adding the eggs is equally important. Raw spinach, peppers, onions, and broccoli release moisture as they cook. If they go directly into the egg mixture, that liquid can collect inside the frittata and create a watery layer.
Useful Substitutions
Loaded Vegetable Frittata is flexible enough to accommodate what you have available. Cauliflower can replace broccoli, while chopped kale can be used instead of spinach. Goat cheese or shredded cheddar may replace the feta.
Mushrooms and zucchini also work, but they should be cooked until most of their moisture has evaporated. Cherry tomatoes can be added in moderation; cut them in half and place them cut-side up so they do not release too much juice into the eggs.
For a mildly spicy version, add a pinch of red pepper flakes or a finely chopped jalapeño with the bell pepper. Fresh herbs such as chives, basil, or dill can be stirred into the egg mixture shortly before cooking.
Serving Ideas
Serve a warm wedge with toasted sourdough for breakfast or brunch. For lunch, add a crisp green salad dressed with lemon and olive oil. Roasted potatoes transform it into a more substantial evening meal.
One of the most enjoyable ways to serve this frittata is as part of a relaxed brunch table. Place the skillet in the center, add bread, fruit, and a simple salad, and let everyone help themselves. The colorful vegetables make the dish inviting before the first slice is even taken.
Storage and Reheating
Allow leftover frittata to cool before placing it in an airtight container. Refrigerate it for up to 3 days. Individual wedges can be enjoyed cold, allowed to return to room temperature, or gently reheated.
For the best texture, warm a slice in a covered skillet over low heat or place it in a moderate oven until heated through. A microwave is quicker, but use short intervals to avoid making the eggs tough.
The Loaded Vegetable
3. Spinach and Feta Crustless Quiche – 6 Eggs
3. Spinach and Feta Crustless Quiche – 6 Eggs
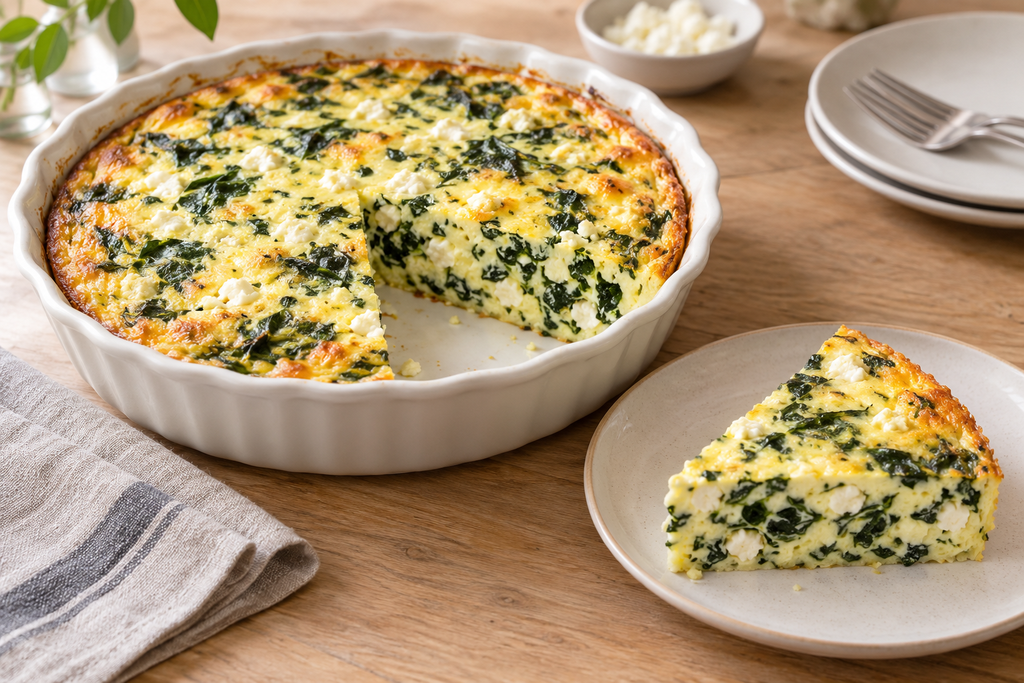
Spinach and Feta Crustless Quiche gives you everything people enjoy about a savory quiche—the softly set custard, generous filling, and satisfying slices—without having to prepare or pre-bake pastry. Six eggs form the base, while whole milk and a small amount of cream create a smoother, more delicate texture than an everyday omelet.
The salty feta works naturally with the spinach, and a little onion and garlic provide flavor without overwhelming the egg custard. Serve it warm for brunch, allow it to cool for a picnic, or prepare it ahead for several easy breakfasts.
Servings: 6
Preparation time: 15 minutes
Cooking time: 35 minutes
Resting time: 10 minutes
Total time: 1 hour
Ingredients
- 1 tablespoon olive oil
- 1 small yellow onion, finely chopped
- 2 garlic cloves, minced
- 5 ounces (140 g) fresh baby spinach
- 6 large eggs
- 3/4 cup (180 ml) whole milk
- 1/4 cup (60 ml) heavy cream
- 1/2 teaspoon fine salt
- 1/4 teaspoon freshly ground black pepper
- 1/4 teaspoon ground nutmeg
- 1 teaspoon dried dill or 1 tablespoon chopped fresh dill
- 1 cup (150 g) crumbled feta, divided
- Butter or nonstick cooking spray, for the dish
Instructions
- Preheat the oven to 375°F (190°C). Lightly butter or spray a 9-inch deep pie dish.
- Heat the olive oil in a large skillet over medium heat. Add the chopped onion and cook for 4–5 minutes, stirring occasionally, until softened but not deeply browned.
- Add the garlic and cook for approximately 30 seconds, just until fragrant.
- Add the baby spinach in two or three batches. Stir each batch until it wilts before adding the next. Continue cooking until the spinach has completely collapsed and the moisture released into the skillet has evaporated.
- Transfer the spinach mixture to a cutting board and allow it to cool for a few minutes. Chop it roughly so long leaves do not pull out of the quiche when it is sliced. If it still feels wet, press it gently between several sheets of paper towel.
- In a large mixing bowl, whisk the eggs until the whites and yolks are combined. Add the whole milk, cream, salt, black pepper, nutmeg, and dill. Whisk gently until smooth.
- Scatter the spinach and onion mixture evenly across the bottom of the prepared pie dish. Add approximately three-quarters of the crumbled feta.
- Slowly pour the egg custard over the spinach and feta. Use a fork to redistribute any filling that gathers in one area.
- Sprinkle the remaining feta across the top.
- Place the pie dish on a rimmed baking sheet. This makes it easier to move and protects the oven if the custard rises near the edge.
- Bake for 30–35 minutes. The edges should be lightly golden and fully set, while the center may have a slight wobble when the dish is gently moved. It should not appear liquid.
- Remove the Spinach and Feta Crustless Quiche from the oven and let it rest for at least 10 minutes. The custard will continue setting as it cools, making it easier to cut into clean wedges.
- Slice into six portions and serve warm or at room temperature.
Why Removing Moisture Matters
Spinach contains far more water than its appearance suggests. If it is wilted briefly and immediately mixed into the eggs, that moisture may be released during baking and collect inside the quiche.
Cook the spinach until the skillet looks dry, then press away any remaining liquid after it cools. This additional step takes only a few minutes but produces a much cleaner slice and prevents a watery bottom.
Frozen spinach can also be used. Thaw approximately 8 ounces (225 g), then squeeze it very firmly in a clean kitchen towel until no more liquid comes out. The finished quantity should feel compact and relatively dry before it is added to the dish.
How to Recognize a Properly Baked Quiche
Avoid waiting until the center becomes completely firm in the oven. By that point, the outer portion may already be overcooked. A gently trembling center is acceptable because the residual heat will continue to set the custard during the resting period.
Overbaking can cause the eggs to release water and develop a rubbery texture. Begin checking after 28–30 minutes, particularly if your pie dish is made from dark metal rather than ceramic or glass.
The quiche will puff slightly in the oven and settle as it cools. This is normal and does not mean that anything has gone wrong.
Flavor Variations
For a brighter finish, add one teaspoon of finely grated lemon zest to the custard. Chopped sun-dried tomatoes can provide a sweet, tangy contrast, but drain away their oil before using them.
Feta gives the dish its characteristic salty flavor, although goat cheese can be substituted for a creamier result. A small amount of grated Parmesan may be scattered over the surface if you prefer a more deeply golden top.
Fresh dill suits the spinach and feta particularly well, but parsley, chives, or oregano can also be used. Keep additional ingredients restrained so the balance between the custard, spinach, and cheese remains clear.
Serving and Storage
Pair Spinach and Feta Crustless Quiche with a tomato and cucumber salad for lunch, or serve it with toasted bread and fresh fruit at brunch. It can also be cut into smaller pieces and included on a buffet table.
Cool leftovers before placing them in a covered container. Refrigerate for up to 3 days. The slices can be eaten cold or reheated gently in a moderate oven. If using a microwave, heat them in short intervals so the egg custard remains tender.
This is also a convenient make-ahead dish. Bake it the previous evening, refrigerate it once cool, and allow it to sit at room temperature briefly before serving or reheating. Having a neatly sliced quiche ready in the refrigerator makes an ordinary morning feel considerably more organized.
4. Sausage and Apple Breakfast Casserole – 12 Eggs
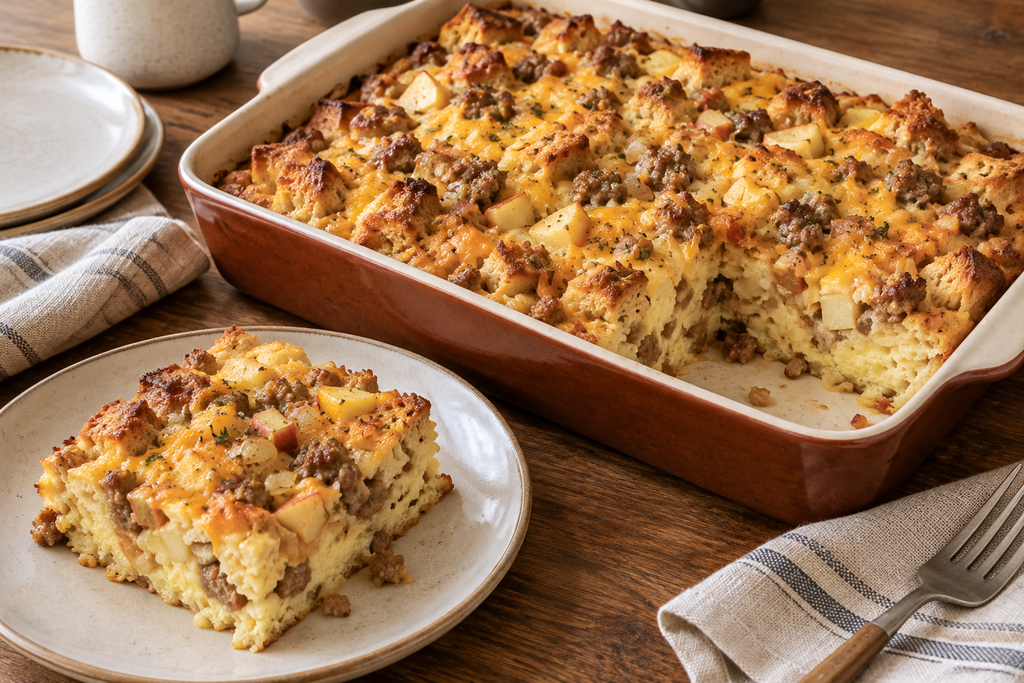
4. Sausage and Apple Breakfast Casserole – 12 Eggs
Sausage and Apple Breakfast Casserole combines the comfort of a savory bread pudding with the convenience of a dish that can feed a full table. Twelve eggs form a rich custard around toasted bread, browned breakfast sausage, tender apple, onion, herbs, and melted cheddar.
Apple may sound unusual in a savory egg casserole, but its gentle sweetness balances the seasoned sausage beautifully. Choose a firm apple and cook it only briefly so the pieces keep some of their character during baking. The finished casserole should taste warm and savory, with small flashes of apple rather than resembling a sweet breakfast dessert.
The entire dish can be assembled the night before. In the morning, all that remains is to place it in the oven, make coffee, and enjoy the gradually filling kitchen aroma.
Servings: 8–10
Preparation time: 25 minutes
Resting time: 30 minutes or overnight
Baking time: 45–55 minutes
Total time: Approximately 1 hour 50 minutes
Ingredients
- 1 tablespoon olive oil or butter
- 1 pound (450 g) breakfast sausage, casings removed if necessary
- 1 medium yellow onion, diced
- 2 firm apples, such as Honeycrisp or Granny Smith, cored and cut into small cubes
- 1 teaspoon dried sage
- 1/2 teaspoon dried thyme
- 8 cups (about 400 g) day-old bread, cut into 1-inch cubes
- 2 cups (225 g) shredded sharp cheddar, divided
- 12 large eggs
- 2 1/2 cups (600 ml) whole milk
- 1 tablespoon Dijon mustard
- 1 teaspoon fine salt
- 1/2 teaspoon freshly ground black pepper
- Butter or nonstick cooking spray, for the baking dish
- Chopped fresh parsley, for serving, optional
Instructions
- Grease a 9×13-inch baking dish with butter or nonstick cooking spray.
- Heat the olive oil in a large skillet over medium heat. Add the sausage and cook for 6–8 minutes, breaking it into small crumbles with a wooden spoon. Continue until no pink remains and the edges begin to brown.
- Use a slotted spoon to transfer the cooked sausage to a plate. Leave approximately one tablespoon of fat in the skillet and discard any excess.
- Add the diced onion to the same skillet. Cook for 3–4 minutes, stirring occasionally, until it begins to soften.
- Add the apple cubes, sage, and thyme. Cook for another 3–4 minutes. The apples should soften slightly around the edges but should not turn into a purée.
- Place half of the bread cubes in the prepared baking dish. Distribute half of the sausage, apple mixture, and shredded cheddar over the bread.
- Repeat with the remaining bread, sausage, apple mixture, and approximately half of the remaining cheese. Reserve the rest of the cheddar for the top.
- Crack the eggs into a large bowl. Add the milk, Dijon mustard, salt, and black pepper. Whisk until the mixture is completely combined.
- Slowly pour the egg mixture over the casserole, moving around the dish so all the bread receives some custard.
- Gently press the top layer down with the back of a spoon. Do not compact it completely; a few exposed bread edges will become pleasantly crisp in the oven.
- Sprinkle the reserved cheddar over the top.
- Cover the baking dish and allow it to rest for at least 30 minutes in the refrigerator. For an overnight casserole, refrigerate it for up to 12 hours.
- When ready to bake, preheat the oven to 350°F (175°C). If the casserole has been refrigerated overnight, let it stand at room temperature while the oven preheats.
- Cover the dish loosely with foil and bake for 25 minutes.
- Remove the foil and continue baking for another 20–30 minutes. The top should be golden, the cheese should be melted, and the center should feel set rather than liquid.
- Remove the Sausage and Apple Breakfast Casserole from the oven and let it rest for 10 minutes before cutting it into squares.
- Garnish with chopped parsley, if desired, and serve warm.
Choosing the Right Bread
Slightly stale bread absorbs the egg custard without immediately falling apart. Sourdough, French bread, Italian bread, or a sturdy white country loaf will all work well.
Very soft sandwich bread can become overly dense and lose its individual texture. If your bread is fresh, spread the cubes on a baking tray and place them in a 300°F (150°C) oven for 10–15 minutes. They should feel dry around the edges without becoming deeply toasted.
The bread needs time to absorb the custard. A 30-minute rest is enough for same-day preparation, but an overnight rest produces a more unified interior.
Keeping the Apple Flavor Balanced
Use two medium, firm apples and cut them into small cubes. Large wedges may remain too firm, while finely chopped apples can disappear into the casserole.
Granny Smith creates a tart contrast with the sausage and cheddar. Honeycrisp or Pink Lady provides a slightly sweeter result without turning the dish into dessert.
Avoid adding sugar, syrup, or strongly sweet baking spices. Sage, thyme, black pepper, and sharp cheddar keep the casserole firmly on the savory side.
How to Tell When the Casserole Is Ready
The edges usually set before the center, so check the middle of the dish before removing it from the oven. Insert a thin knife into the central portion. It may appear moist, but it should not be coated in uncooked egg.
If the top browns too quickly, loosely replace the foil and continue baking until the center is set. Baking time can be slightly longer when the casserole has been refrigerated overnight.
Letting the dish rest after baking allows the custard to settle. Cutting immediately can make the portions collapse, while waiting 10 minutes produces cleaner, more attractive squares.
Serving and Storage
Serve Sausage and Apple Breakfast Casserole with a crisp green salad, roasted potatoes, or fresh fruit. Because it already contains bread, eggs, meat, fruit, and cheese, it can also stand alone as a complete breakfast.
Cool leftovers before transferring them to a covered container. Refrigerate for up to 3 days. Reheat individual portions in a moderate oven or microwave them in short intervals until heated through.
The casserole is especially welcome when several people wake up hungry at different times. Each person can reheat a square without requiring you to begin breakfast again—a small convenience that makes a busy morning feel much easier.
5. Chicken Chiles Rellenos Strata – 12 Eggs
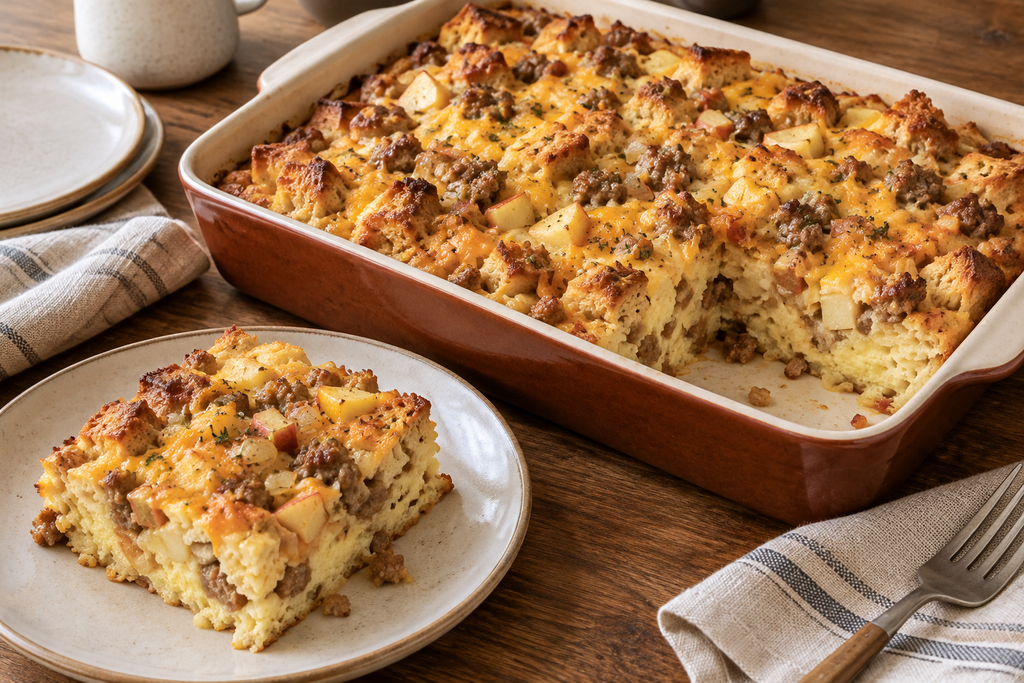
5. Chicken Chiles Rellenos Strata – 12 Eggs
Chicken Chiles Rellenos Strata brings the flavors of roasted green chiles, tender chicken, eggs, and melted cheese into a generous bread-based casserole. It is inspired by the comforting flavors associated with chiles rellenos, but it is not intended to replace the traditional stuffed-pepper dish. Instead, it transforms that familiar combination into a make-ahead meal that can serve a crowd.
Twelve eggs bind the layers together, while cubes of rustic bread absorb the seasoned custard. Monterey Jack provides mild creaminess, cheddar brings deeper flavor, and roasted green chiles add character without making the dish overwhelmingly hot.
Prepare the strata before going to bed, and breakfast is largely taken care of the following morning. It also works as a casual dinner when served with salad, avocado, and fresh salsa.
Servings: 8–10
Preparation time: 25 minutes
Chilling time: At least 4 hours or overnight
Baking time: 50 minutes
Resting time: 10 minutes
Ingredients
- Butter or nonstick cooking spray, for the baking dish
- 7 cups (about 350 g) day-old rustic bread, cut into 1-inch cubes
- 3 cups (about 420 g) shredded cooked chicken
- 1 1/2 cups (225 g) chopped roasted mild green chiles, drained well
- 2 cups (225 g) shredded Monterey Jack cheese, divided
- 1 cup (115 g) shredded sharp cheddar, divided
- 12 large eggs
- 2 1/4 cups (540 ml) whole milk
- 1 teaspoon ground cumin
- 1/2 teaspoon dried oregano
- 1/2 teaspoon garlic powder
- 1 teaspoon fine salt
- 1/2 teaspoon freshly ground black pepper
- 3 green onions, thinly sliced
- Salsa, avocado, or sour cream, for serving, optional
Instructions
- Lightly butter or spray a 9×13-inch baking dish.
- Spread half of the bread cubes across the bottom of the prepared dish.
- Scatter half of the shredded chicken and half of the chopped green chiles over the bread.
- Add half of the Monterey Jack and half of the cheddar.
- Repeat the layers using the remaining bread, chicken, and green chiles. Reserve approximately one-third of the remaining cheese for the top.
- Crack the eggs into a large mixing bowl. Add the milk, cumin, oregano, garlic powder, salt, and black pepper.
- Whisk until the eggs and milk are completely combined and no separate streaks of egg white remain.
- Slowly pour the egg mixture over the layered ingredients. Move around the baking dish as you pour so the bread is moistened as evenly as possible.
- Press the surface down gently with the back of a spoon. The bread should come into contact with the custard, but it does not need to be completely submerged.
- Scatter the reserved cheese over the top.
- Cover the dish and refrigerate for at least 4 hours, preferably overnight. This resting period allows the bread to absorb the egg mixture and helps the strata hold together when sliced.
- When ready to bake, remove the dish from the refrigerator and allow it to stand at room temperature while the oven preheats to 350°F (175°C).
- Cover loosely with foil and bake for 25 minutes.
- Remove the foil and continue baking for 20–30 minutes, until the top is golden, the cheese is melted, and the center no longer looks liquid.
- If the surface begins browning before the center has set, loosely return the foil to the dish.
- Remove the Chicken Chiles Rellenos Strata from the oven and allow it to rest for 10 minutes.
- Sprinkle with sliced green onions, then cut into squares. Serve with salsa, avocado, or sour cream if desired.
Choosing and Preparing the Green Chiles
Mild roasted green chiles give this casserole its distinctive flavor. Canned chopped green chiles are convenient, but drain them thoroughly before adding them. Excess liquid can prevent the center of the strata from setting evenly.
You can also roast fresh poblano peppers. Place the peppers beneath a hot broiler, turning occasionally, until their skins are blistered and darkened. Transfer them to a covered bowl for several minutes, then peel away the loose skin, remove the seeds, and chop the flesh.
Poblanos vary in heat, but they are generally milder than jalapeños. If serving children or guests with different spice preferences, keep the casserole gentle and offer hot sauce separately.
Using Cooked Chicken
This recipe is ideal for using leftover roasted or poached chicken. Rotisserie chicken also works well, although removing the skin keeps the casserole from becoming overly greasy.
Shred the chicken into relatively small pieces so it distributes evenly between the bread cubes. Large chunks can cause the strata to break apart when portions are lifted from the baking dish.
The chicken should already be fully cooked before it is added. The oven time is intended to set the egg custard and heat the assembled dish, not to cook raw poultry safely from the beginning.
Getting Clean, Stable Portions
The strata may look slightly puffed when it first comes out of the oven. Letting it rest for 10 minutes allows the internal steam to settle and gives the egg custard time to firm.
A thin knife inserted into the center should come out without uncooked egg mixture. Some melted cheese or moisture from the filling is normal, but the middle should not ripple like liquid.
If the casserole was chilled overnight in a heavy ceramic dish, it may require an additional 5–10 minutes of baking.
Serving and Storage
Chicken Chiles Rellenos Strata can anchor an entire brunch table. Serve it with fresh fruit in the morning or pair it with a tomato, avocado, and lime salad for dinner.
Place salsa and sour cream in separate bowls so everyone can adjust the flavor and heat of their own serving. Fresh cilantro can replace the green onions if you enjoy its brighter taste.
Cool leftovers before covering and refrigerating them for up to 3 days. Reheat individual portions in a moderate oven or microwave them in short intervals until thoroughly heated.
There is something especially satisfying about removing a bubbling casserole from the oven when most of the work was completed the night before. The golden top may look celebratory, but the preparation remains practical enough for an ordinary family morning.
6. Spiral Vegetable Omelet Roll – 12 Eggs
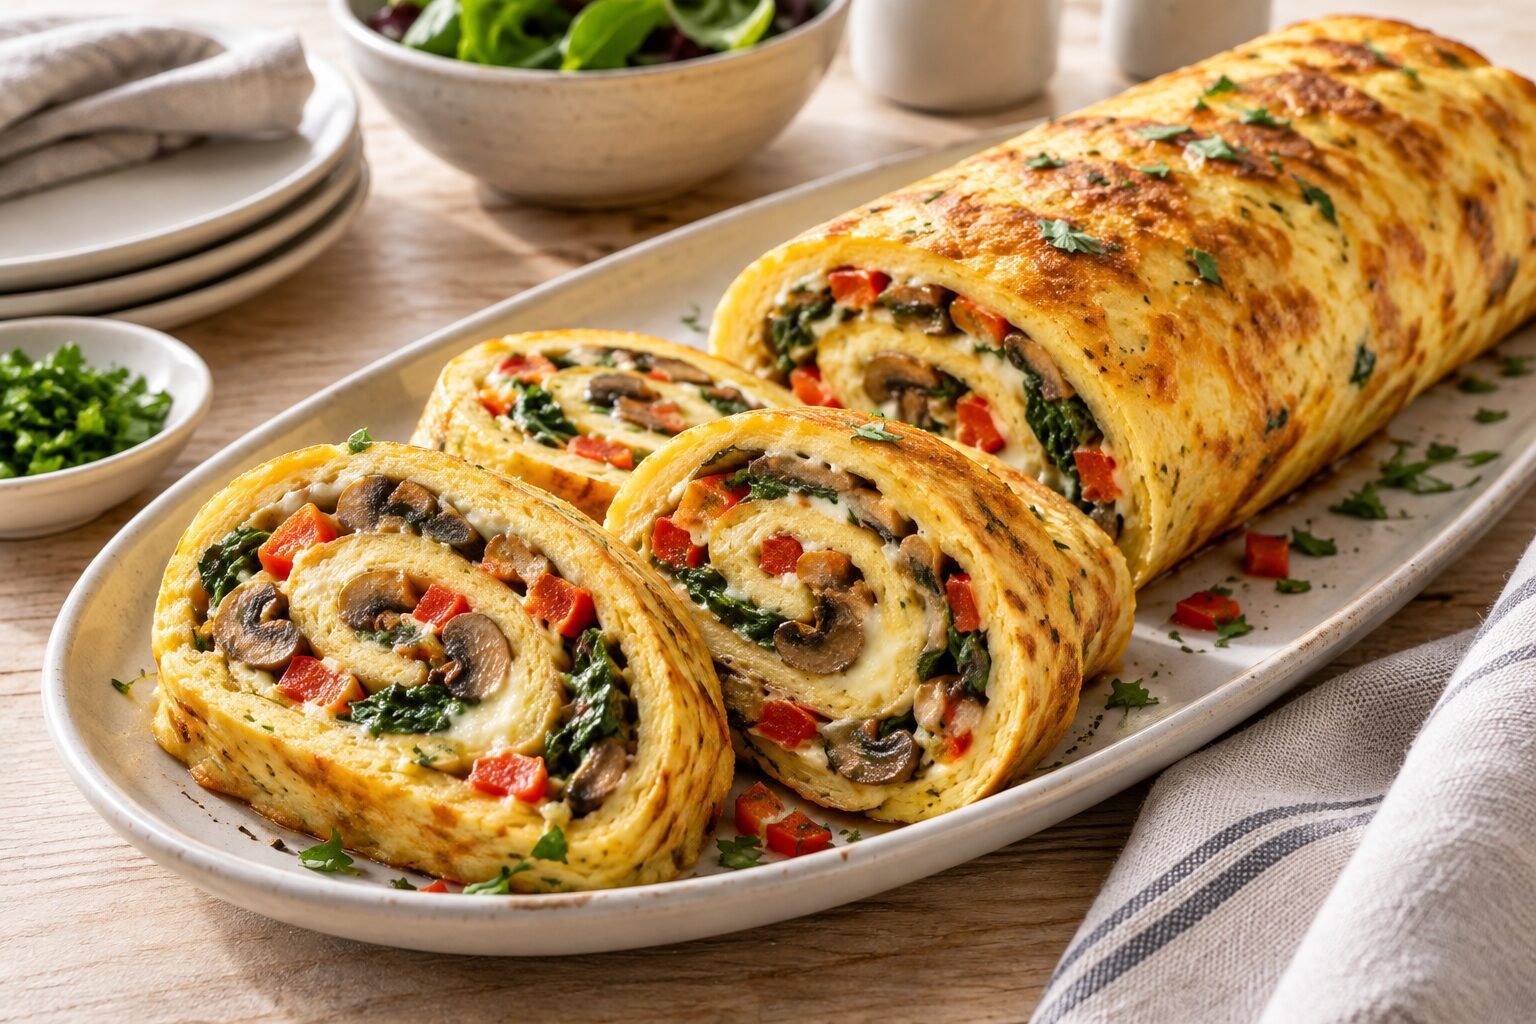
6. Spiral Vegetable Omelet Roll – 12 Eggs
Spiral Vegetable Omelet Roll turns twelve eggs into a colorful centerpiece that feels far more special than an ordinary omelet. Instead of cooking individual portions in a skillet, the eggs are baked into one flexible sheet, covered with sautéed vegetables and mozzarella, then carefully rolled and sliced.
The visible spiral gives each serving an impressive appearance, but the technique is easier than it first seems. The most important details are using the correct pan, removing moisture from the filling, and rolling the egg sheet while it is still warm and flexible.
Serve the slices for a celebratory brunch, place them on a buffet, or pair them with salad for a lighter evening meal.
Servings: 8
Preparation time: 25 minutes
Cooking time: 25 minutes
Resting time: 5 minutes
Total time: 55 minutes
Ingredients
For the omelet sheet
- 12 large eggs
- 1/2 cup (120 ml) whole milk
- 2 tablespoons all-purpose flour
- 3/4 teaspoon fine salt
- 1/4 teaspoon freshly ground black pepper
- 2 tablespoons finely chopped fresh chives or parsley
- Butter or nonstick cooking spray, for the pan
For the vegetable filling
- 1 tablespoon olive oil
- 8 ounces (225 g) mushrooms, finely sliced
- 1 red bell pepper, deseeded and finely diced
- 4 ounces (115 g) baby spinach
- 1 garlic clove, minced
- 1/2 teaspoon Italian seasoning
- 1 1/2 cups (170 g) shredded low-moisture mozzarella
- 2 tablespoons grated Parmesan, optional
Instructions
- Preheat the oven to 375°F (190°C).
- Line the bottom and sides of a 15×10-inch rimmed jelly-roll pan with parchment paper. Leave a small overhang on two sides to help lift the omelet later. Lightly butter or spray the parchment.
- Heat the olive oil in a large skillet over medium-high heat. Add the sliced mushrooms and cook for 5–6 minutes, stirring occasionally.
- Once the mushrooms release their liquid, continue cooking until that moisture has evaporated and the edges begin to brown.
- Add the diced red bell pepper and cook for another 3–4 minutes, until slightly softened.
- Add the spinach, garlic, and Italian seasoning. Cook for 1–2 minutes, stirring until the spinach wilts and no visible liquid remains in the skillet.
- Remove the vegetable mixture from the heat and spread it on a plate so it can cool slightly.
- Crack the eggs into a large bowl. Add the milk, flour, salt, and black pepper. Whisk until the mixture is smooth and no visible pockets of flour remain. Stir in the chopped chives or parsley.
- Pour the egg mixture into the prepared baking pan. Carefully tilt the pan so the eggs form an even layer.
- Bake for 12–16 minutes. The omelet sheet should be completely set in the center but still flexible. Avoid baking until it becomes dark or crisp around the edges.
- Remove the pan from the oven. Sprinkle the mozzarella evenly across the warm egg sheet, leaving a 1-inch border around the outside.
- Distribute the vegetable filling over the cheese. Sprinkle with Parmesan, if using.
- Return the pan to the oven for 2–3 minutes, just until the mozzarella begins to soften. Do not allow the omelet to become dry.
- Remove the pan from the oven. Starting at one of the shorter ends, use the parchment paper to lift the edge of the omelet.
- Roll the omelet slowly but firmly, peeling away the parchment as you work. Keep the filling tucked inside, but do not squeeze so tightly that it is pushed out of the ends.
- Position the roll seam-side down on a serving platter. Allow it to rest for 5 minutes.
- Use a sharp serrated or thin-bladed knife to cut the Spiral Vegetable Omelet Roll into thick slices. Wipe the knife between cuts for cleaner spirals.
- Serve the slices warm, garnished with additional herbs if desired.
Why the Pan Size Matters
A 15×10-inch rimmed baking pan produces an egg sheet that is thin enough to roll but strong enough to contain the filling. A larger half-sheet pan may spread the mixture too thinly, increasing the risk of tearing. A much smaller pan creates a thick layer that may crack when rolled.
Make sure the parchment covers the sides as well as the base. Egg can adhere firmly to exposed metal, making the sheet difficult to lift without damage.
The small amount of flour provides additional flexibility and structure. It does not turn the omelet into bread or cake; it simply helps twelve eggs form a manageable sheet.
Preventing a Soggy Filling
Mushrooms and spinach both release substantial amounts of water. Cook the mushrooms until their liquid has evaporated before adding the remaining vegetables. The finished filling should look moist but not wet.
Letting the vegetables cool briefly also prevents excess steam from collecting between the egg and cheese layers.
Low-moisture mozzarella is preferable to fresh mozzarella for this recipe. Fresh mozzarella can release liquid as it melts, making the spiral slippery and difficult to slice.
Rolling Without Cracks
Roll the omelet shortly after adding the warm filling. A fully cooled egg sheet becomes firmer and more likely to split.
Begin with a gentle fold to establish the center of the spiral, then continue lifting and guiding the roll with the parchment. Small surface cracks are not a problem and can give the finished dish a natural homemade appearance.
If an edge feels dry, trim away only the very crisp portion before rolling. Do not overfill the sheet, as an excessive layer makes the center bulky and pushes vegetables out of the sides.
Serving and Storage
Spiral Vegetable Omelet Roll looks especially attractive on a large platter with the cut surfaces facing upward. Serve it with a green salad, roasted potatoes, tomato salsa, or a spoonful of herbed yogurt.
For a buffet, cut slightly thinner slices and arrange them in overlapping rows. The roll remains enjoyable at room temperature, making it easier to serve than individual omelets.
Refrigerate leftovers in a covered container for up to 3 days. Reheat the slices gently in a covered baking dish or microwave them briefly. Excessive reheating can dry the exposed spiral edges.
There is a particularly satisfying moment when the first slice reveals the colorful pattern inside. It looks as though it required elaborate preparation, even though the oven performed most of the cooking at once.
7. Tomato, Sausage and Cheddar Bread Pudding – 8 Eggs
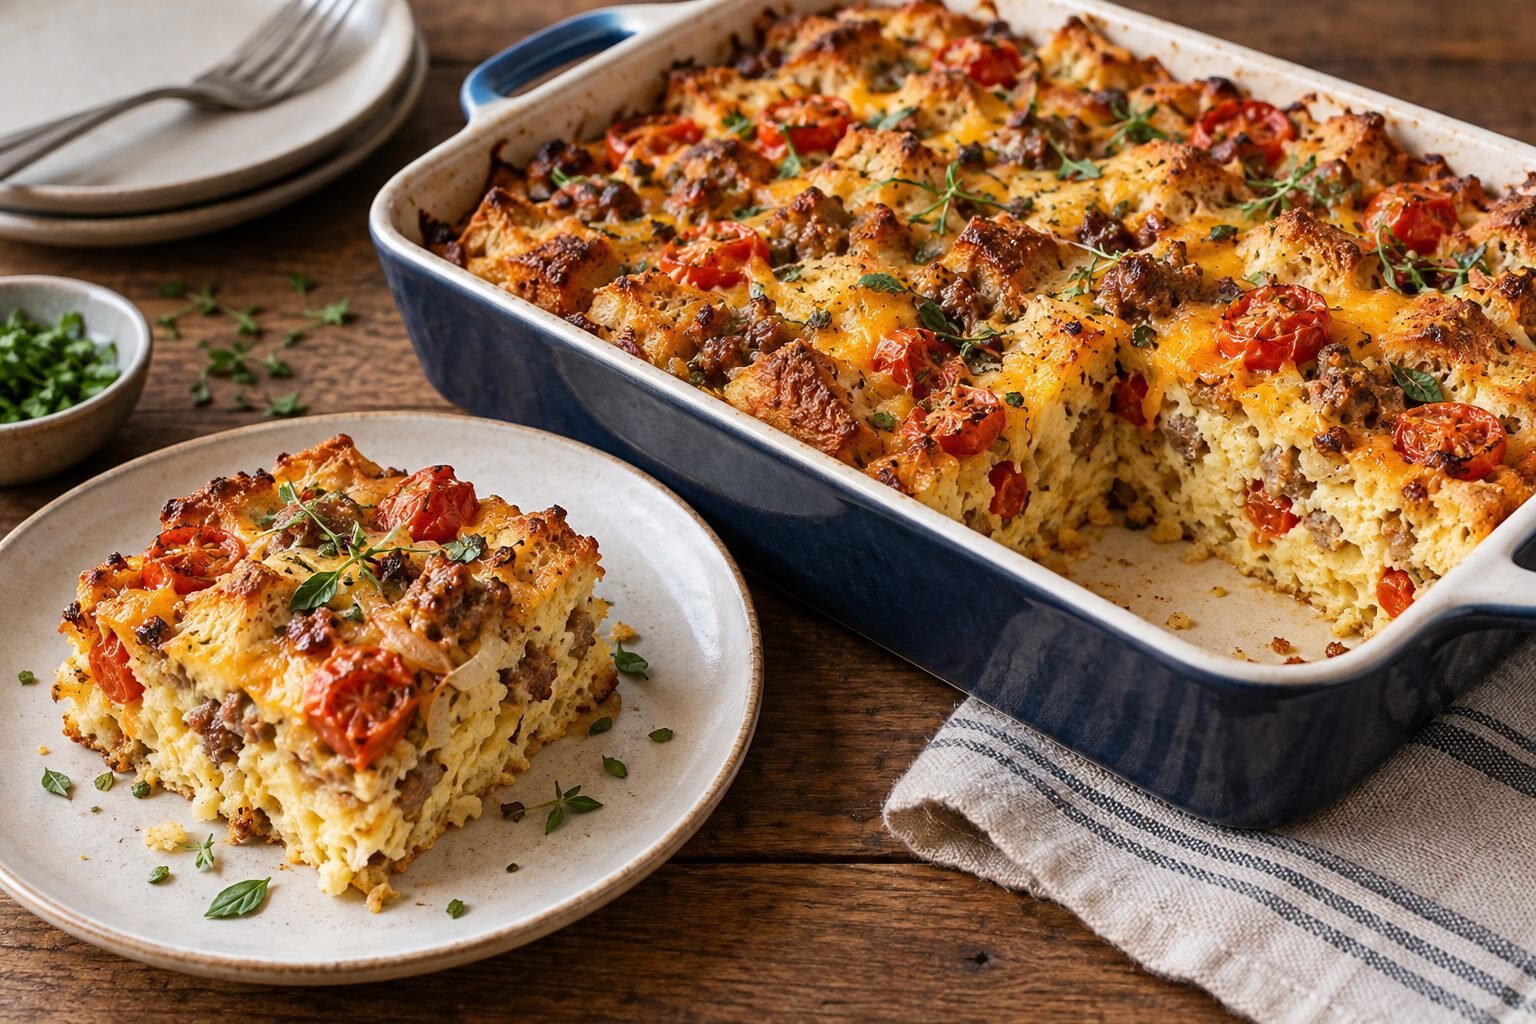
7. Tomato, Sausage and Cheddar Bread Pudding – 8 Eggs
Tomato, Sausage and Cheddar Bread Pudding is a savory answer to the familiar sweet dessert. Instead of sugar, raisins, and warm baking spices, this version combines toasted bread with browned sausage, roasted tomatoes, sharp cheddar, onion, herbs, and an eight-egg custard.
The contrast between the crisp, golden bread on the surface and the tender interior makes every serving especially satisfying. Roasting the tomatoes before assembling the dish concentrates their flavor and removes some of their moisture, preventing the finished bread pudding from becoming watery.
It is generous enough for a brunch gathering but equally comfortable as a family supper. Add a green salad, and you have a complete meal built largely from ingredients that might already be waiting in the kitchen.
Servings: 8
Preparation time: 30 minutes
Soaking time: 30 minutes
Baking time: 45–55 minutes
Total time: Approximately 1 hour 55 minutes
Ingredients
- 2 cups (300 g) cherry or grape tomatoes, halved
- 2 tablespoons olive oil, divided
- 1 pound (450 g) breakfast or Italian sausage, casings removed
- 1 medium yellow onion, diced
- 2 garlic cloves, minced
- 8 cups (about 400 g) day-old rustic bread, cut into 1-inch cubes
- 2 cups (225 g) shredded sharp cheddar, divided
- 8 large eggs
- 2 cups (480 ml) whole milk
- 1/2 cup (120 ml) heavy cream
- 1 tablespoon Dijon mustard
- 1 teaspoon dried thyme
- 1/2 teaspoon smoked paprika
- 3/4 teaspoon fine salt
- 1/2 teaspoon freshly ground black pepper
- Butter or nonstick cooking spray, for the baking dish
- Chopped fresh parsley, basil, or thyme, for serving
Instructions
- Preheat the oven to 400°F (200°C). Line a rimmed baking sheet with parchment paper.
- Place the halved tomatoes on the baking sheet. Drizzle them with 1 tablespoon of olive oil and season lightly with salt and pepper.
- Arrange the tomatoes cut-side up and roast for 15–20 minutes. They should soften and begin to caramelize around the edges, but they do not need to become completely dry.
- Remove the tomatoes from the oven and reduce the oven temperature to 350°F (175°C).
- Lightly butter or spray a 9×13-inch baking dish.
- Heat the remaining tablespoon of olive oil in a large skillet over medium heat. Add the sausage and cook for 6–8 minutes, breaking it into small crumbles. Continue cooking until no pink remains and the pieces begin to brown.
- Transfer the sausage to a plate using a slotted spoon. Leave approximately one tablespoon of fat in the skillet and discard any excess.
- Add the onion to the skillet and cook for 4–5 minutes, until softened. Add the garlic and cook for another 30 seconds.
- Place the bread cubes in a large mixing bowl. Add the cooked sausage, onion mixture, roasted tomatoes, and 1 1/2 cups of the shredded cheddar. Toss gently to distribute the ingredients without crushing the tomatoes.
- Transfer the bread mixture to the prepared baking dish.
- In a separate bowl, whisk together the eggs, milk, cream, Dijon mustard, thyme, smoked paprika, salt, and black pepper.
- Slowly pour the egg mixture over the bread, moving around the dish to moisten it evenly.
- Press the bread down gently with the back of a spoon. Leave some upper edges exposed so they can become crisp during baking.
- Sprinkle the remaining cheddar over the surface.
- Let the assembled bread pudding rest for 30 minutes. During this time, press the bread down once or twice so the drier pieces have an opportunity to absorb the custard.
- Cover the baking dish loosely with foil and bake for 25 minutes.
- Remove the foil and bake for another 20–30 minutes, until the center has set, the cheese is bubbling, and the exposed bread cubes are golden and crisp.
- Let the Tomato, Sausage and Cheddar Bread Pudding rest for 10 minutes before cutting it into squares.
- Garnish with fresh parsley, basil, or thyme and serve warm.
Why the Tomatoes Are Roasted First
Fresh tomatoes release a large amount of liquid as they cook. Adding them directly to the bread mixture can dilute the egg custard and leave damp pockets around the center.
A short roasting period removes some moisture while concentrating their natural sweetness and acidity. Keeping the cut sides facing upward prevents too much juice from spilling onto the baking sheet.
If using larger tomatoes, remove the watery seed pockets and cut the firm flesh into small pieces. Sun-dried tomatoes can also be used, although their stronger flavor means you will need a smaller quantity.
Choosing and Preparing the Bread
A sturdy country loaf, sourdough, French bread, or Italian bread works well. The bread should be slightly dry so it absorbs the custard while retaining some structure.
If your bread is fresh, spread the cubes on a baking sheet and dry them in a 300°F (150°C) oven for 10–15 minutes. They should feel dry at the edges without becoming hard croutons.
Avoid cutting the cubes too small. Larger pieces create the desirable contrast between the soft custard-soaked center and the toasted surface.
Sausage and Cheese Options
Breakfast sausage creates a mild, familiar flavor, while Italian sausage gives the dish a more pronounced savory character. Either sweet or mildly spicy sausage can be used.
Sharp cheddar stands up well to the tomatoes and sausage. Monterey Jack produces a milder result, while a small amount of Parmesan adds nuttiness. Whatever cheese you select, avoid adding so much that it forms a heavy, greasy layer over the bread.
Preparing the Dish Ahead
The bread pudding can be assembled, covered, and refrigerated for up to 12 hours before baking. When preparing it overnight, keep the roasted tomatoes slightly firmer so they maintain their texture.
Remove the dish from the refrigerator while the oven heats. A very cold ceramic baking dish may require an additional 5–10 minutes in the oven.
The center is ready when it feels set and a thin knife inserted into it is not coated with uncooked egg. Moisture from melted cheese and tomatoes is normal, but the custard should not appear liquid.
Serving and Storage
Serve Tomato, Sausage and Cheddar Bread Pudding with a peppery arugula salad, steamed green vegetables, or fresh fruit. Smaller squares can also be included as part of a larger brunch buffet.
Cool leftovers before transferring them to a covered container. Refrigerate for up to 3 days. For the best contrast between crisp and soft textures, reheat portions in the oven rather than the microwave.
This is a particularly satisfying recipe for using bread that might otherwise be discarded. What begins as a slightly dry loaf becomes a warm, generous meal with golden edges worth reaching for first.
8. Hash Brown Quiche Cups – 8 Eggs
8. Hash Brown Quiche Cups – 8 Eggs
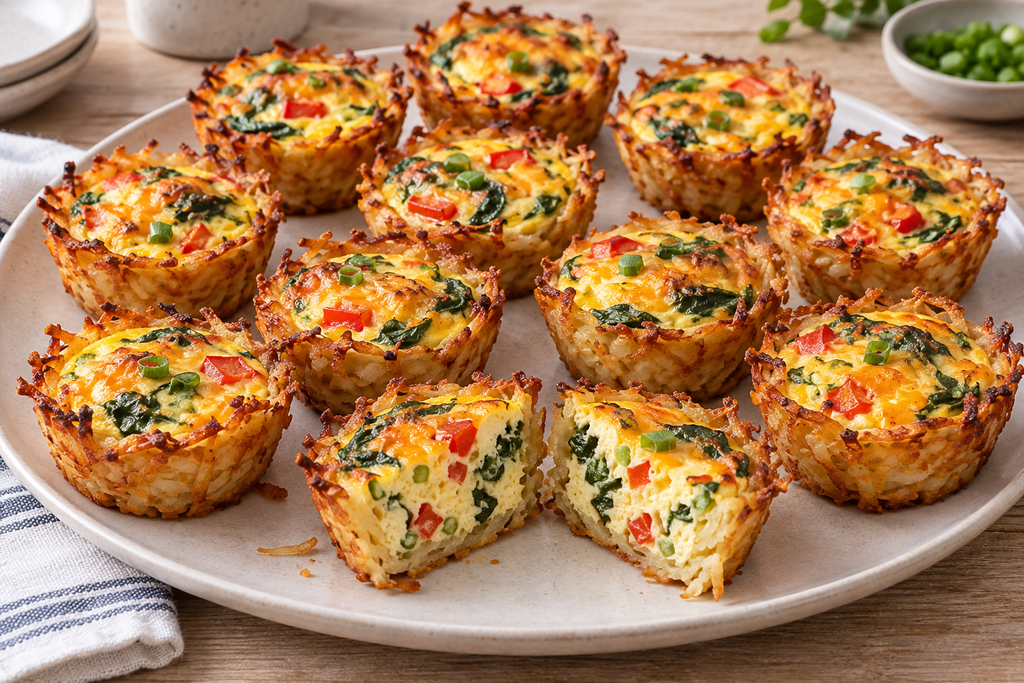
Hash Brown Quiche Cups combine two breakfast favorites in one convenient, handheld portion. Instead of pastry, each cup begins with a nest of shredded potato that is baked until crisp and golden. The shells are then filled with a tender mixture of eggs, spinach, red pepper, green onion, and cheddar.
Eight eggs produce twelve individual cups, making this recipe particularly useful for meal preparation, brunch tables, and busy mornings. The cups are substantial enough to satisfy without requiring a plate and knife, yet they still look inviting when arranged on a serving platter.
The potato shells need to be baked before the egg filling is added. This extra step creates the crisp exterior that distinguishes these cups from ordinary mini frittatas.
Yield: 12 quiche cups
Servings: 6
Preparation time: 25 minutes
Cooking time: 40–45 minutes
Total time: Approximately 1 hour 10 minutes
Ingredients
For the hash brown shells
- 20 ounces (565 g) frozen shredded hash browns, thawed
- 3 tablespoons unsalted butter, melted
- 1/2 cup (55 g) shredded sharp cheddar
- 1/2 teaspoon fine salt
- 1/4 teaspoon freshly ground black pepper
- Nonstick cooking spray or softened butter, for the muffin pan
For the egg filling
- 1 teaspoon olive oil
- 1/2 red bell pepper, finely diced
- 2 packed cups (60 g) baby spinach, roughly chopped
- 3 green onions, thinly sliced, divided
- 8 large eggs
- 1/2 cup (120 ml) whole milk
- 1/2 teaspoon fine salt
- 1/4 teaspoon freshly ground black pepper
- 1/2 teaspoon garlic powder
- 3/4 cup (85 g) shredded sharp cheddar, divided
Instructions
- Preheat the oven to 425°F (220°C). Generously grease a standard 12-cup muffin pan, including the upper surface around each opening.
- Place the thawed hash browns in the center of a clean kitchen towel. Gather the towel around the potatoes and squeeze firmly over the sink until as much liquid as possible has been removed.
- Transfer the dry potatoes to a large bowl. Add the melted butter, 1/2 cup cheddar, salt, and black pepper. Toss until the potato strands are evenly coated.
- Divide the mixture among the 12 muffin cups, using approximately 1/3 cup for each.
- Press the potatoes firmly into the bottom and up the sides of every cup. Keep the center open for the filling and make sure the base does not contain thin gaps.
- Bake the empty hash brown shells for 20–25 minutes. They should be golden around the upper edges and beginning to brown on the inside.
- While the shells bake, heat the olive oil in a skillet over medium heat. Add the diced bell pepper and cook for 3 minutes.
- Add the spinach and approximately two-thirds of the green onions. Cook for another 1–2 minutes, stirring until the spinach wilts and any released liquid has evaporated.
- Remove the skillet from the heat and allow the vegetables to cool slightly.
- When the hash brown shells are ready, remove the pan from the oven and reduce the temperature to 350°F (175°C).
- Divide the cooked vegetables evenly among the potato cups. Add approximately half of the cheddar reserved for the filling.
- Crack the eggs into a mixing bowl. Add the milk, salt, pepper, and garlic powder. Whisk until thoroughly combined.
- Pour the egg mixture into the cups, stopping just below the top of each potato shell. Do not overfill them, as the eggs will puff slightly while baking.
- Sprinkle the remaining cheddar over the cups.
- Bake for 15–20 minutes, until the centers are set and no longer look wet. Begin checking after 15 minutes to avoid overcooking the eggs.
- Let the Hash Brown Quiche Cups cool in the pan for 5–10 minutes.
- Run a thin butter knife carefully around the outside of each cup. Lift them from the pan using a small offset spatula or spoon.
- Garnish with the reserved green onions and serve warm.
How to Make the Potato Shells Crisp
Removing water from the thawed potatoes is the most important part of the recipe. Wet hash browns steam in the muffin pan instead of browning, producing soft shells that may fall apart.
Squeeze the potatoes in small batches if necessary. They should feel loose and relatively dry before being mixed with the butter and cheese.
Press the potato mixture firmly into the pan. A loosely formed shell may crack when removed, while a compact layer holds the egg filling securely. Pay particular attention to the bottom corners, where small gaps can allow the custard to leak.
Do not skip the initial baking stage. The potato nests need time to form a crisp structure before any liquid filling is added.
Avoiding Watery Egg Cups
Cook the vegetables before placing them inside the shells. Spinach contains a surprising amount of moisture, and raw bell pepper can release liquid during baking.
The skillet should look dry before the vegetables are removed from the heat. Allowing them to cool for a few minutes also prevents steam from collecting inside the cups.
Use modest quantities of cheese and filling. Overloaded cups take longer to set and may soften the potato sides.
Flavor Variations
Hash Brown Quiche Cups can be adapted to suit the ingredients available in your refrigerator. Finely chopped broccoli, mushrooms, cooked asparagus, or kale can replace the spinach and bell pepper, provided they are cooked and drained first.
For a stronger cheese flavor, substitute Gruyère, smoked cheddar, or Parmesan for part of the cheddar. Crumbled feta works well with spinach but should be used sparingly because it adds salt.
Cooked bacon, ham, or sausage can be included if desired. Make sure any meat is fully cooked, drained, and cut into small pieces before adding it to the cups.
Serving and Storage
Serve two Hash Brown Quiche Cups per person with fresh fruit, dressed salad leaves, or sliced tomatoes. They are also easy to pack for breakfast away from home once they have cooled.
Store leftovers in an airtight container in the refrigerator for up to 3 days. For the crispiest result, reheat them in a 350°F (175°C) oven or air fryer until warmed through. A microwave works when time is limited, although the potato crust will become softer.
The cups can also be frozen after baking. Cool them completely, freeze them in a single layer, then transfer them to a freezer-safe container. Reheat directly from frozen in a moderate oven.
The contrast is what makes them memorable: crisp, golden potato on the outside and a soft, colorful egg filling in the center. They feel playful enough for a shared brunch but remain practical enough for an ordinary weekday.
9. Lemon Pound Cake – 5 Eggs

9. Lemon Pound Cake – 5 Eggs
Lemon Pound Cake uses five eggs to create the rich structure and close, tender crumb that makes this traditional style of cake so satisfying. Fresh lemon zest perfumes the batter, while a small amount of juice adds brightness without upsetting its careful balance.
This is not an airy sponge cake. A good pound cake should feel substantial but never heavy or dry. Softened butter, room-temperature eggs, and a patient mixing method produce a fine crumb that remains moist for several days. The thin lemon glaze adds a final layer of fresh flavor without hiding the golden loaf underneath.
Serve it beside afternoon coffee, add fresh berries for dessert, or wrap a few slices for an easy homemade gift.
Yield: One 9×5-inch loaf
Servings: 10–12 slices
Preparation time: 25 minutes
Baking time: 65–75 minutes
Cooling time: Approximately 2 hours
Ingredients
For the cake
- 1 cup (226 g) unsalted butter, softened
- 1 1/4 cups (250 g) granulated sugar
- 2 tablespoons finely grated lemon zest
- 5 large eggs, at room temperature
- 1 teaspoon vanilla extract
- 2 tablespoons fresh lemon juice
- 1 3/4 cups plus 1 tablespoon (225 g) all-purpose flour
- 1/2 teaspoon baking powder
- 1/2 teaspoon fine salt
- 1/3 cup (80 g) full-fat sour cream, at room temperature
For the lemon glaze
- 3/4 cup (90 g) powdered sugar
- 1 1/2–2 tablespoons fresh lemon juice
- 1 teaspoon finely grated lemon zest, optional
Instructions
- Remove the butter, eggs, and sour cream from the refrigerator early enough for them to reach room temperature.
- Preheat the oven to 325°F (165°C). Grease a 9×5-inch loaf pan and line it with parchment paper, leaving an overhang along the two longer sides.
- In a medium bowl, whisk together the flour, baking powder, and salt. Set aside.
- Place the granulated sugar and lemon zest in a large mixing bowl. Rub them together with your fingertips for approximately 30 seconds. The sugar should become fragrant and slightly moist as the zest releases its oils.
- Add the softened butter. Using an electric mixer, beat the butter and lemon sugar on medium speed for 4–5 minutes. Stop once or twice to scrape the sides and bottom of the bowl. The mixture should become pale and visibly lighter.
- Crack the eggs into a separate jug or small bowl. Add them to the butter mixture one at a time, beating for approximately 20–30 seconds after each addition.
- Scrape the bowl thoroughly between additions. If the mixture begins to look slightly curdled, add one tablespoon of the measured flour.
- Mix in the vanilla extract and lemon juice.
- Add one-third of the flour mixture and mix on low speed just until incorporated.
- Add half of the sour cream and mix briefly. Continue alternating the flour and sour cream, finishing with the remaining flour.
- Fold the batter gently with a spatula to make sure no pockets of flour remain at the bottom. Do not continue mixing once the batter is uniform.
- Spoon the batter into the prepared loaf pan and smooth the surface. Run the tip of a buttered knife lengthwise through the center to encourage a neat central crack.
- Bake for 65–75 minutes. Begin checking the cake after 60 minutes. A skewer inserted into the center should emerge clean or with a few moist crumbs, but not wet batter.
- If the top becomes dark before the center is ready, cover it loosely with foil during the final 15–20 minutes.
- Let the Lemon Pound Cake cool in the pan for 15 minutes.
- Use the parchment overhang to lift it carefully onto a wire rack. Allow it to cool completely before glazing.
- To make the glaze, whisk the powdered sugar with 1 1/2 tablespoons of lemon juice. Add the remaining juice a few drops at a time until the glaze becomes pourable but not watery.
- Drizzle the glaze over the cooled loaf. Sprinkle with additional lemon zest if desired.
- Allow the glaze to set for 20–30 minutes before slicing.
Why Room-Temperature Ingredients Matter
Butter, eggs, and sour cream combine more evenly when they are at similar temperatures. Cold eggs can cause softened butter to firm suddenly, leaving the batter curdled and uneven.
Add the eggs individually rather than pouring them in all at once. This gives the butter mixture time to absorb each one and helps create a stable emulsion.
If you forget to remove the eggs from the refrigerator, place them in a bowl of warm—not hot—water for approximately 10 minutes. Do not melt or excessively warm the butter; it should yield when pressed while still holding its shape.
Mixing Without Making the Cake Tough
Creaming the butter and sugar properly introduces small pockets of air that help the cake rise. Once the flour is added, however, mix as little as possible.
Overmixing develops gluten and can create a tough or rubbery crumb. Use low mixer speed and finish folding by hand.
Measuring flour by weight offers the most consistent result. If using cups, spoon the flour into the measuring cup and level it rather than packing it down.
Baking the Center Evenly
Pound cake batter is thick and requires a relatively long bake at a moderate temperature. A deeply colored or glass loaf pan may bake the edges faster than a light metal pan.
Do not remove the cake merely because the top appears ready. Test the deepest central portion with a skewer. If wet batter remains, continue baking in 5-minute intervals.
Allowing the cake to cool before slicing is also part of the baking process. A warm pound cake can appear gummy and may compress beneath the knife.
Serving and Storage
Lemon Pound Cake is flavorful enough to serve on its own. For a more complete dessert, add fresh berries, lightly whipped cream, or a spoonful of plain yogurt.
Store the uncut or sliced cake in an airtight container at room temperature for up to 3 days. Refrigeration can firm the butter and make the crumb feel denser, although refrigerated slices will soften again after returning to room temperature.
Individual slices can be wrapped and frozen for up to 2 months. Defrost them at room temperature before serving.
There is something quietly rewarding about cutting into the cooled loaf and finding an even, golden crumb inside. The five eggs have not simply been “used up”—they have given the cake the richness, strength, and keeping quality that define a good pound cake.
10. Pumpkin Crème Brûlée – 6 Egg Yolks
10. Pumpkin Crème Brûlée – 6 Egg Yolks
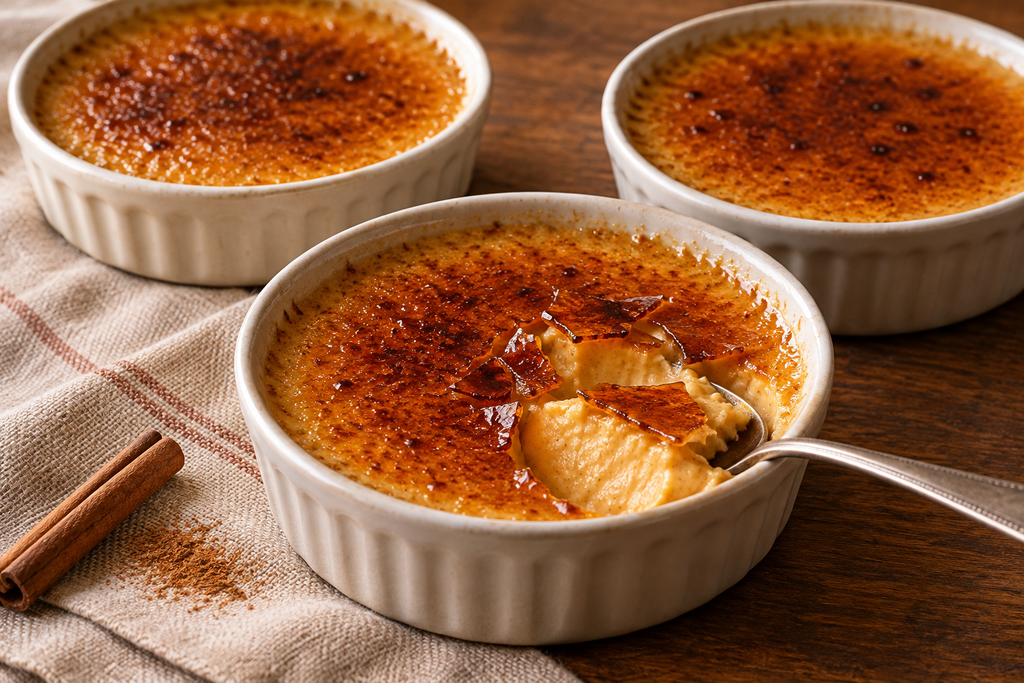
Pumpkin Crème Brûlée combines the silky elegance of a classic baked custard with the warm, familiar flavors of pumpkin and autumn spices. Six egg yolks give the dessert its smooth texture and rich structure, while a thin layer of caramelized sugar creates the signature brittle surface.
The pleasure begins with the first tap of the spoon. The amber crust cracks into delicate pieces, revealing the cool, creamy pumpkin custard underneath. Although the finished dessert feels refined, most of the preparation can be completed a day in advance. Only the sugar topping should wait until shortly before serving.
Use plain pumpkin purée rather than pumpkin pie filling. The latter already contains sugar and spices, making it difficult to control the sweetness and consistency of the custard.
Yield: 6 shallow ramekins
Servings: 6
Preparation time: 20 minutes
Baking time: 30–40 minutes
Chilling time: At least 4 hours
Total time: Approximately 5 hours
Ingredients
For the pumpkin custard
- 2 cups (480 ml) heavy cream
- 1/2 cup (120 g) plain pumpkin purée
- 1 teaspoon vanilla extract
- 1 teaspoon ground cinnamon
- 1/4 teaspoon ground ginger
- 1/8 teaspoon ground nutmeg
- Small pinch of ground cloves, optional
- 1/4 teaspoon fine salt
- 6 large egg yolks
- 1/3 cup (67 g) granulated sugar
For the caramelized topping
- 6 teaspoons superfine or granulated sugar, approximately 1 teaspoon per ramekin
Instructions
- Preheat the oven to 300°F (150°C).
- Arrange six shallow 4- to 5-ounce ramekins in a deep roasting pan or large baking dish. Set the pan aside.
- Pour the heavy cream into a medium saucepan. Add the pumpkin purée, vanilla, cinnamon, ginger, nutmeg, cloves, and salt.
- Whisk over medium-low heat until the pumpkin is completely blended into the cream.
- Heat the mixture until it is steaming and small bubbles begin appearing around the edge. Do not allow it to reach a full boil.
- Remove the saucepan from the heat and let the cream mixture stand for 5 minutes.
- Place the egg yolks and granulated sugar in a large bowl. Whisk gently until smooth and slightly lighter in color. Avoid beating vigorously, as excessive air can create bubbles on the surface of the custard.
- While whisking continuously, slowly pour approximately half a cup of the warm cream mixture into the egg yolks.
- Continue adding the cream gradually until approximately half has been incorporated. Once the yolks are warmed, whisk in the remaining cream.
- Pour the custard through a fine-mesh strainer into a jug or bowl with a pouring spout. Straining removes any cooked egg particles, pumpkin fibers, or undissolved spice clumps.
- Divide the custard evenly among the ramekins.
- If bubbles remain on the surface, skim them away with a spoon or touch them gently with the corner of a paper towel.
- Carefully pour hot water into the roasting pan until it reaches approximately halfway up the sides of the ramekins. Make sure no water splashes into the custard.
- Transfer the pan to the oven and bake for 30–40 minutes. The exact time depends on the depth and material of the ramekins.
- The edges should appear set, while the center should still tremble gently when a ramekin is moved. It should wobble as one soft unit rather than ripple like liquid.
- Remove the roasting pan from the oven. Using tongs or a wide spatula, carefully lift the ramekins from the hot water.
- Let them cool at room temperature for approximately 45 minutes.
- Cover each ramekin and refrigerate for at least 4 hours, preferably overnight.
- Shortly before serving, remove the custards from the refrigerator and blot away any condensation with a paper towel.
- Sprinkle approximately 1 teaspoon of sugar in a thin, even layer over each custard. Tilt and rotate the ramekin to distribute it.
- Using a kitchen torch, move the flame continuously across the surface until the sugar melts, bubbles, and becomes amber. Avoid holding the flame in one place long enough to scorch the custard.
- Let the caramelized sugar cool for 2–3 minutes. The surface will harden as it cools.
- Serve the Pumpkin Crème Brûlée promptly while the custard remains cool and the sugar crust stays crisp.
Tempering the Egg Yolks
Tempering means gradually warming the egg yolks before combining them with all the hot cream. Adding the entire pan of cream at once can cause the yolks to scramble.
Pour slowly and whisk constantly, particularly during the first few additions. The bowl can be placed on a folded kitchen towel to prevent it from moving while you work.
The cream should be hot but not boiling. Boiling cream increases the chance of overcooking the yolks and can create an uneven custard.
Why a Water Bath Is Important
The hot water surrounding the ramekins softens the oven’s heat and helps the custards bake evenly. Without a water bath, the outside may become firm and grainy before the center has set.
Use hot tap water or recently boiled water that has rested briefly. Place the roasting pan close to the oven before filling it if carrying a pan of hot water feels uncomfortable.
Remove the ramekins from the bath soon after baking. Leaving them in the hot water allows the custard to continue cooking and may take it beyond the ideal texture.
Recognizing the Correct Texture
A finished crème brûlée should not be completely firm when it leaves the oven. The center needs a gentle wobble because it will continue setting during cooling and refrigeration.
Tiny holes or a curdled appearance are signs of excessive heat or overbaking. A smooth upper surface and unified movement indicate a more delicate texture.
Shallow ramekins cook more evenly and provide a larger caramel surface. Deeper ramekins can be used, but they may require additional baking time.
Creating a Thin Caramel Crust
More sugar does not necessarily produce a better crust. A thick layer takes longer to melt, making it easier to overheat the custard or burn parts of the topping.
One level teaspoon is usually enough for a shallow ramekin. Spread it all the way to the edges, then pour off any noticeable excess.
A kitchen torch provides the greatest control. If you do not have one, place the chilled custards beneath a very hot broiler for a short time, watching continuously. The broiler may warm the custard more than a torch, so refrigerate the ramekins briefly afterward if necessary.
Preparing and Serving Ahead
The baked custards can be covered and refrigerated for up to 2 days before caramelizing. Do not add the sugar crust in advance, as moisture from the refrigerator will gradually soften it.
Use the six leftover egg whites for meringues, an egg-white omelet, coconut macaroons, or another suitable recipe.
Pumpkin Crème Brûlée needs little decoration. Its smooth orange custard and glassy amber surface provide enough visual appeal. The memorable part is not an elaborate garnish—it is the sound of the caramel breaking beneath the spoon.
11. Baked Vanilla Custard – 6 Eggs
11. Baked Vanilla Custard – 6 Eggs
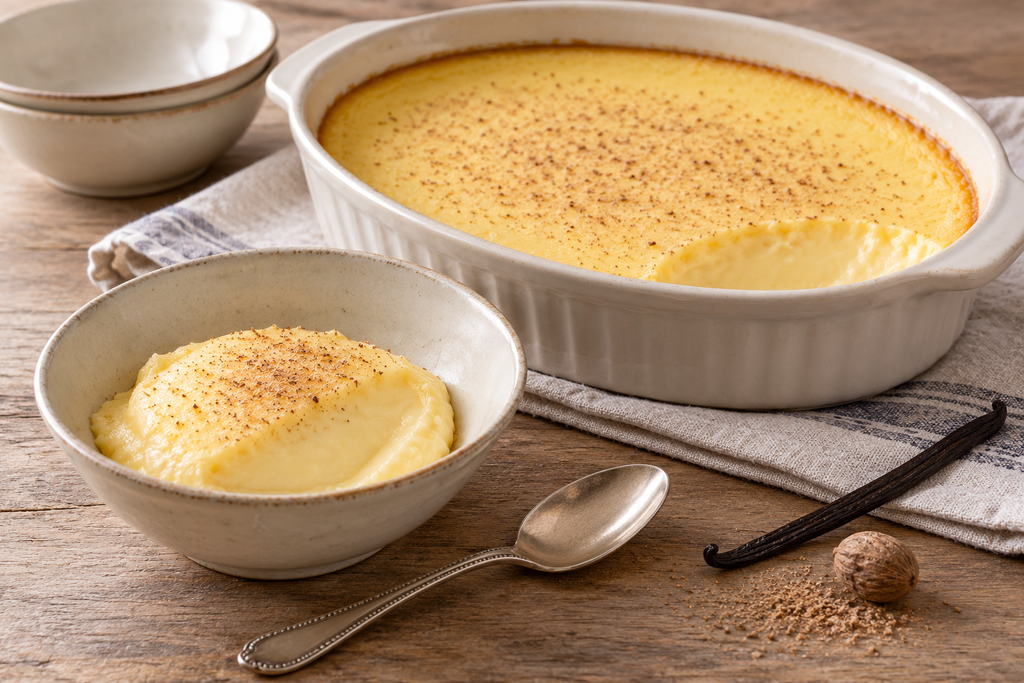
Baked Vanilla Custard is a quiet, comforting dessert made from six whole eggs, milk, sugar, and vanilla. It does not rely on pastry, frosting, or an elaborate topping. Its appeal comes from the contrast between the delicately spiced surface and the smooth, softly set custard underneath.
This version is baked in one larger ceramic dish and served by the spoonful. It can be enjoyed slightly warm, at room temperature, or thoroughly chilled. The method is simple, but gentle heat matters: baking the custard slowly in a water bath keeps the eggs from curdling and gives the dessert its characteristic silky texture.
A light dusting of nutmeg makes the custard feel especially traditional. If nutmeg is not to your taste, leave it out and allow the vanilla to remain the main flavor.
Servings: 8
Preparation time: 20 minutes
Baking time: 50–65 minutes
Cooling time: At least 1 hour
Total time: Approximately 2 hours 20 minutes
Ingredients
- 4 cups (960 ml) whole milk
- 1 vanilla bean or 2 teaspoons vanilla extract
- 6 large eggs
- 3/4 cup (150 g) granulated sugar
- 1/4 teaspoon fine salt
- 1/4 teaspoon freshly grated nutmeg, plus more for the top if desired
- Butter, for the baking dish
Instructions
- Preheat the oven to 325°F (165°C).
- Lightly butter a 2-quart ceramic baking dish. Choose a round or oval dish that is deep enough to hold the custard without filling it to the rim.
- Place the prepared custard dish inside a larger, deep roasting pan. Set both aside while preparing the mixture.
- Pour the milk into a medium saucepan.
- If using a vanilla bean, split it lengthwise and scrape the seeds into the milk. Add the empty pod as well.
- Heat the milk over medium-low heat until it is steaming and small bubbles appear around the edge. Do not allow it to boil.
- Remove the saucepan from the heat. If using a vanilla bean, let it steep in the warm milk for 10 minutes, then remove the pod.
- Place the eggs, sugar, salt, and nutmeg in a large bowl. Whisk gently until combined. Avoid beating vigorously, as a large amount of foam can create bubbles and an uneven surface.
- While whisking constantly, slowly pour approximately 1 cup of the warm milk into the egg mixture.
- Continue adding the milk in a thin stream until roughly half has been incorporated. Once the eggs have warmed gradually, whisk in the remaining milk.
- If using vanilla extract instead of a bean, stir it into the custard mixture now.
- Pour the mixture through a fine-mesh strainer into a large jug or bowl with a pouring spout. Straining removes any small pieces of cooked egg and helps produce a smoother custard.
- Pour the strained custard into the prepared baking dish.
- Skim away surface foam with a spoon. Alternatively, touch the bubbles gently with the corner of a paper towel.
- Sprinkle a very light layer of additional nutmeg over the surface, if desired.
- Place the roasting pan close to the oven. Carefully pour hot water into the outer pan until it reaches approximately halfway up the side of the custard dish. Do not splash water into the custard.
- Transfer the entire roasting pan to the oven.
- Bake for 50–65 minutes. Begin checking the custard after 45 minutes, as baking time varies according to the depth and material of the dish.
- The outer portion should be set, while the center should still tremble gently when the dish is moved. It should not ripple like liquid, but it should not feel completely firm either.
- Carefully remove the roasting pan from the oven.
- Lift the custard dish from the hot water using dry oven gloves. Place it on a wire rack and allow it to cool for at least 1 hour.
- Serve slightly warm or at room temperature, or cover and refrigerate for at least 3 hours if you prefer chilled custard.
- Spoon the Baked Vanilla Custard into small dessert bowls. Add a final, restrained grating of nutmeg if desired.
Why the Milk Should Not Boil
Heating the milk helps dissolve the sugar and shortens the time the custard needs in the oven. However, boiling is unnecessary and can make tempering the eggs more difficult.
The milk is ready when it is visibly steaming and small bubbles collect around the perimeter of the saucepan. Remove it from the heat before it begins to rise or foam.
Let very hot milk stand for a minute or two before adding it to the eggs. Pouring it gradually while whisking prevents the eggs from cooking into small scrambled pieces.
Using a Water Bath
A water bath surrounds the custard dish with gentle, evenly distributed heat. This protects the edges from overcooking before the center has had time to set.
Use hot water rather than cold water, but avoid filling the roasting pan so deeply that it becomes difficult to move safely. Halfway up the custard dish is sufficient.
The water may still be extremely hot when the custard is ready. Remove the inner baking dish first, then allow the roasting pan and water to cool before moving or emptying them.
How to Avoid a Grainy Custard
High heat and excessive baking are the main causes of a grainy or watery custard. The finished dessert should be removed while the center retains a soft wobble.
Residual heat continues cooking the eggs after the dish leaves the oven. Waiting until the center is completely rigid can result in small holes, curdled edges, and released liquid.
Whisk gently, strain the mixture, and skim away the foam before baking. These small steps create a smoother surface and finer interior texture.
Vanilla Bean or Vanilla Extract
A vanilla bean gives the custard a rounded flavor and adds small, natural vanilla seeds. Once used, the rinsed and dried pod can be placed in a jar of sugar to create vanilla-scented sugar.
Good-quality vanilla extract is a convenient alternative and still produces an excellent dessert. Add extract after the hot milk has been tempered into the eggs so its aroma is not lost through prolonged heating.
Vanilla paste may also be used. Follow the quantity recommended by its manufacturer, as concentration differs between brands.
Individual Custards
The same mixture can be divided among eight oven-safe ramekins. Arrange them in a deep roasting pan and add hot water as directed.
Individual custards generally bake more quickly than one large dish. Begin checking after 25–30 minutes. Their centers should show the same gentle wobble.
Ramekins are useful for dinner parties, but the larger dish has its own charm. Spooning custard into bowls at the table makes the dessert feel relaxed, generous, and unmistakably homemade.
Serving and Storage
Baked Vanilla Custard can be served without any accompaniment. If you would like to add something, choose a simple complement such as fresh berries or softly poached fruit.
Do not add a caramelized sugar crust; that would turn the presentation toward crème brûlée and hide the custard’s delicate surface.
Cover the cooled dish and refrigerate it for up to 3 days. The custard may release a small amount of moisture around the edge after storage, but it should remain soft and spoonable.
Some desserts impress through decoration. This one works differently. Its most reassuring quality is its simplicity: warm vanilla, a faint touch of nutmeg, and a smooth spoonful that feels familiar from the very first taste.
A Note About the Recipe Images
The food images in this article were created with the assistance of artificial intelligence and are provided as carefully developed visual guides. Each image was designed specifically around the corresponding recipe, including its stated ingredients, quantities, preparation method, cooking vessel, texture, and realistically expected finished appearance.
They are not photographs of one exact batch prepared in a physical kitchen, and they should not be treated as a promise that every homemade result will look identical. Egg size, ingredient brands, oven performance, cookware, humidity, preparation technique, and natural variations in fresh produce can all influence the color, shape, rise, and texture of a finished dish.
During image creation, particular attention was given to avoiding misleading additions, impossible textures, and presentation details that the written recipe could not reasonably produce. The images are therefore intended to offer realistic inspiration and help readers understand the expected character of each dish—not to replace the recipe instructions or the natural individuality of home cooking.
If your shakshuka has a differently shaped yolk, your frittata rises less evenly, or your casserole browns more deeply around the edges, that does not mean the recipe has failed. Those small differences are often signs of genuine homemade food—and part of what makes every result uniquely yours.